Why You Should Know What Print Head Specifications Mean
Up until last time, we have summarized 24 UV printer ink supply problems and solutions.
This is a summary of all the issues that have occurred over the past 5 years. If you have a printer that uses the damper method, you can solve most problems by just looking at the link below.
Ink supply issue and solution summary
Now, I’m organizing the problems and symptoms related to the UV Printer head.
Before dealing with the actual problems and solutions, there are too many misconceptions about the head, so I’ll explain the basics first.
1.Does the head have a lifespan? Is a head warranty available?
2. “In what cases does the head free warranty apply?’
3. “They say it’s the same head but 2400 dpi?” Summary of the concept of printing resolution
4. “I don’t know what print head specs mean” Just by reading this, you will have the same level of knowledge as a printer distributor.
Today, we will look at an actual head brochure and explain the important points to look for in the specifications and what they mean.
I. Why Print Head Specifications Matter _Why You Should Know What Print Head Specifications Mean
You can easily find print head specifications on the Internet.
In addition to the print head catalog, inkjet equipment development companies receive more detailed information from the head manufacturers.
However, you can catch a lot of information just by looking at the head catalog.
For inkjet distributors or those who use inkjet directly, print head specifications are not easy to understand, but they contain quite important information.
“Why is our printer slow? Is it fast?”
“Why is our equipment finer than other companies’ equipment? Is it bound to be rough?”
“Why is the print resolution high? Is it low?”
“What is the head-to-material gap that the head manufacturer talks about, rather than the appropriate head-to-material height that the distributor talks about?”
I will explain the important points while looking at the Xaar1201 brochure, which has the same specifications as the Ricoh Gen5i print head.

II. Maximum width that can be printed at one time _Why You Should Know What Print Head Specifications Mean

Why You Should Know What Print Head Specifications Mean
Inkjet printer manufacturers estimate the printing speed based on the nozzle jetting section, i.e. the print width, before developing the printer.
In the table above, Print swathe, 27 mm, refers to the length of the nozzle’s starting section and the last nozzle section.
When printing, the concept of pass is used. To explain briefly,
- If you print from the first nozzle to the last nozzle at once, it is 1 pass. Just like the Nozzle Test pattern, the nozzle is fired at once for the maximum head width of 27 mm.
- 1 pass is only used in single pass equipment, and in scanning printers, it is not used for actual printing work, except for nozzle tests.
- 2 pass is printed in two passes, 27 ÷ 2 = 13.5 mm, moving only 13.5 mm in the Y-axis direction instead of 27 mm, so compared to 1 pass, the printing time is doubled.
- 4 pass Of course, 27 ÷ 4 = 6.75 mm, the printing time is 4 times longer compared to 1 pass. 6 pass, 27 ÷ 4 = 4.5mm, 6 times compared to 1 pass.
Usually, Xaar1201(Gen5i) head should use 6 passes to obtain the appropriate resolution for printing, and E closure (feathering mask or gradient mask) is applied to reduce the visibility of banding.
Let me briefly explain E closion (feathering mask or gradient mask).
- Let’s assume that 900 x 1200 dpi is printed when 6 passes are used.
- If you add 1 stage of gradient mask, the resolution (900 x 1200 dpi) is the same, but 2 passes are added, so the printing is done with 8 passes.
- The speed is slower by adding 2 passes, but instead, the boundaries between passes are dulled, so banding is less visible.
- As such, gradient mask is a software mask technique that collapses the boundaries of passes, making the boundaries less visible, that is, making banding less visible.
- Usually, it is not easy to hide the boundaries with 1 stage (2 passes added), and 3 stages (6 passes added) are required to eliminate solid color banding.
You can estimate the printing speed by the head printing section.
- Not all heads are the same, but if you apply 3 stages of E closion (feathering mask or gradient mask) to the basic 6 pass resolution, it becomes 12 passes.
- When printing with 12 passes, the length moving along the Y axis is 27 ÷ 12 = 2.25 mm.
- When printing, the speed at which the Head Carriage can move stably is approximately 800 mm/second.
- When printing with the full length of the flatbed, if you calculate how many times 2.25 mm has to go back and forth at 800 mm/second,
- you can estimate the approximate printing speed when making a product with this head before making a printer.
Just by looking at the nozzle fired section like this, you can estimate the approximate printing speed.
II. Nozzle spacing _Why You Should Know What Print Head Specifications Mean
1. Nozzle spacing determines print resolution _Why You Should Know What Print Head Specifications Mean

In the figure above, when one color is used for one nozzle row,
- The nozzle spacing at this time is A=0.0847 mm
- 25.4mm(1 inch) ÷ 0.0847 mm = 299.88
- If different inks are used for each row of A, B, C, and D, printing can be done at 300 dpi per color when printing in 1 pass.
- When printing in 2 passes, it becomes 600 dpi,
- and if you divide it into 1/3 and add one more, it becomes 900 dpi, but in the case of 900 dpi, the Y-axis may not feed as accurately as desired, so it should be considered as such in theory.
In the picture above, when one color is used in two rows of nozzles,
- If you look closely at the nozzles, the Cyan nozzle after the Black is located exactly between the Black nozzles.
- 25.4mm(1 inch) ÷ 0.0423 mm = 600.4
- If you use Black ink together with the Cyan nozzle (i.e. the same color in two rows of nozzles), you can express Black at 600 dpi instead of 300 dpi.
2. “If I put Black in all 4 columns, will it be 1200 dpi?” _Why You Should Know What Print Head Specifications Mean
If you look closely, columns 1 and 2 are offset by exactly 0.0423 mm, and columns 3 and 4 are in exactly the same position as columns 1 and 2.
So even if you put one color in the 4 channels, it is not half of 0.0423 mm, which is 0.0211.5 mm, so it is not 1200 dpi but 600 dpi.
Of course, the dots are twice as far apart, but they are in the same position, so the color is only darker and it does not become 1200 dpi.
3. “Can I make it 600 dpi by attaching many heads and increase the speed?” _Why You Should Know What Print Head Specifications Mean
Theoretically, it is possible.
However, the nozzles inside the print head are precisely offset, but it is almost impossible to precisely align the offset between print heads by hand.
In order to move mechanically in um units, a high-capacity camera is required, and a zig that can be precisely controlled through the camera is required.
Rather than increasing the printing resolution by attaching multiple heads, it is better to adopt a high-resolution print head.
In this way, the printing resolution can also be estimated through the nozzle spacing.
III. “How many pico heads?” _Why You Should Know What Print Head Specifications Mean

1. Ink volume _Why You Should Know What Print Head Specifications Mean
According to the specs, it is a very small volume of 1.5 to 2.5 pl. Note that this is not a distance unit, but a volume unit in pico liter.
One thing to note is that each print head manufacturer has their own best test fluid that is optimized for their developed print head.
The test fluid standard is 1.5 to 2.5 pl, but the volume varies depending on water-based, oil-based, or UV ink.
The waveform varies depending on the ink, and the pico liter varies depending on the waveform.
In the case of UV ink, the volume is usually larger than the specs, and for the Xaar1201 (Gen5i) print head, it is estimated to be around 3 to 3.5 pl.
If you know the ink volume, you can estimate the maximum resolution.
2. Ink drop rate and Max Hz _Why You Should Know What Print Head Specifications Mean
When ink comes out of the print head hole and falls on the material, its speed and the Max Hz of the print head are also important.
If the ink falls slowly, and the head carriage moves too fast, the ink cannot fall on the exact spot,
and the head carriage and X-axis resolution must be operated within the Max kHz range of the print head, so the Max kHz is also important.
This information is also important because the ink jetting speed and the Max kHz of the print head can be used to estimate the transport speed of the head carriage.
For reference, it is 7 m/s here. m is meter and s is second.
It means that it falls at a speed of 7 meters per second.
IV. Optimal gap between print head and material? _Why You Should Know What Print Head Specifications Mean
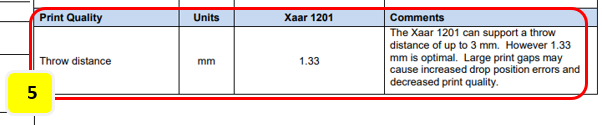
1. 1.33mm meaning _Why You Should Know What Print Head Specifications Mean
The gap between the material and the head is called “Stand off” in inkjet printer terms.
1.33 mm is the specification presented by the print head manufacturer.
If you translate the English text next to it, it says, “Up to 3 mm is possible, but 1.33 mm is optimal. If it is more than that, the dot drop position error increases and the image quality deteriorates.”
2. Problems that arise when standoff is large _Why You Should Know What Print Head Specifications Mean
“How long can the ink jetting speed of 7 meters/second be maintained after being jetted from the head?”
The distance at which the 3.5 pl ink droplets, which are so small and light, can maintain that speed after being jetted from the print head can be estimated with the following answer.
“It’s possible up to 3 mm, but,” that is, after being jetted, the speed gradually decreases.
If the standoff is too large,
- small ink droplets lose speed when they come out of the head,
- and are also affected by the air vortex generated when the head carriage is transported.
- In addition, ink droplets that were clumped together may lose speed, creating satellites, or small ink droplets separated from the large droplets.
- Not only are small ink droplets separated by the air vortex affected, but also large ink droplets do not land in their proper positions, and especially small ink droplets fly in the air and stick to the head nozzle surface.
- If you continue printing without cleaning these fine ink droplets, the UV light of the UV printer will continue to harden the fine ink droplets attached to the nozzle surface,
- and over time, the ink will harden around the head nozzle, collapsing the circles and causing the nozzle pattern to be printed messily, as shown in the photo below.

If you know how to read head spec data like this, you can understand the characteristics of your own printer better.
V. This is how ARTJET supports our customers.
One thing I feel while selling and maintaining ARTJET UV Printers for 5 years is that the next most important thing after product stability is Troubleshooting DATA.
All products have problems, whether they are actual equipment problems or consumer errors, and product stability is how easily and quickly you solve those problems.
We are organizing all the troubleshooting DATA as follows.
You can see the product print quality by clicking here.

1. Complete Guide to Printhead Problems and Solutions
ARTJET UV Printer Problems and Solution _Printhead Problems Summary
Additional issue and solution
The red color does not appear at first, then appears during printing, and then does not appear again
Printhead replacement video and precautions
2. Complete Guide to Ink Supply Problems and Solutions
Previously sorted, ink supply problem summary
Updated ink supply problem summary
3. Mechanical problem and Solutions
1. How to align the print head in a straight line
2. There is a clicking noise from the X-axis
3. Banding problem in specific section
4. The Importance of Head Height in Bidirectional Printing
5. Problems that occur when the wiper height is high
6. When the cleaning belt screw is loose
7. When the capping fixing plate does not fit
8. How do I prepare the ARTJET electricity?
9.When Anti-crash becomes a jam in captop
10. Print head Anti crash system
4. Electron board and Software problem is hereunder.
1. The printer works but printing does not work
2. Resetting to default settings
3. Touch panel does not turn on
4. The printer is printing, but nothing is printed
5. Software closes when I just press the print button
6. Printing in the wrong place
7. Positioning misalignment in X-axis direction
8. How to make the Offset fine tune
9. Vertical offset is not correct only for the right section of white
10. Software turn off when click print button
5. Sai Flexi Rip software
1. How to make the Spot Color & several mistakes
2. Color is strange after applying Spot color
3. White is sticking out
4. Installation and Dongle Key Recognition Failure Measures
5. Dongle Key Recognition Failure
6. White lines appear when printing only color
7. Color Adjustment through Graph
8. Print size compensation
9. Ink Consumption Calculation
10. What is ICC profile & menu board UV Printing
11. Dongle Key recognition Failure from USB port
6. Problems and solutions from actual consumer sites
1. Paper that absorbs ink
2. A line-like thing appears at the end of the white print surface
3.Can varnish banding be reduced?
4. Are there many problems with China’s UV Printer?
7. UV Printer Application
we are explaining not only UV printer problems and solutions, but also what products are produced with UV printers.
1. Braille printing
2. Flip the material and align it
3. 2.5D UV print
4. ARTJET UV Printer Application 6 _아크릴 본딩 장비
5. I phone 14 print limitation
6. Mask printing not recommend
7. Leather Cigarette Case UV Printing
8. Round soccer strategy board UV printing
9. Primer performance & limitation
10. UV Print & Laser crop mark cutting
11. Mobil case UV print profit
12. Screen vs Digital Comparison and UV Printing on Hand Sanitizer Cases
13. Bottle zig & print
14. Canvas UV Printing
15. Applying epoxy effect with varnish
16. Making a light frame with UV Printer & Laser cutter
17. UV Printer & Laser Cutting Equipment Button Name Tag Making
18. UV Printer & Laser Cutting Making a Cell Phone GripTok
19. Making an Acrylic Keychain with UV Printer & Laser Cutter
20. UV Print with Zig
21. How to make RD WORKS CCD camera cutting Video manual
22. Acrylic bonding equipment
23. All the steps to create UVDTF
24. UVDTF TEST Result on various material
25. ARTJET CW+C Print time & Ink Cost
26. Create a white shield with different images on the front and back of the keyring
27. Keyring Business Required Equipment and Investment Costs
29. Acrylic Lighting Goods
30. Ballpoint pen jig printing
31. Staining occurs when printing on coated leather
8. Bonus
1. ARTJET UV Printer Old Model Refurbished
2. UV Printer Laser Cutter Bonding Machine Which equipment should I buy first?
3. Considerations when choosing a UV printer
4. DTF Printer Price and Specification Survey
5. Acrylic Bonding Equipment Don’t Put It Off Anymore
6. China inkjet level now
7. Thoughts on KOSIGN 2024
8. ARTJET Delivery Preparation
9. ARTJET Setting Sequence
10. UV Printer History and Future Prediction 1
11. UV Printer History and Future Prediction 2
12. UV Printer History and Future Prediction 3
13. UV Printer History and Future Prediction 4
14. UV Printer History and Future Prediction 5
15. Are there many problems with China’s UV Printer?
16. UV Printer Small Text Meaning
17. Is the XP600 head okay
18. Roland UV Printer Summary
19. Mimaki UV Printer Summary
20. UV Printer Alibaba Direct Purchase Considerations
21. Things to consider when buying a used UV Printer
22. Bi Uni Print Quality Differences
23. RDworks download install and laser head position by SW
That’s it for today.
핑백: Printhead inkjet principle ARTJET 2025
핑백: Print head multi drop Gray scale ARTJET 2025
핑백: Ricoh Printhead Description ARTJET 2025
핑백: Ricoh Gen5i and Xaar1201 same head ARTJET 2025
핑백: Konica print head model name meaning ARTJET 2025
핑백: Head problem Y-axis banding ARTJET 2025