- Anyone installing Sai Rip for the first time
- Anyone replacing or setting up a new PC
- Anyone who installed Sai Rip but can’t connect it to the printer
- Anyone who doesn’t know how to apply an ICC Profile
- Anyone who wants to follow the full installation process for the Dongle USB version
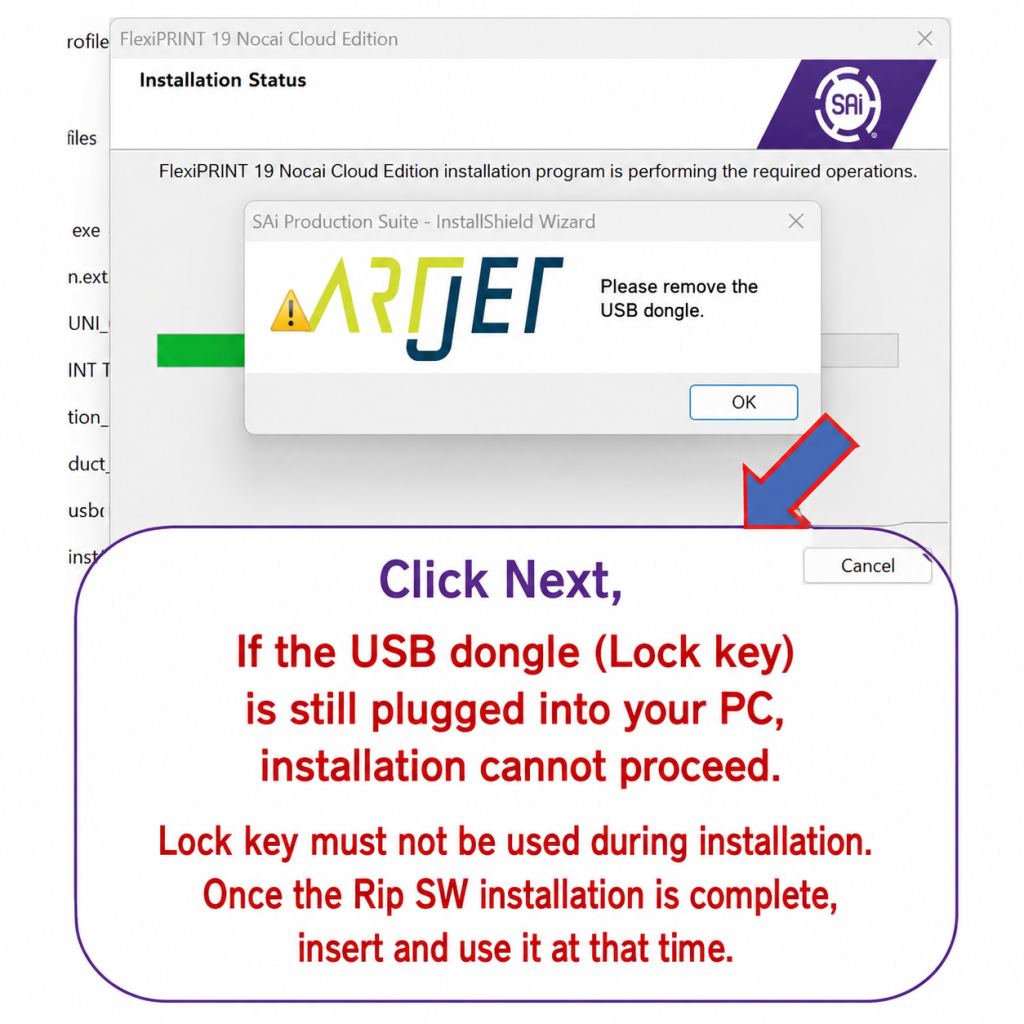
- Do NOT plug in the Dongle USB during installation. Insert it only after the installation is complete.
- An internet connection is required during installation. Without it, Activation code authentication will fail.
- Keep your Sai Rip box (with the Activation code) safe. If lost, you will need to repurchase the software.
- For the non-Dongle USB version, remove the License code from the old PC first before setting up on a new one.
- Required items: Internet connection + Installation USB + Activation code — all three are essential
- Remove Dongle USB before installation → plug it in only after installation is complete
- After installation, follow this order: Printer Driver → ICC Profile → Basic Settings
- 4 basic settings: Flatbed size (600×900) / Hold in queue / ICC color correction + White suppression 0.09mm / Spot_1·2 as Spot Color
I. Installing Sai Rip — Driver and basic settings after installing Sai Rip ARTJET 2025
1. What You Need Before Installing Sai Rip
Here are the common situations where a fresh Sai Rip installation is needed:
- When the Rip program has an issue and needs to be reinstalled on the current PC
- When the PC is old and needs to be replaced with a new one
- When purchasing a used printer and setting up a new PC from scratch
Required items for Sai Rip installation:
- Dongle USB version: Dongle USB, Activation code number (from the Sai Rip box), and an internet connection.
- Non-Dongle USB version: Activation code number, internet connection, and removal of the license code from the previous PC. (The license must be removed from the old PC before it can be registered on a new one. This will be explained separately in a future article.)
- For reference, here is how to remove the license code from the previous PC. https://www.youtube.com/shorts/0zIyubFrqVQ
- This article covers installation based on the Dongle USB version.
- Only the installation step differs — the initial setup after installation is the same for both versions.
Where to find each required item (Dongle USB version):
- The Dongle USB should be plugged into your current PC. (It must remain plugged in for Sai Rip to run.)
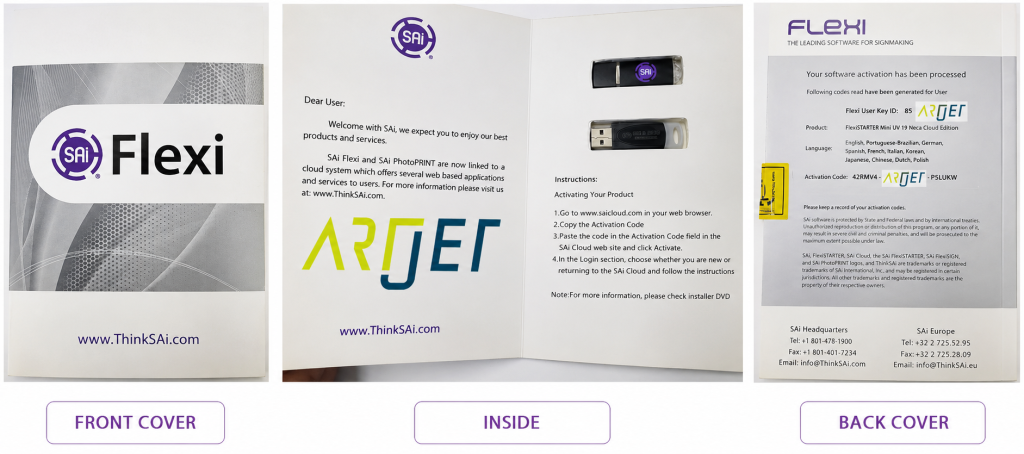
- Inside the box, you will find the USB containing the installation program.
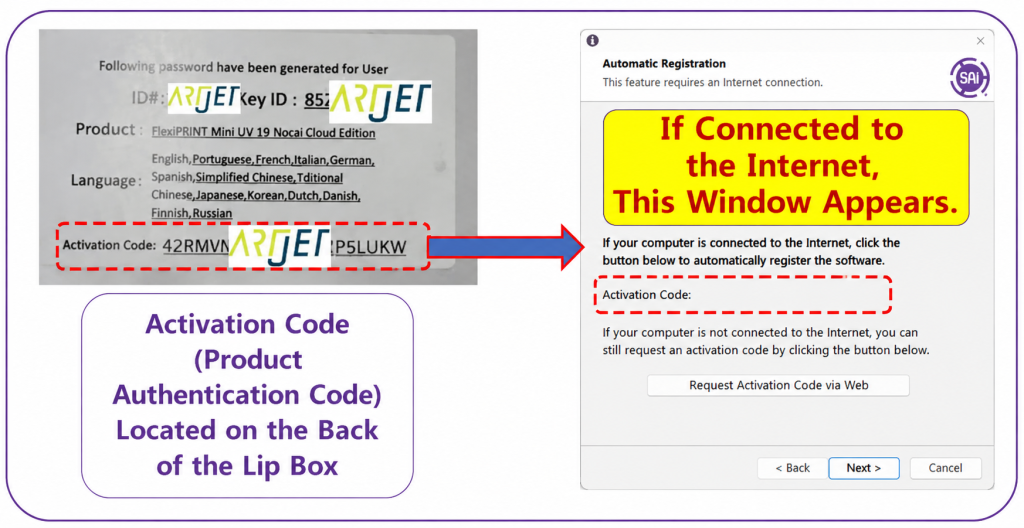
- On the back of the box, you will find the Activation code number.
- If the box is lost and the Activation code was not saved elsewhere, you will need to repurchase Sai Rip. Always keep the box in a safe place.
- The photos below show the front, inside, and back of the box in order.
- An internet connection is required during installation to register the Sai Rip license.
-
Driver and basic settings after installing Sai Rip ARTJET 2025
A customer who only kept the Dongle USB:
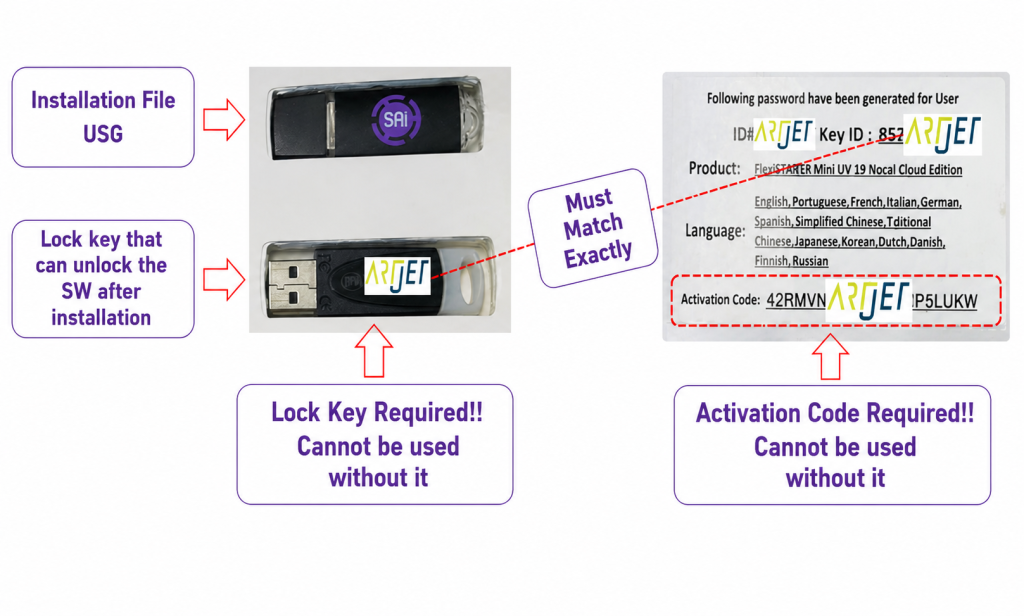
- One customer moved to a new location and kept the Dongle USB (also called Lock key),
- but lost the box containing the activation code — and ended up having to repurchase Sai Rip at full price.
- Both the Dongle USB and Activation code number shown in the photo below are required to install Sai Rip.
For reference — required items for the non-Dongle USB version:
- Remove the Sai Rip license from the old PC (the old PC must still be functional to do this)
- Activation code number
- Sai Rip website (www.saicloud.com) — the installation program can be downloaded here
2. How to Install Sai Rip
The following installation steps are based on the Dongle USB version.
Important reminders before you begin:
- You need three things: internet connection, installation USB, and Activation code.
- Do NOT plug in the Dongle USB during installation. The Dongle USB should only be inserted after installation is complete for Sai Rip to work normally.
Follow the steps below to install Sai Rip. All screens are shown in the photos — please refer to them as you go.
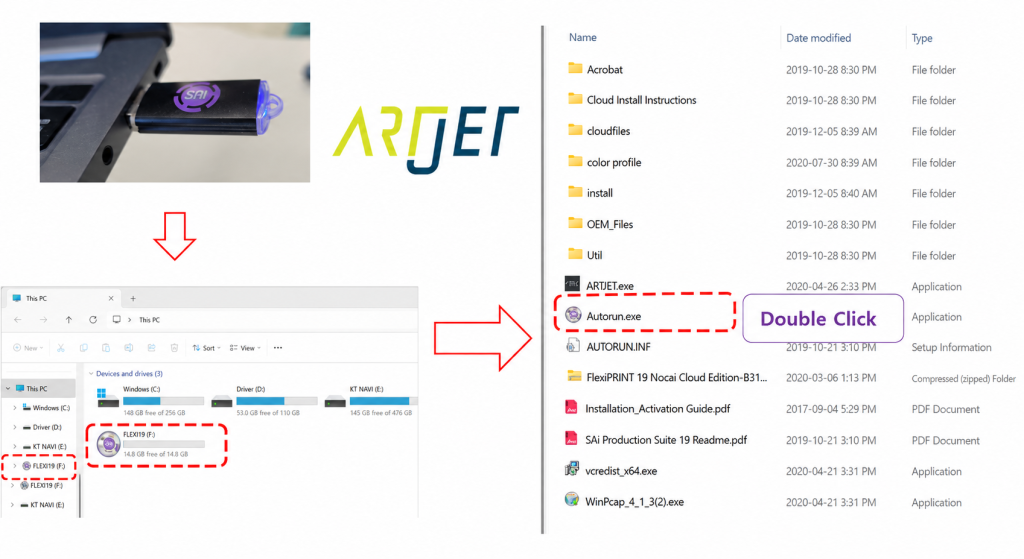
1. Insert the USB containing the Sai Rip installation program (from the Sai Rip box) into your computer.
2. Open the [Flex] folder, and inside you will see Autorun.exe.
3. Double-click Autorun.exe to begin the installation.
4. A language selection window will appear. Select Korean and click “OK.”
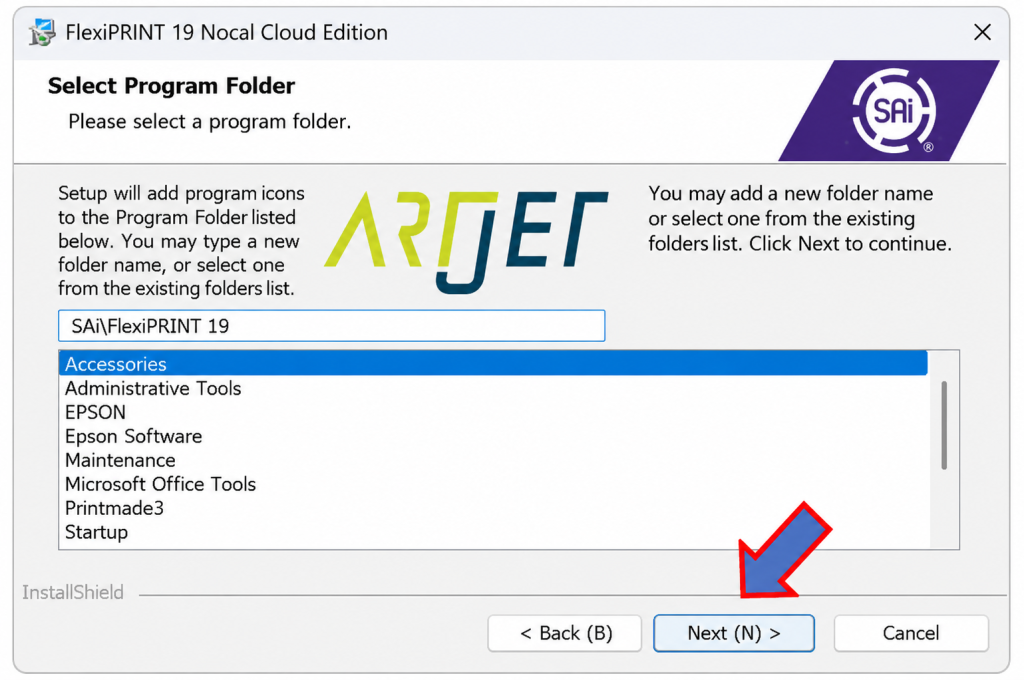
5. The next screen appears. Click “Next.”

6. Select [I accept the terms of the license agreement] and click “Next.”

7. A screen asking for the installation location appears. Leave the default and click “Next.”

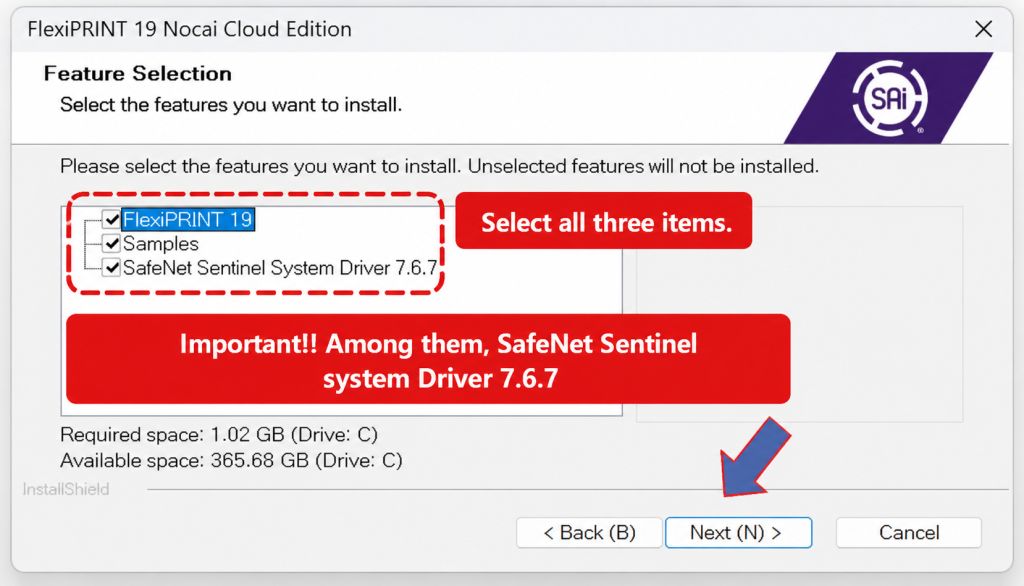
8. On the feature selection screen, check all boxes and click “Next.”
9. The next screen appears. Click “Next.”
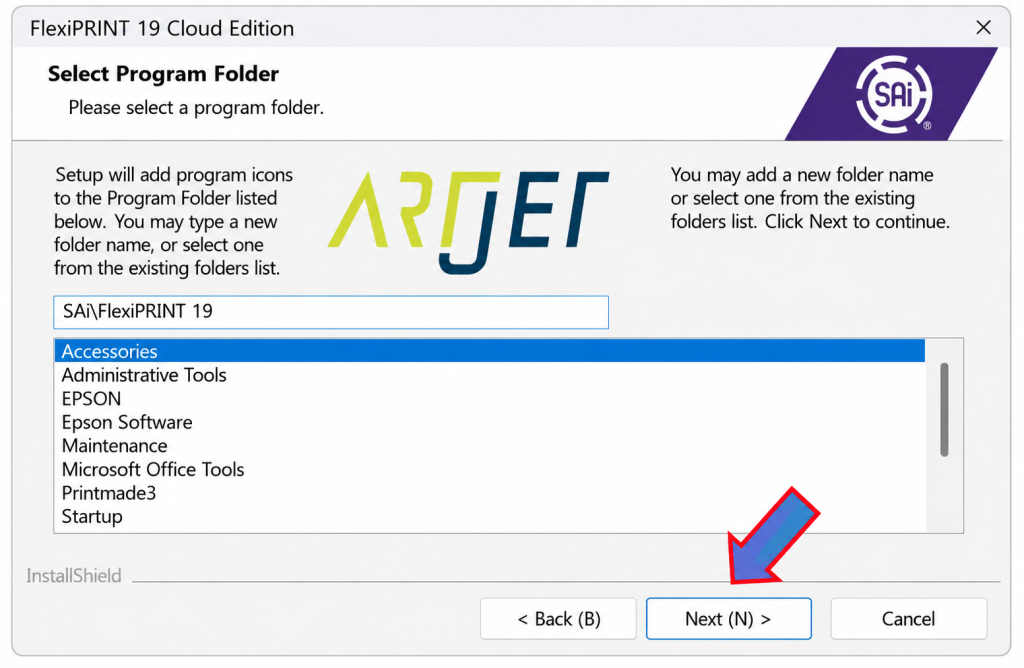
Steps 4 through 9 are shown together in the photo below.

10. The program installation now begins.
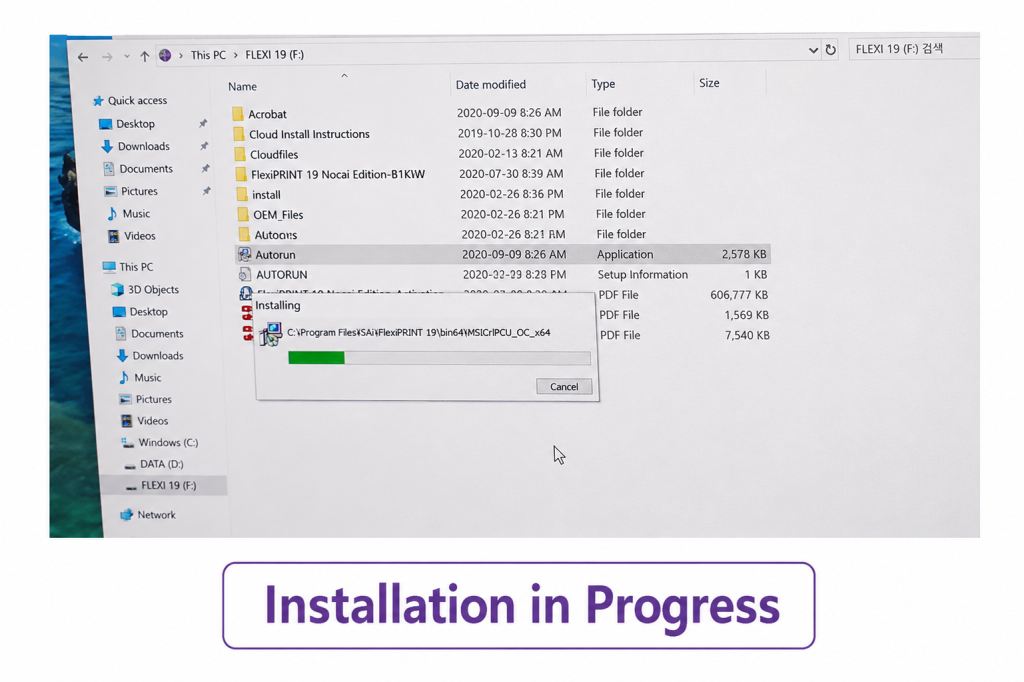
11. During installation, a message will appear asking whether the Dongle USB (Lock key) is plugged in. If it is, remove it and click “Next.” The Dongle USB is not used during installation — it should only be inserted after the Rip software is fully installed.
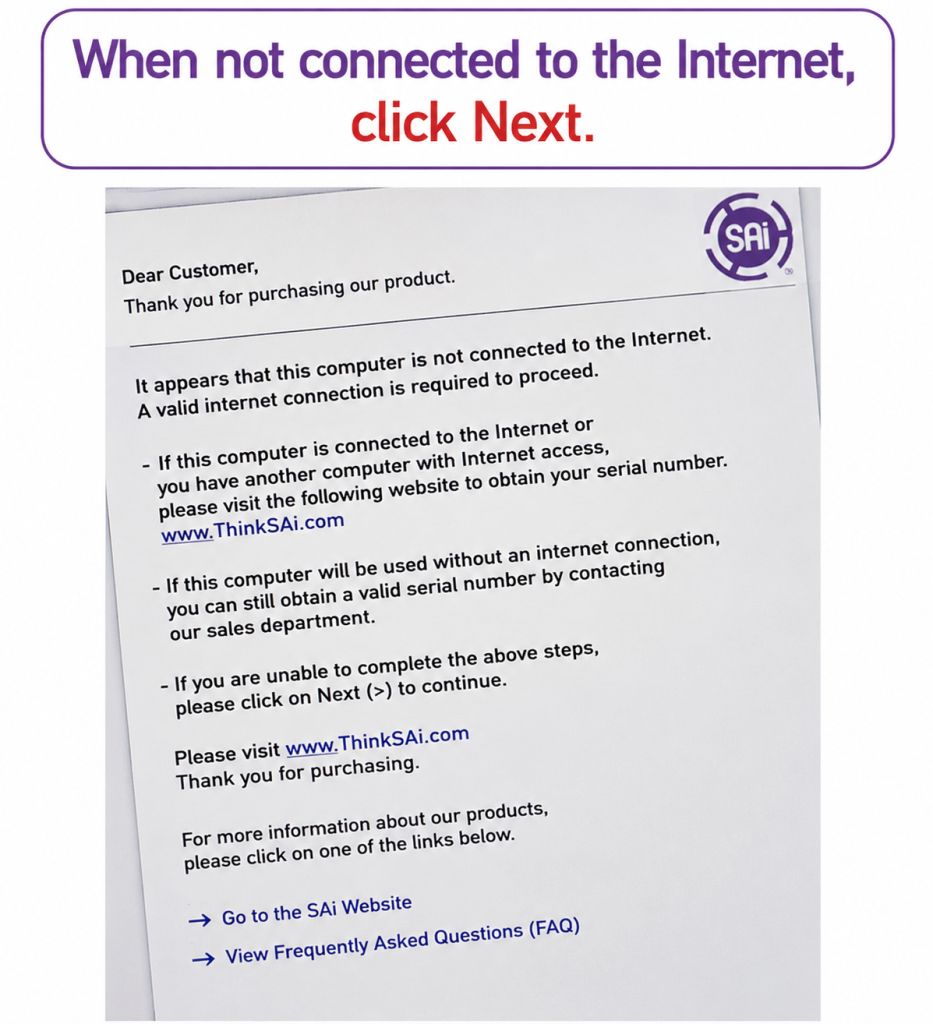
12_1. If there is no internet connection, the following screen will appear. (Internet is required.)
12_2. If internet is connected, the following screen appears. Enter the Activation code from the Sai Rip box in the product code field.
13. Once the Activation code is entered, installation continues.
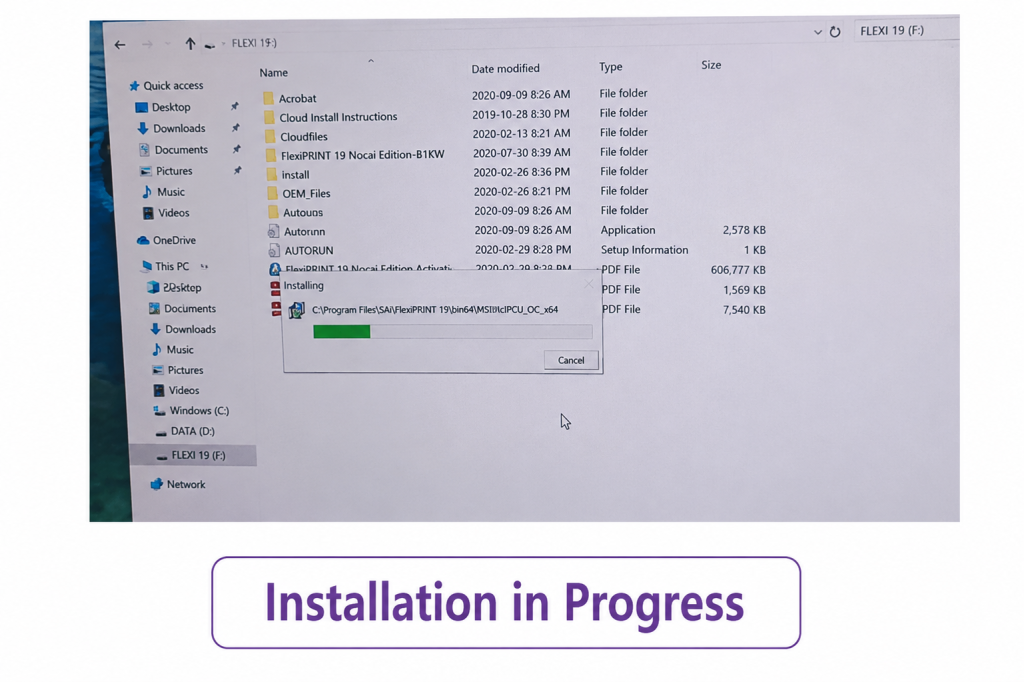
Steps 10 through 13 are shown together in the photo below.
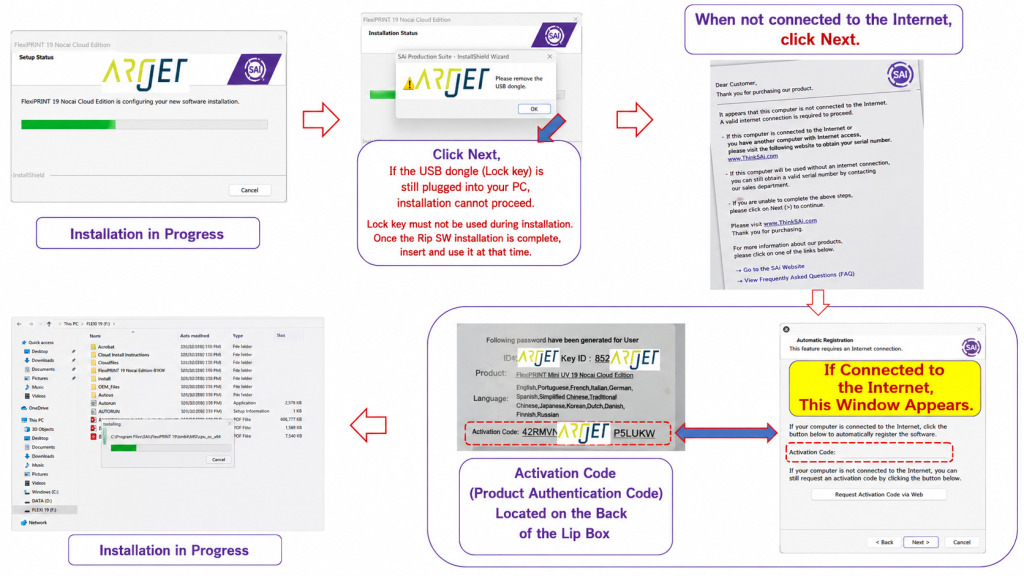
14. FX and PM icons will appear on the desktop first. However, installation is still in progress even after the icons appear. Wait patiently until the Setup Wizard completion screen appears on the left. Click “Finish” to complete the installation.
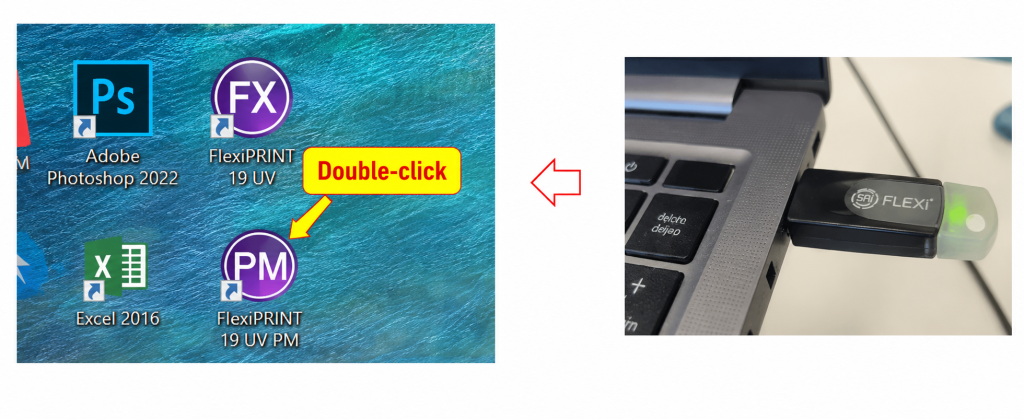
15. Once installation is complete and the PM icon appears, do not launch it yet. First plug in the Dongle USB, then open the program.
- Occasionally the PM program may not appear on the main screen. Check the bottom-right taskbar for a small [pm] icon and click it to bring up the main window.
- Note: There are two icons — FX and PM. Sai Rip runs through PM. FX is not used.
This completes the Sai Rip program installation.
However, Sai Rip alone will not connect to the printer yet. You must complete the initial setup steps below before the printer can be used with Sai Rip.
II. Printer Driver Setup and Initial Configuration — Initial Setup After Installing Sai Rip
1. Setting Up the Printer Driver
You need to set up the printer driver within the Rip Software before printing can begin. This is the same reason you install a printer driver when setting up a desktop printer for the first time.
1. In the Rip program, click the Printer icon highlighted in red in the photo below.
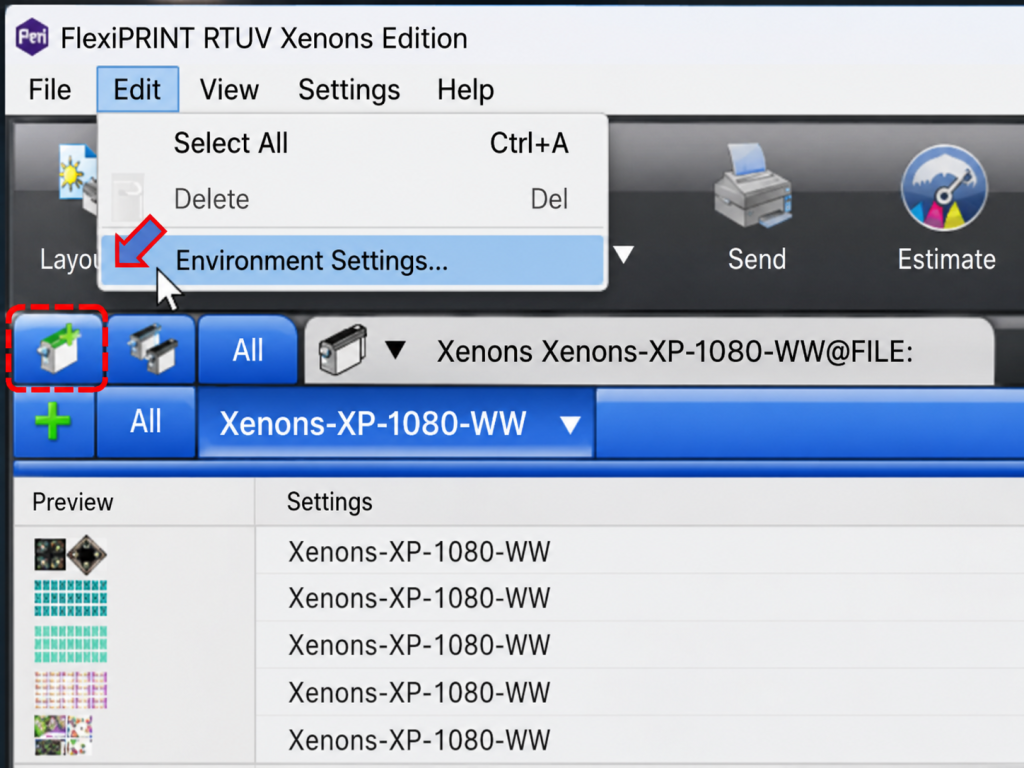
2. In the screen shown below, select your printer manufacturer and model.
In our case, the brand is Xenons and the model is Xenons-XP-1080-WV. Select the appropriate options and click “Next.”

3. The next screen appears. Leave all other settings as default.
- If you want to change the Rip file save location (shown in the red box), do so here, then click “Finish.”
- This can also be changed later when saving a ripping file.

4. After clicking “Finish,” the driver setup is complete. A Xenons-XP-1080-WV window will appear as shown in the red box below.
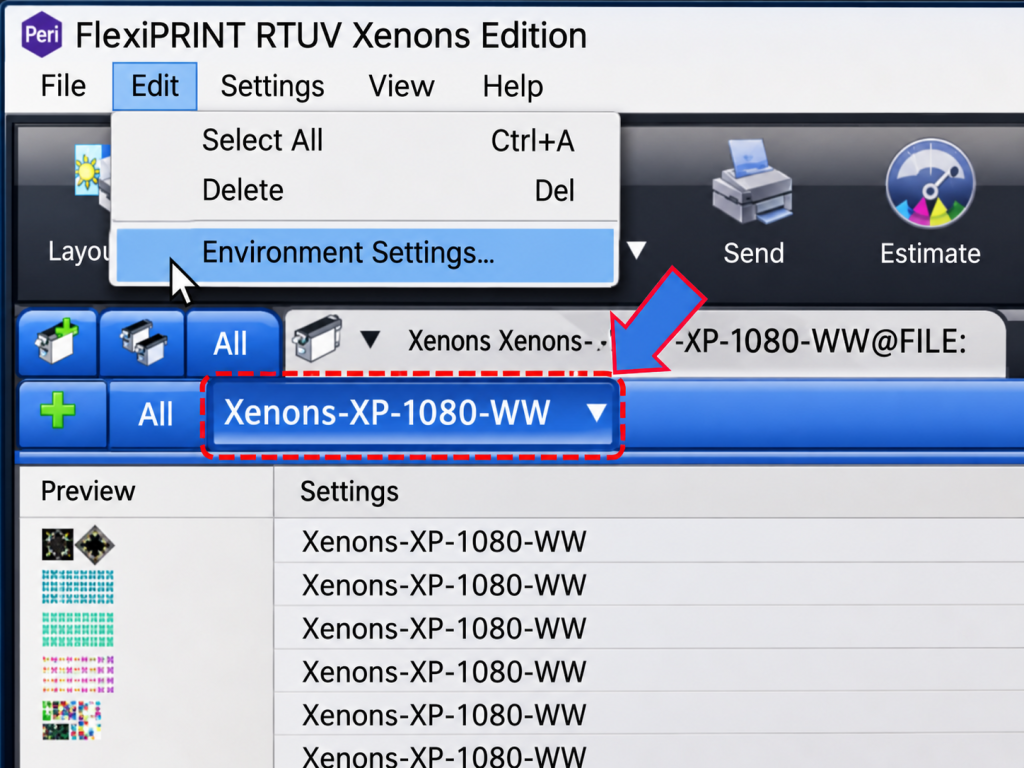
The full process from steps 2 through 4 is shown in the photo below.

2. Applying the ICC Profile
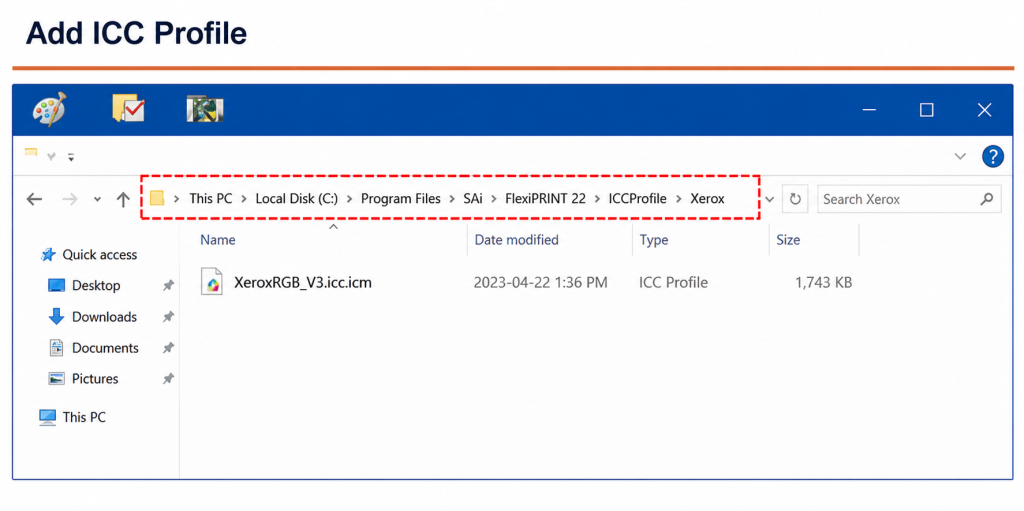
Each manufacturer provides an ICC profile file when the printer is installed.
- For our printer, all necessary files are stored in the ARTJET folder on the desktop.
- If you cannot locate the ICC profile, contact the manufacturer or the seller of the used printer.
How to apply the ICC profile in the Rip software:
- The Printer Driver must be set up first before the ICC profile file can be applied.
- The ICC profile must be manually placed inside the Rip software folder. This method is more convenient than importing it directly through the Rip software.
- Path: My Computer → C → Program Files → Sai → FlexiPRINT (the manufacturer name is appended; ours is Xenons Editions) → ICCProfiles → Xenons. Refer to the red box in the photo above.
- The folder will be empty at first. Simply paste your ICC profile file into this folder.
- For our printer, copy the [220822_M_R 720 x 1080] ICC profile from the ARTJET folder on the desktop and paste it into the folder above.
3. Configuring the Basic Sai Rip Settings
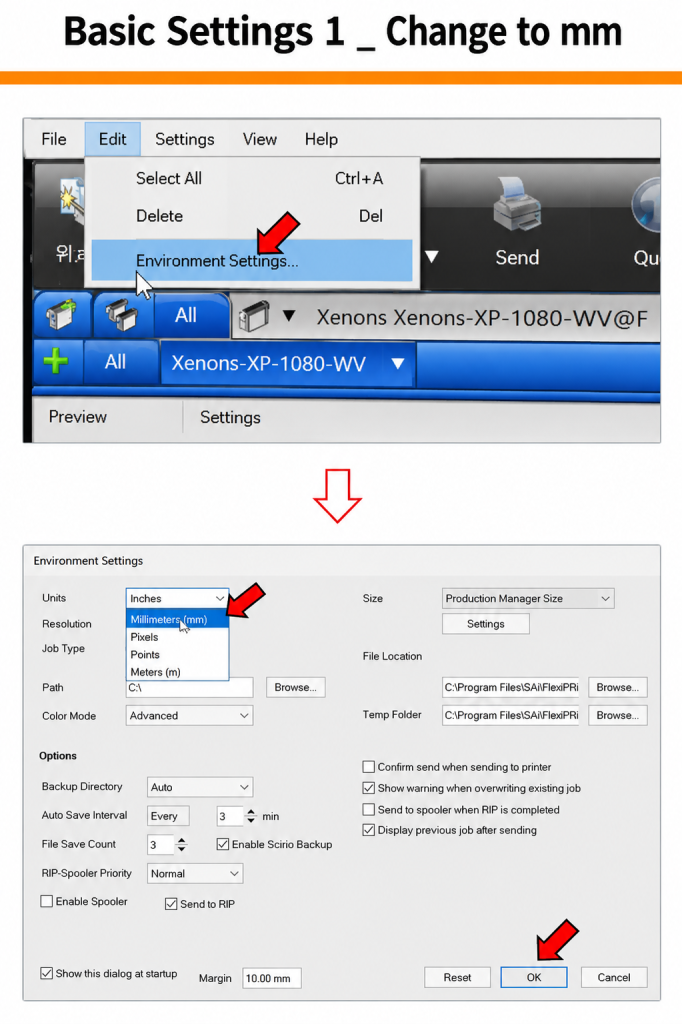
1. Changing the unit from cm to mm
- Go to Edit → Preferences → Units, and change the unit from cm to mm.
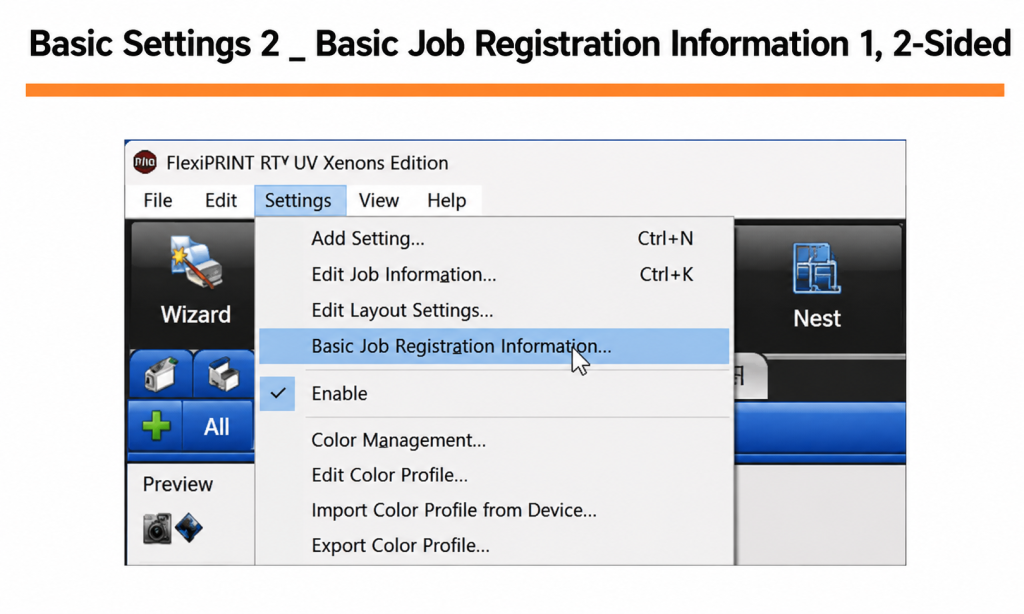
2. Configuring Default Job Properties
- Go to Settings → Default Job Properties. A window with icon-based settings will appear.
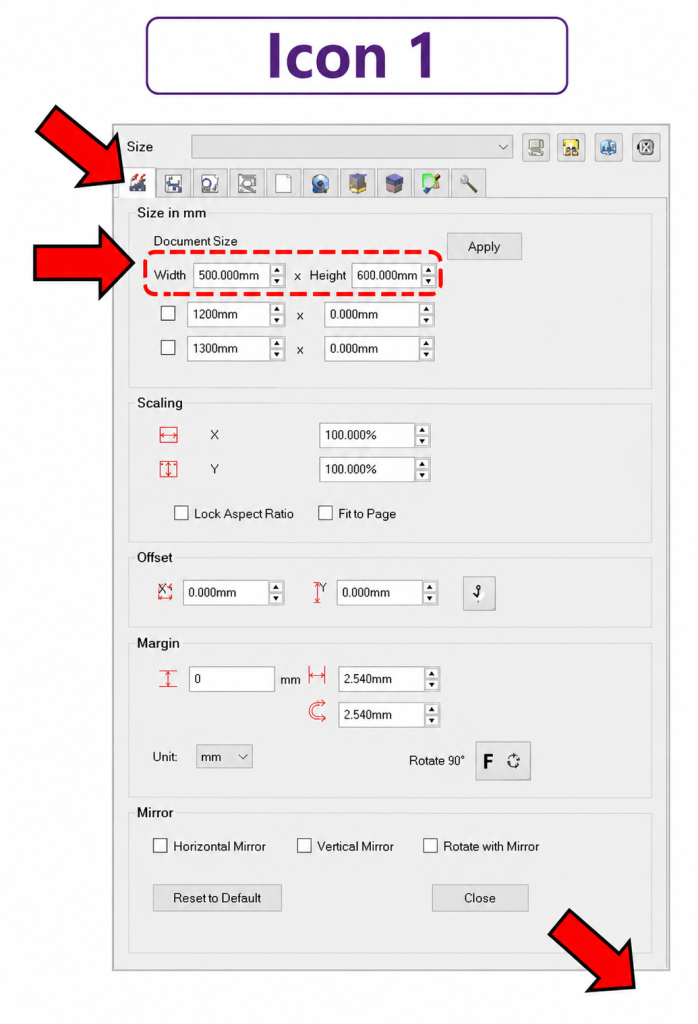
2_1 Setting the Flatbed Size (Printable Area)
- Click the first icon to open the settings window.
- Change only the numbers in the red box to set the flatbed size to 600 × 900. Leave everything else as default.
- After making the change, click the [Apply] button in the lower right (not visible in the photo below).
2_2 Setting the queue behavior after ripping
- Click the second icon to open the settings window.
- It is generally recommended to keep ripped files in the print queue after completion.
- They can be useful for reprinting later, and can always be deleted manually from the queue. Set this to “Hold” as the default.
- After making the change, click [Apply] in the lower right of the screen.

2_3 Applying ICC Profile and Setting White Suppression
- The ICC profile file must already be placed in the correct folder (My Computer → C → Program Files → Sai → FlexiPRINT → ICCProfiles → Xenons).
- Click the third icon to open the settings window. Select [Use Color Correction] in the red box to activate the ICC profile.
- Click [Apply] in the lower right.

- In the same window, click the [Choke] button to open the choke and bleed options.
- Set Spot_1 White suppression to 0.09mm. (A detailed explanation of this option will be provided in a separate article.)
- Click [Apply] in the lower right.
2_4 Configuring Spot_1 and Spot_2
- Click the fourth icon to open the settings window.
- Set both Spot_1 and Spot_2 to [Spot Color].
- Click [Apply] in the lower right.

To summarize, after installing Sai Rip you must:
- Set up the Printer Driver,
- Install the ICC Profile, and
- Configure the basic settings as described above — only then will the printer work as it did before.
The steps covered in this article represent the essential initial setup for running Sai Rip after installation. Further details on each individual function will be covered in separate articles.
The full process described today can also be viewed in the video below.
ARTJET UV Printer — Consumer Issue #4: Sai Flexi Rip Installation & Dongle Key Recognition Failure
III. ARTJET UV Printer

핑백: Sai rip Lock key recognition failure ARTJET 2025
핑백: How to adjust colors in Sai Rip ARTJET 2025
핑백: Can you print the exact size? ARTJET 2025
핑백: Rip security key not found ARTJET 2025
핑백: Printing two images together in Rip ARTJET 2025
핑백: After applying Spot color, the color appears strange ARTJET 2025
핑백: Sai Rip Installation Spot Color ARTJET 2025