INKJET UV Printer & Coat & CUT

INKJET UV Printer & Laser Cutting Machine

경기도 안양시 동안구 시민대로109번길 29, 13층 1302호

From downloading to installing The latest version of RDWORKS V8

From Downloading to Installing the Latest Version of RDWORKS V8

“The crop marks cutting program can move the laser head to the desired location with SW, but the engraving program does not have a place to move the laser head precisely with SW.”
This function was added when the RDWORKS software version was upgraded from V8.01.29 to V8.01.60.
The latest version is now V8.01.65 — download it from the Ruida official website.

From downloading to installing The latest version of RDWORKS
This guide covers how to download and install the latest version, then position the laser head at your desired location before starting a cut.
Note: I handle mainly sales, so software installation is not something I do often. I have written this guide in enough detail that even first-time users can follow along.

✅ Who Should Read This
  • Anyone installing the latest version of RDWORKS V8 for the first time
  • Anyone who wants to start cutting from a specific laser head position
  • Anyone considering upgrading from an older version

⚠️ Important Notes
  • During installation, make sure to set the laser origin point (e.g. Topleft / TopRight) correctly for your machine — an incorrect setting can cause the head to recognize the wrong direction as the zero point
  • The current latest version is V8.01.65 — check the Ruida official website for updates as versions may change

🧭 Key Summary
  • Free download from the Ruida official website — no registration required
  • Three things to set correctly during installation: Language, laser origin point, and desktop shortcut
  • Starting from V8.01.60, you can move the laser head to any position by entering a numeric value

I. From Downloading to Installing the Latest Version of RDWORKS V8

1. Program Download

No registration needed — just click the link below to access the download site.

Motion Control Software and V8 Software Downloads – Ruida Technology

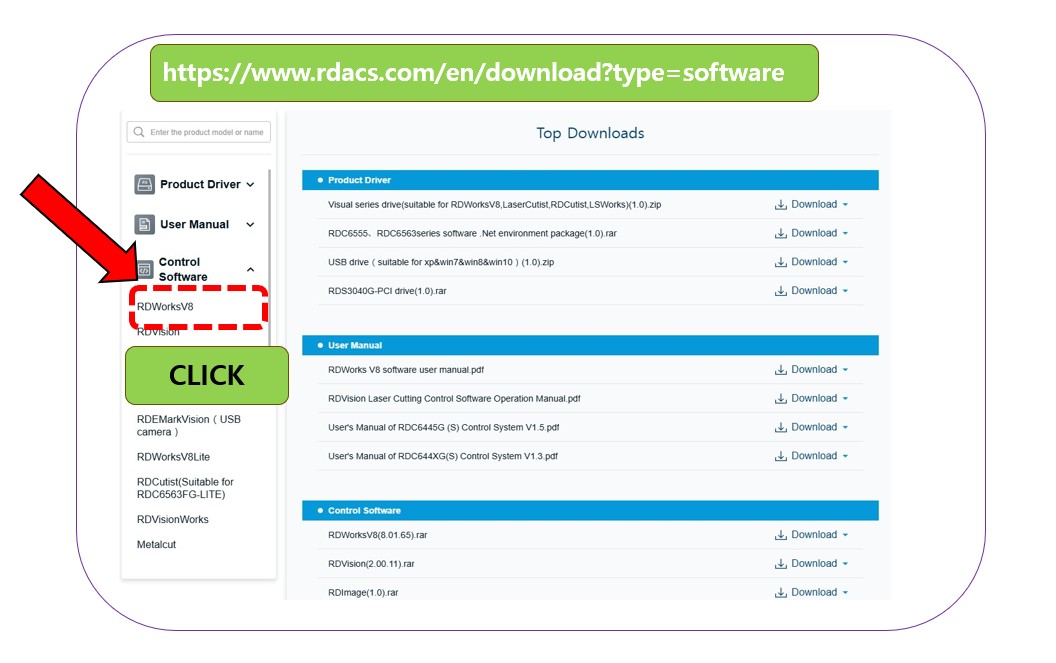
When the homepage loads, look on the left side, select “Control Software”, then drag down and you will see RDWorksV8.
From downloading to installing the latest version of RDWORKS
From downloading to installing The latest version of RDWORKS
Select Control Software, then click RDWorksV8

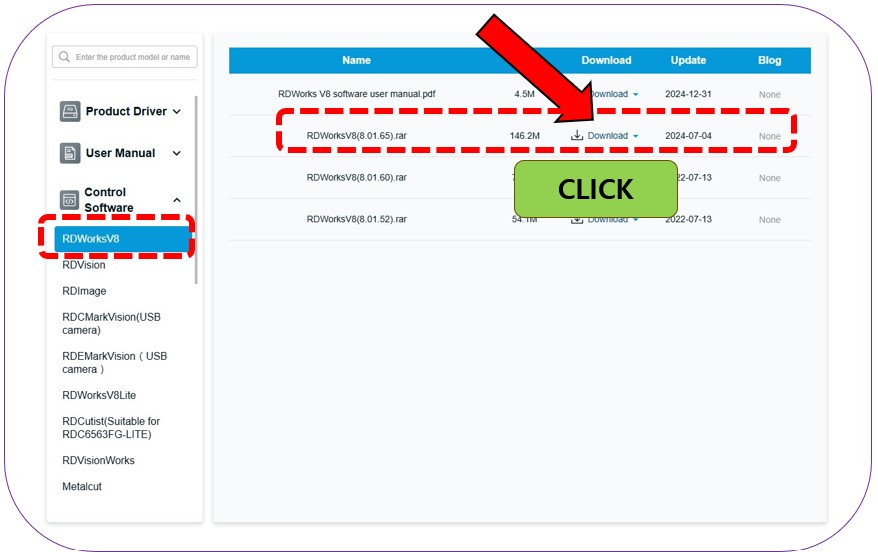
Click RDWorksV8 and the following screen will appear on the right — click RDWorksV8(8.01.65).
From downloading to installing the latest version of RDWORKS
From downloading to installing The latest version of RDWORKS
Click RDWorksV8(8.01.65)

A puzzle will appear — drag the arrow to the right to solve it, and the download will begin.

Once the download is complete, click the small circle in the upper right corner to go to the downloaded program screen.

From downloading to installing the latest version of RDWORKS
From downloading to installing The latest version of RDWORKS
Solve the puzzle to start the download

Drag the program from that folder to the desktop.
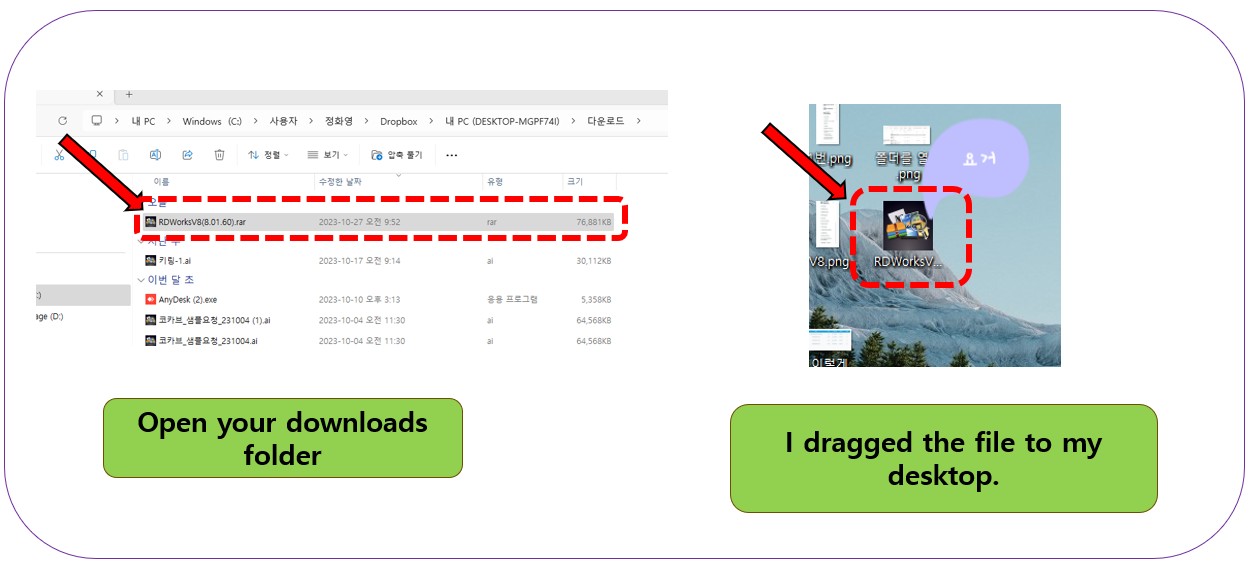
From downloading to installing the latest version of RDWORKS
Drag the program to the desktop

2. Program Installation

Select the downloaded program, right-click and choose Unzip.

A new folder will be created — go into that folder and double-click the program. When the installation window appears, click Install.
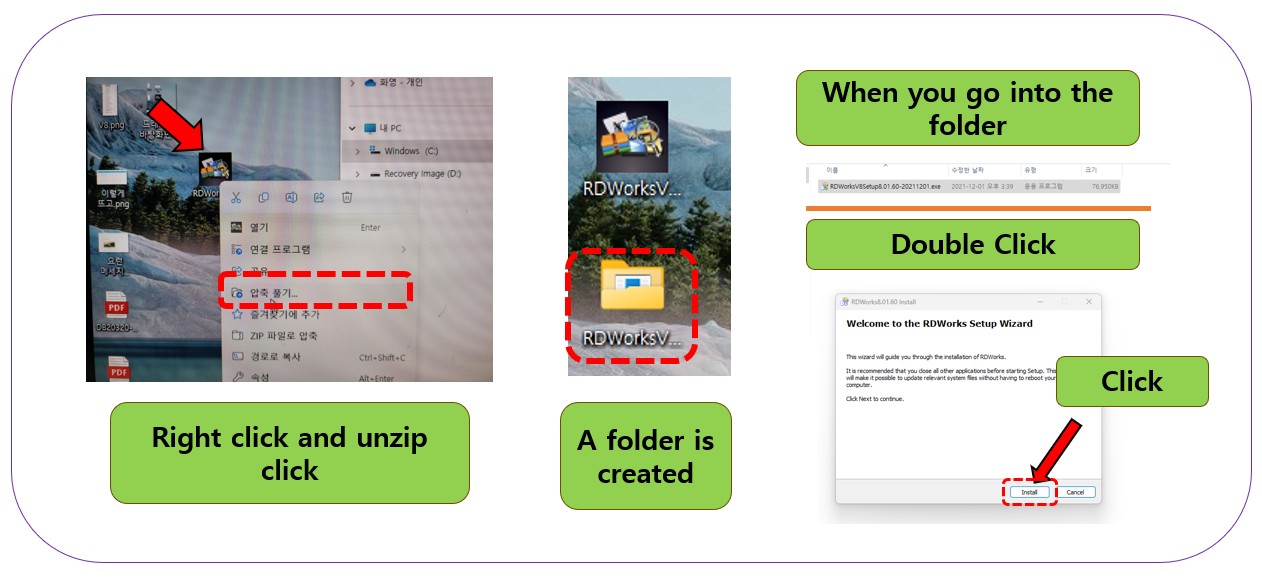
From downloading to installing the latest version of RDWORKS
Unzip, then click Install

Installation takes about 30 seconds. Once complete, a new screen will appear.
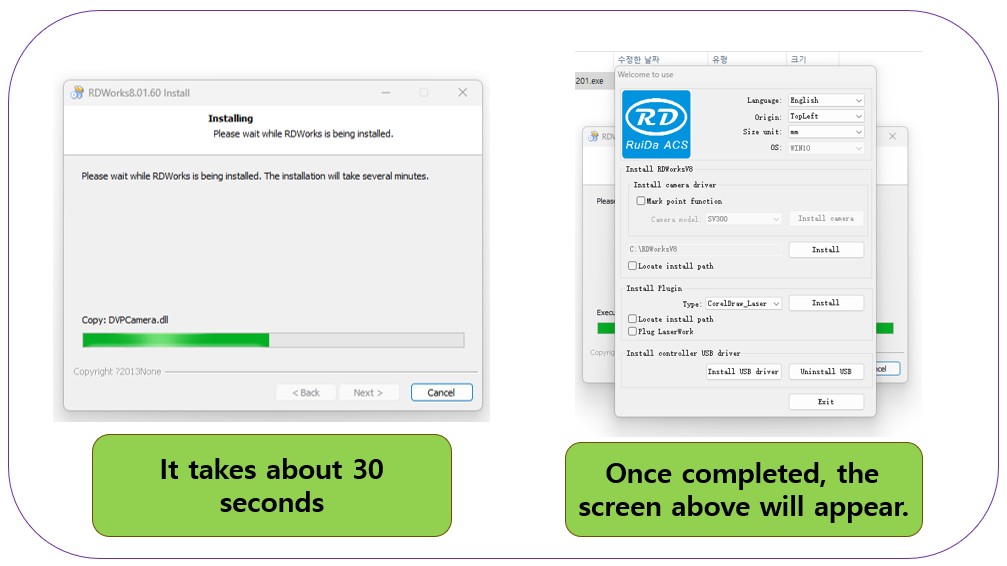
From downloading to installing the latest version of RDWORKS
Left screen progresses for about 30 seconds, then the right screen appears

⚠️ Pay close attention to this section, especially the laser head origin point setting.

  • Language: Select your preferred language
  • Laser origin point: Set according to your machine (e.g. Topleft → TopRight). You must set this correctly for the equipment you are using. If set incorrectly, the laser head may recognize a completely different direction as the zero point after installation. There is a way to change the head zero point later, but it is best to set it correctly during installation.
  • Locate install path: Check this to create a desktop shortcut
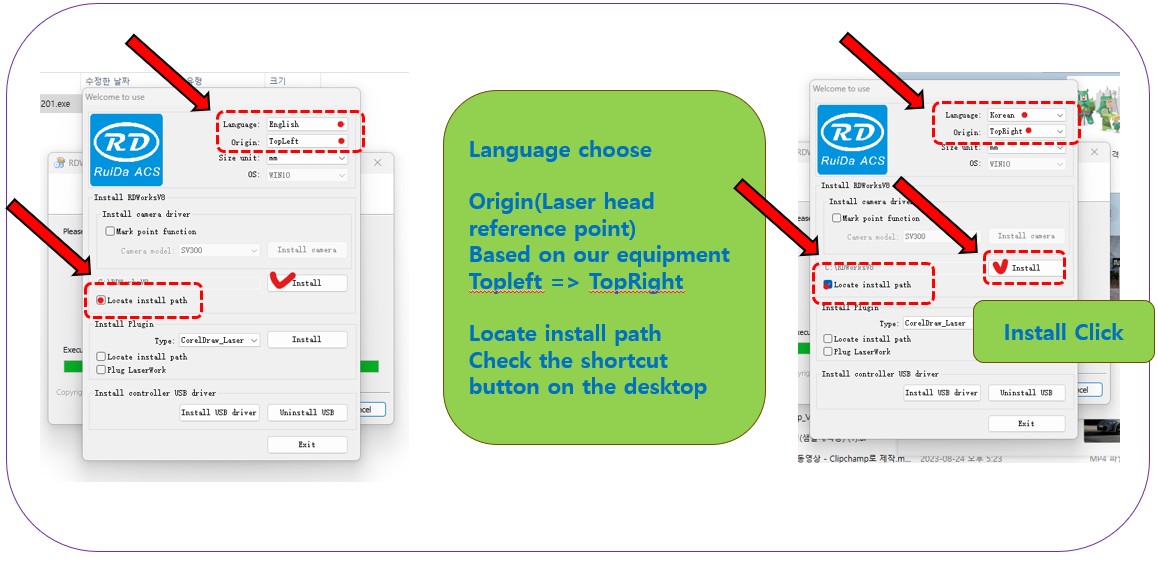
Language setting, laser origin point setting, desktop shortcut
Language / Laser origin point / Desktop shortcut settings

After completing the settings, click the Install button and set the program storage location. Select C drive and click OK.

An “Install Finish” message will appear — click OK. Then click the Exit button on the third screen, and the program will appear on the desktop.
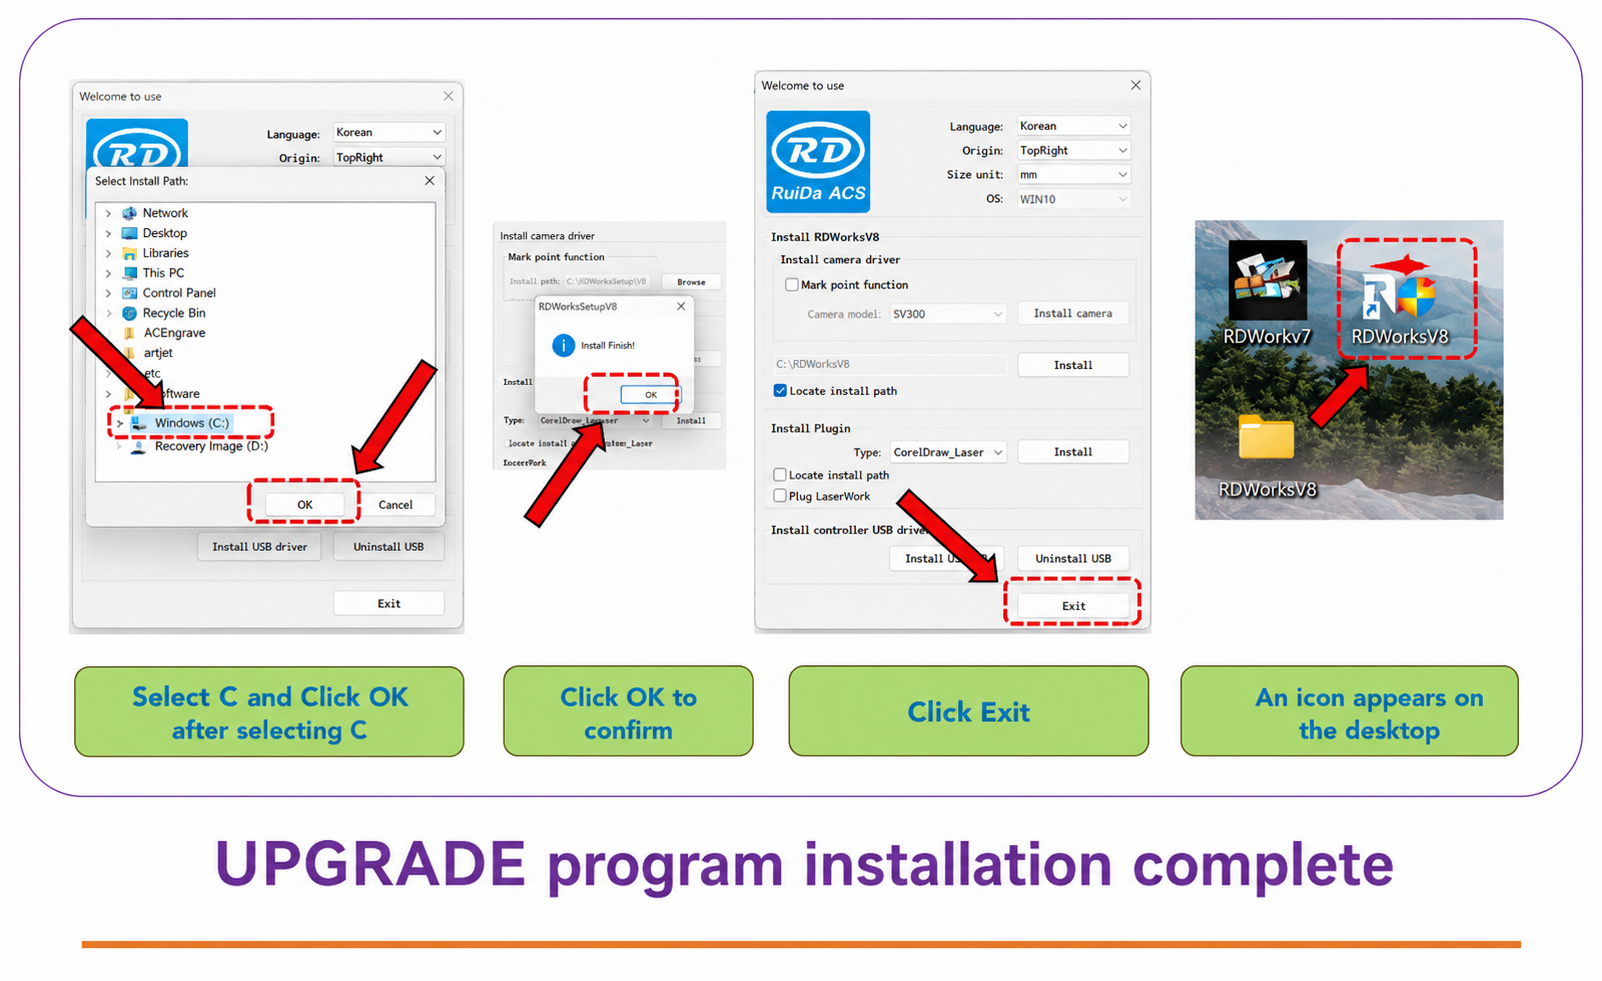
Installation complete — program appears on the desktop

II. Starting a Cut from the Desired Laser Head Position – From downloading to installing the latest version of RDWORKS

1. Laser Head Position Setting Window

Users of older versions may have been estimating the starting position by eye. Now you can move the laser head to any position by entering a numeric value.

Click the “Test” button at the top right of the program.
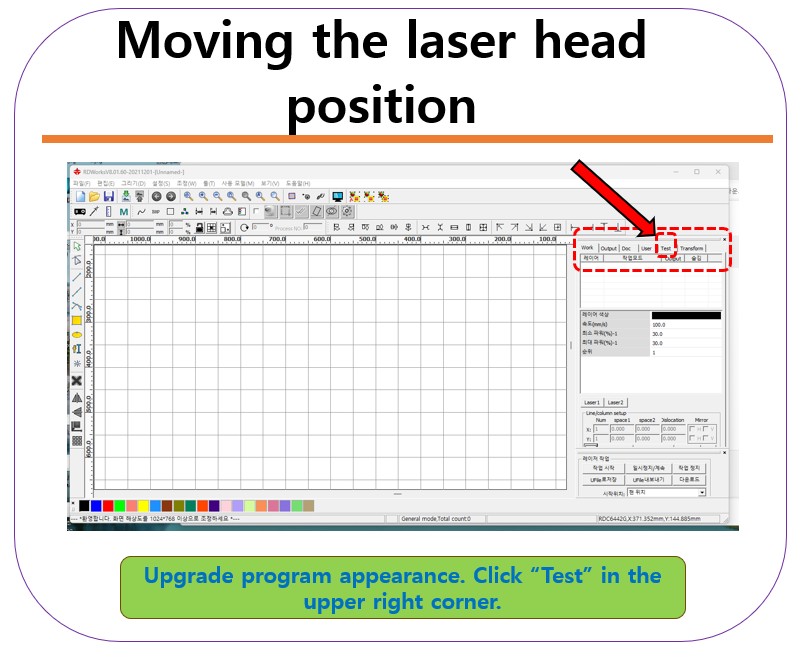
From downloading to installing the latest version of RDWORKS
Click the Test button at the top right

2. How to Use
From downloading to installing the latest version of RDWORKS
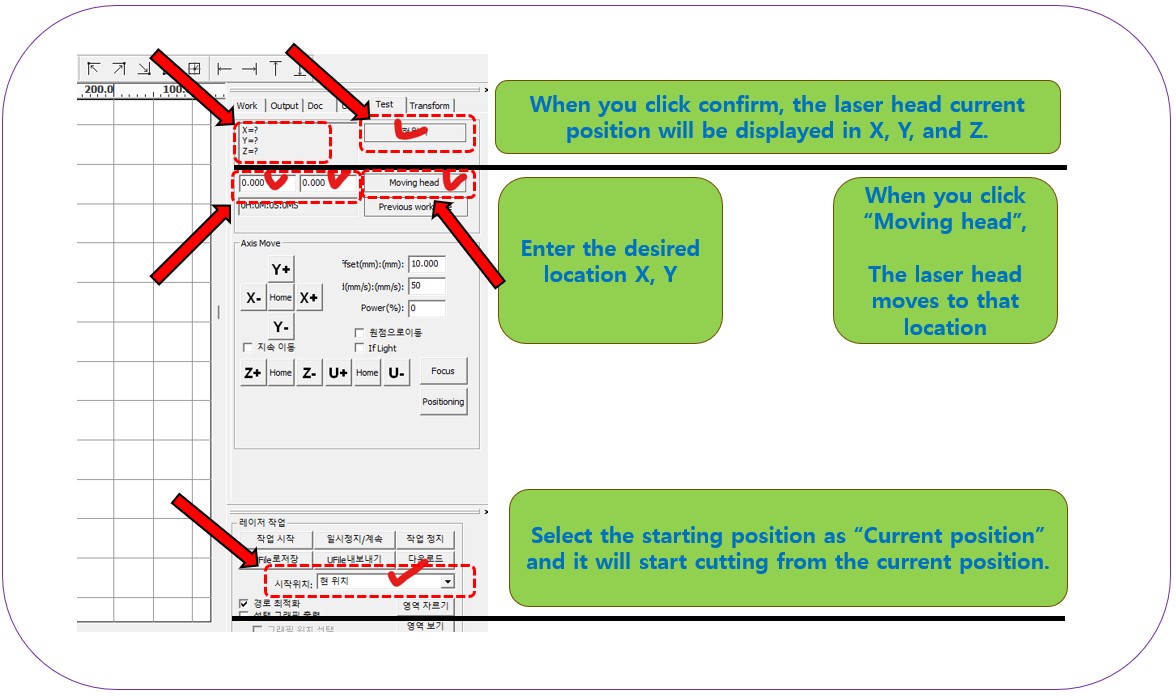
Test screen — enter values and click Moving head
  • On the Test screen, press “Confirm” and the current position will be displayed as X=?, Y=?, Z=? (excluding Z), ?. The X, Y, Z position display is a feature that was also present in the previous version.
  • Enter a value in the blank field at the bottom that shows 0.000 / 0.000 (not present in previous versions) — the first value is X, the second is Y. Press “Moving head” and the laser head will move by that amount. Use this to position the laser head where you want it.
  • Once the head is in position, select “Current position” at the bottom and press “Start work” — cutting will begin from that position.

III. ARTJET UV Printer

After selling and maintaining ARTJET UV printers for over 5 years, we have learned one vital lesson.
The most important factor next to product stability is accumulating troubleshooting data.
Problems can occur with any equipment depending on the environment, working conditions, and user skill level. What matters most in the field is not “trouble-free equipment,” but:
How fast and how accurately you can identify the cause and resolve the problem when it occurs.
ARTJET continuously collects and organizes real-world problem data from the field to support faster and more accurate troubleshooting.
🎥 View Print Quality Samples
💰 Pricing & Sales Conditions
(Note: Exterior design has been updated)
🧾 Full List of UV Printable Products
From downloading to installing the latest version of RDWORKS
* Note: Exterior design has been updated.
※ This article is based on actual field cases. Results may vary depending on the environment and equipment configuration.

UV Printer Basics · Troubleshooting · Product Guides
We have organized our UV Printer content below. Click an item to read the full post.
1) Ink Supply
23 articles on ink supply issues, including cleaning and pumping
2) Print Head Issues
12 articles on head-related problems, from replacement methods to symptoms
For deeper printhead study: Printhead Basics — 9 Articles
3) Electronics / Software Issues
4) Mechanical Issues
5) Sai Flexi RIP Installation, Spot Color, Troubleshooting
6) UV Printable Products — Full Summary

댓글 달기

이메일 주소는 공개되지 않습니다. 필수 필드는 *로 표시됩니다