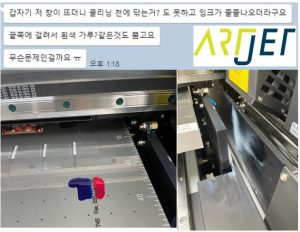
When operating a UV printer, these are common concerns:
“The cleaning wiper is not moving.”
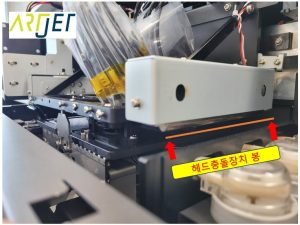
“The anti-crash sensor keeps triggering.”
An incorrect approach results in a waste of both time and money.
- Those experiencing noise from the X/Y-axis or banding in specific areas.
- Users seeing ghosting or misaligned offsets during bi-directional printing.
- Operators dealing with a stuck cleaning wiper or frequent anti-crash alerts.
- Those facing software connection issues or Capping Station malfunctions.
- Potential buyers checking electrical specifications before installation.
- Check motor leveling after belt replacement. Misalignment will cause the noise to return.
- When adjusting wiper height, manually check the gap from the printhead before operating.
- Always turn off the power before manually releasing the anti-crash bar.
- Use a dedicated outlet. Sharing power strips with other appliances can damage electronic boards due to voltage instability.
- X-axis noise is most often caused by belt wear or poor tension.
- For bi-directional quality, inspect in this order: Standoff height → Offset.
- Wiper/Capping issues usually stem from ink buildup or loose belt screws.
- Learning the manual release method for the anti-crash sensor ensures quick field response.
- Recommended electrical spec: AC 220V ± 10%, Max 1.3kW — Dedicated outlet only.
Ⅰ. Symptom-Based Diagnostic Table (Immediate Field Response) _Printer Mechanical Troubleshooting 10 Case Studies
For “Noise/Motion issues,” check Belt → Wiper → Sensor. For “Print Quality issues,” check Standoff → Offset.
| Symptom | Characteristics | Likely Cause | Quick Check | Ref. |
|---|---|---|---|---|
| X-axis Tapping Noise | Repetitive noise during motion | X-axis Pulley Belt wear/damage | Inspect belt visually and move by hand to find noise source | ① |
| Sectional Banding | Occurs only in specific areas | Vibration from media replacement | Check if banding matches timing of media handling | ② |
| Low Bi-di Quality | Micro-ghosting in bi-di mode | Standoff height or Offset error | Verify Standoff height first, then adjust Offset | ③ |
| Bi-di Offset Error | Left/Right print misalignment | Incorrect Offset settings | Run software Offset recalibration | ④ |
| Anti-crash Triggered | Sensor error during cleaning | Excessive Wiper height | Check gap between wiper and printhead base | ⑤ |
| Wiper Not Moving | No motion during cleaning command | Loose belt screws or ink buildup | Inspect belt plate screws → Clean ink contamination | ⑥ |
| No Software Connection | Stalls during initialization | Capping plate displacement | Verify capping station position and plate status | ⑦ |
| Anti-crash Bar Jam | Sensor stuck in ‘on’ position | Physical jamming of the bar | Power off and perform manual release | ⑧ |
| Bar Jammed on Captop | Bar stuck at capping station | Capping station alignment issue | Manually lower capping station to release jam | ⑨ |
| Electrical Specs | Uncertainty before installation | Need for power/wiring prep | AC 220V ± 10%, Max 1.3kW, Dedicated outlet | ⑩ |
Ⅱ. Problem Categorization (Understanding Structure) _Printer Mechanical Troubleshooting 10 Case Studies
| Category | Key Causes & Elements | Main Symptoms | Notes | Ref. |
|---|---|---|---|---|
| A. Belt / Drive System | X-axis Belt wear, Tension issues | X-axis noise, Sectional banding | Common in high-volume machines | ① ② |
| B. Bi-directional Setup | Standoff height, Offset calibration | Blurry images, Ghosting | Check height before software settings | ③ ④ |
| C. Wiper / Cleaning System | Wiper gap, Belt screws, Ink buildup | Anti-crash error, Wiper stall | Preventable with regular cleaning | ⑤ ⑥ |
| D. Capping Station | Plate position, Manual lowering | Connection fail, Bar jam | Manual control knowledge is essential | ⑦ ⑧ ⑨ |
| E. Electrical Setup | Voltage, Current, Dedicated wiring | Board damage, unstable operation | AC 220V, 1.3kW recommended | ⑩ |
Ⅲ. 10 Detailed Mechanical Guides _UV Printer Mechanical Troubleshooting 10 Case Studies
Resolution manuals based on actual field experience.
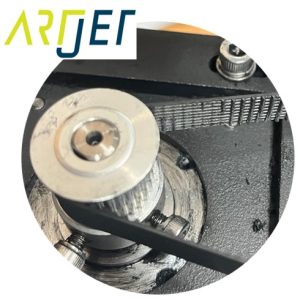
Symptom: Regular friction or clicking sounds during movement
Caused by belt gear wear. Leveling the motor after replacement is the key to preventing recurrence.
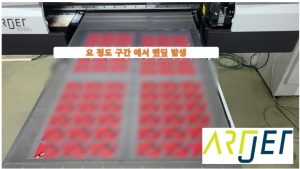
Symptom: Lines appear only at specific intervals
Micro-vibrations from handling media during printing are the cause. Workflow optimization is required.
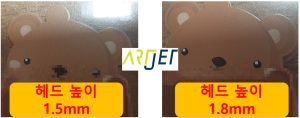
Symptom: Ghosting or blurred images during bi-di passes
Fix the physical Standoff height before adjusting software Offset for accurate alignment.

Symptom: Misalignment between left and right ink passes
Sync ink drop positions by recalibrating software parameters within the control program.
Symptom: Sensor error occurs when the wiper moves
If the wiper is too high, it touches the printhead base. Re-gap adjustment is required.
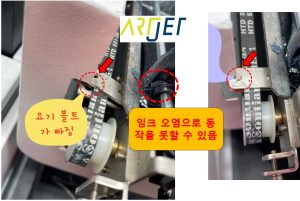
Symptom: Wiper remains stationary during cleaning commands
Check for loose belt screws or physical blockage from dried ink. Cleaning is necessary.

Symptom: Software error or stall during initialization
If the capping station plate is displaced, the sensor fails to home correctly, causing connection issues.
Symptom: Sensor remains ‘triggered’ even without impact
In case of physical jamming, turn off power and manually release the anti-crash bar.
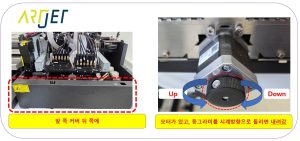
Symptom: Bar stuck at capping station during haming
When the bar gets stuck on the captop, manual lowering is necessary to free the carriage safely.
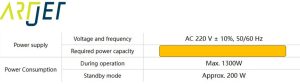
Symptom: Unstable operation or board damage
Ensure AC 220V ± 10%, Max 1.3kW with a dedicated outlet to prevent voltage instability.
Ⅳ. ARTJET UV Printer Support
 (Note: Exterior design has been updated)
핑백: Do Not Print on Masks — UV Printer Products (Part 5) ARTJET 2026
핑백: Is Printing with a Rotary Bottle Jig Profitable — Making Products with a UV Printer (Part 12) ARTJET 2026
핑백: How UV DTF Stickers Adhere After Printing — Making Products with a UV Printer (Part 21) ARTJET 2026
핑백: Materials UV DTF Film Does Not Adhere Well To — Making Products with a UV Printer (Part 22) ARTJET 2026