- Those looking to apply UV DTF Film to various materials
- Those wanting to understand the adhesion principle of UV DTF Film and the limitations of the adhesive method
- Those wanting to identify which materials adhere well and which do not before production
- UV DTF Film does not adhere well to surfaces that are not smooth (unpainted wood, rubber rollers, bumpy surfaces) — the adhesive cannot make full contact with porous surfaces
- Even on painted surfaces, adhesion varies greatly depending on the paint type — some smooth painted surfaces still do not adhere well, so pre-testing is essential
- UV DTF Film does not work by UV ink penetrating directly into the material — it adheres through the adhesive on Film A, so the surface condition of the material determines the result
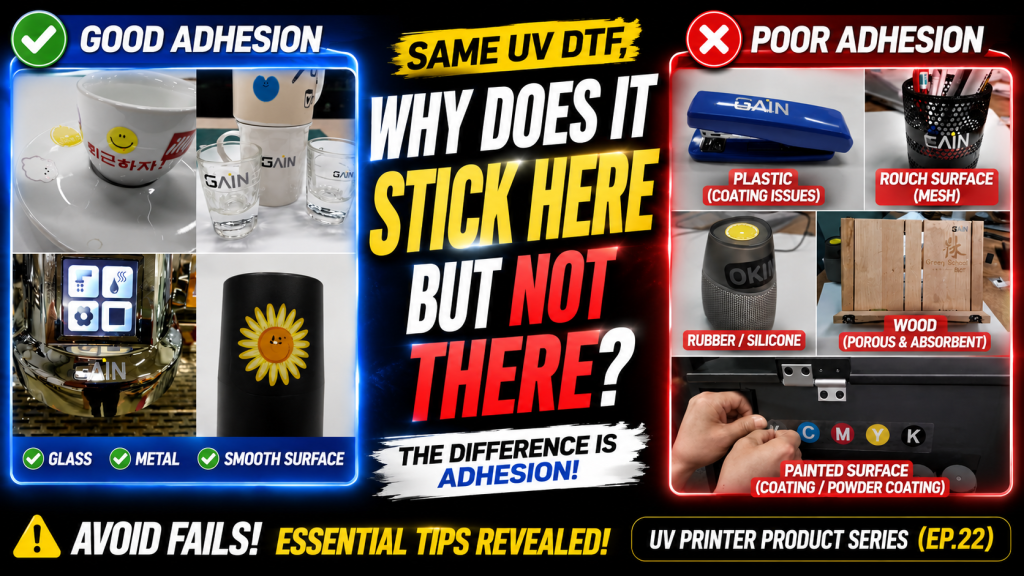
- Good Adhesion Materials → Steel plates, glass, unpainted plastic, and other smooth non-porous surfaces
- Poor Adhesion Materials → Unpainted wood, rubber rollers, painted steel (rough surface), pencil holders, speakers, and other bumpy or porous surfaces
- Judgment Criteria → Whether the surface is smooth (non-porous) determines adhesion; painted surfaces vary greatly by paint type, so pre-testing is essential
Today, we will apply UV DTF Film to various objects and explain which materials it adheres to and which it does not.
I. How UV DTF Film Adheres to Objects — Materials UV DTF Film Does Not Adhere Well To
1. How It Adheres to Objects
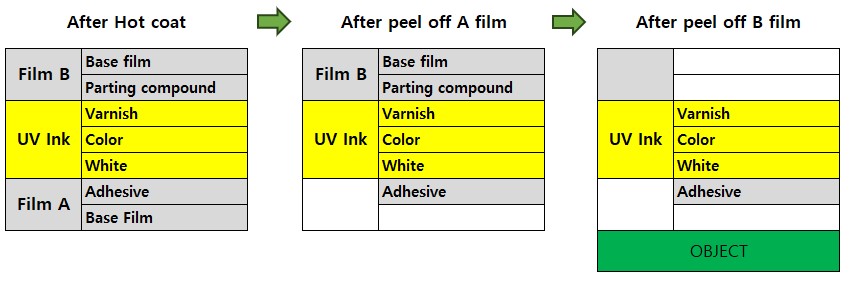
- After UV printing on Film A and heat-laminating Film B, as shown on the far left of the diagram above,
- White, Color, and Varnish ink are layered on top of the adhesive on Film A’s base film, and Film B’s release agent and base film cover the top.
- When Film A and Film B are separated by hand, as shown in the second diagram above, the adhesive remains attached to the White ink while only Film A’s base film peels away.
- When the separated film is applied to an object and Film B is peeled off, the release agent and Film B’s base film separate,
- leaving only the adhesive, White, Color, and Varnish on the object.
2. Why UV DTF Film Adheres Well to Objects and Does Not Peel Off Easily
First, the reason UV ink itself adheres to materials is that the UV ink slightly penetrates the surface of the object as soon as it lands and cures, creating adhesion with the object.
However, UV DTF Film
- works on the principle of adhering to objects through the adhesive on Film A.
- The adhesive bonds well to smooth surfaces that are not porous, such as glass and steel plates.
- On surfaces that are not smooth, such as wood, or on bumpy surfaces, the adhesive does not bond well because the surface is porous.
Keeping this in mind, you can roughly predict the adhesion level before applying UV DTF Film to an object.
II. Real-World UV DTF Film Application and Adhesion — Materials UV DTF Film Does Not Adhere Well To
1. Materials with Good UV DTF Film Adhesion
Steel Plates, Glass
The surface is smooth, so adhesion is good, and when peeling off Film B, the surrounding adhesive also comes off relatively cleanly.

Plastic
On unpainted plastic, adhesion is good, and when peeling off Film B, the surrounding adhesive also comes off relatively cleanly.

Painted Surfaces
For the objects shown below, adhesion is good, and when peeling off Film B, the surrounding adhesive also comes off relatively cleanly.
However, since the film adheres to a painted surface, adhesion may vary depending on the type of paint.

As shown below, even similar electronics can have significant differences in workability depending on the paint and surface roughness.
The PC on the right was easy to work with when both applying and peeling the DTF Film, while the laptop on the left was not easy.

2. Materials with Poor Adhesion
Materials with poor adhesion are as follows.
- Unpainted wood — surface is not smooth
- Rubber rollers — surface is not smooth
- Painted steel plates — surface is not smooth
- Pencil holders, speakers — surface is not smooth

One notable exception: in the case of the stapler, the painted surface was smooth but adhesion was still poor.
It appears that adhesion varies depending on the type of paint.
3. Video
This is a 7-minute video, and the first minute covers whether working with 18 different materials is easy or difficult.
From the 1-minute mark onward, it shows the UV DTF production process as follows.
- UV DTF materials and overview of the entire process
- Placing the print material on the printer, explaining print settings, and actual printing
- Overlaying Film B on the printed surface without bubbles (we succeeded about half the time), then transferring with the heat laminator → This process is simple when using a roll laminator.
- Cutting the image to apply (we purchased one budget cutter, and it was very convenient), then actual application (we tried it on a mouse)
- Phone, glass cup (tested by taking it out of the fridge and testing with water)
- Application on an oily, slightly rough-painted steel plate
One additional note:
At the time, a sheet heat laminator was used, and since sheet heat laminators cannot avoid bubble defects, a roll-type heat laminator should be used.
Using a roll laminator simplifies the UV DTF production process.
The video can be viewed by clicking the URL below.
UV DTF Application Test
III. ARTJET UV Printer
