Creating Jigs for Pen Printing — Making Products with a UV Printer (Part 14)
✅ Who Should Read This
- Those who need to mass-produce UV printing on small cylindrical items like ballpoint pens
- Those who want to improve UV printing efficiency by creating their own Jigs with a laser cutter
- Those experiencing nozzle issues due to UV light reflection when using transparent acrylic Jigs
⚠️ Precautions
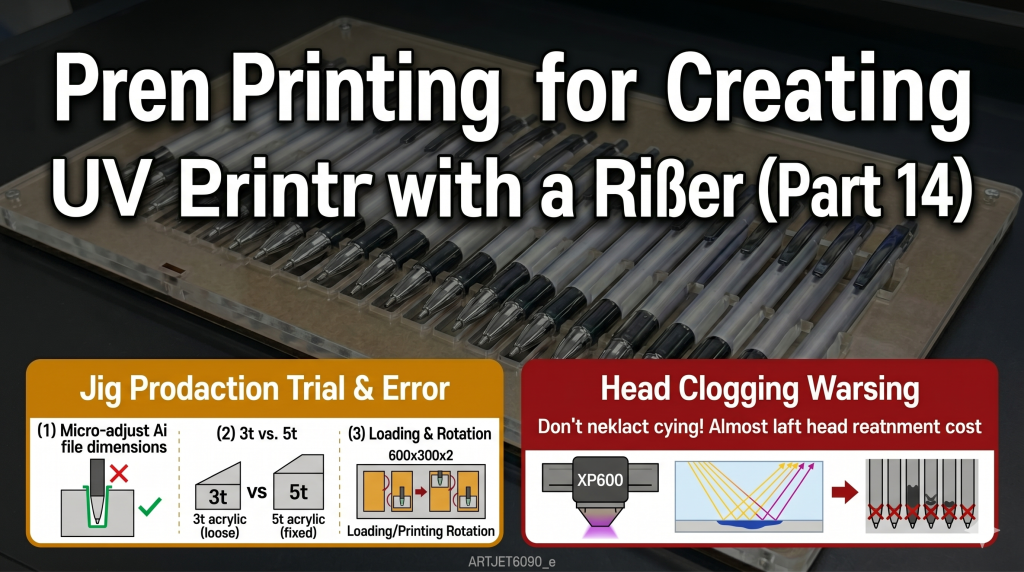
- Do not create the entire layout from the start; finalize the exact dimensions based on a single-unit test before full-scale production
- 3mm (3t) acrylic lacks sufficient holding power — use 5mm (5t) acrylic to ensure the substrate is securely fixed
- Transparent acrylic Jigs cause severe UV LED light reflection, which can cure ink in unused nozzles, leading to clogs or deflected spraying — perform cleaning every 1-2 hours
- Jobs that only print text use only a portion of the nozzles, making the unused nozzles even more vulnerable to light reflection
🧭 Key Summary (Field Insight)
- Finalizing Dimensions → Test a single unit first; if too small, pens won’t fit; if too large, they will be loose and misaligned
- Jig Material → Use 5mm (5t) acrylic; if possible, use black acrylic to block light reflection
- Jig Size → Create two 600×300mm plates instead of one 600×900mm plate to eliminate downtime by loading the second plate while the first is printing
- Light Reflection Countermeasure → When using transparent or reflective Jigs, cleaning every 1-2 hours is mandatory; neglect can lead to full color-head replacement
UV Printer Basics · Troubleshooting · Product Guides
We have organized our UV Printer content below. Click an item to read the full post.
1) Ink Supply
We have organized 23 articles on ink supply issues, including cleaning/pumping
2) Print Head Issues
We have organized 12 articles on print head related issues, from replacement methods to problems
For a deeper understanding of print heads: Printhead Basics — 9 Articles
3) Electronics / Software Issues
4) Mechanical Issues
5) Sai Flexi RIP Installation, Spot color, Troubleshooting
📋 Creating Products with a UV Printer — Full Series List
We are documenting printing methods for various products. This list is updated with each new part.
14Creating Jigs for Pen Printing
We are introducing products that can be made with a UV Printer.
Today, we will explain the process of creating a Jig with a laser cutter for pen printing and the printing method.
Today, we will explain the process of creating a Jig with a laser cutter for pen printing and the printing method.
I. Making a Jig for Pen Printing — Creating Jigs for Pen Printing
1. Why a Jig is Necessary
- Usually, ballpoint pen printing involves large quantities.
- An acquaintance requested an order of 5,000 units.
- Due to the high volume, a Jig was necessary to save time on loading materials.
- Additionally, since the printing surface wouldn’t stay aligned on its own, a Jig was needed to stabilize the pens.
2. Trial and Error in Jig Production
- I initially designed the Jig in Illustrator (Ai), but the pen slots were too small, so the pens didn’t fit properly.
- After increasing the dimensions, they were too loose, causing the pens to shift.
- After several adjustments, I achieved a size that allowed for easy loading and perfect positioning.
- I also switched from 3mm (3t) acrylic to 5mm (5t) acrylic to ensure the pens remained securely fixed.
2_1. Jig Production Workflow
- Do not create the entire layout from the start; finalize the exact dimensions based on a single test unit.
- Once the size is confirmed, produce the Jig using 5mm (5t) acrylic instead of 3mm.
- Create two 600 x 300 Jigs instead of one 600 x 900 (reasoning explained later).
-
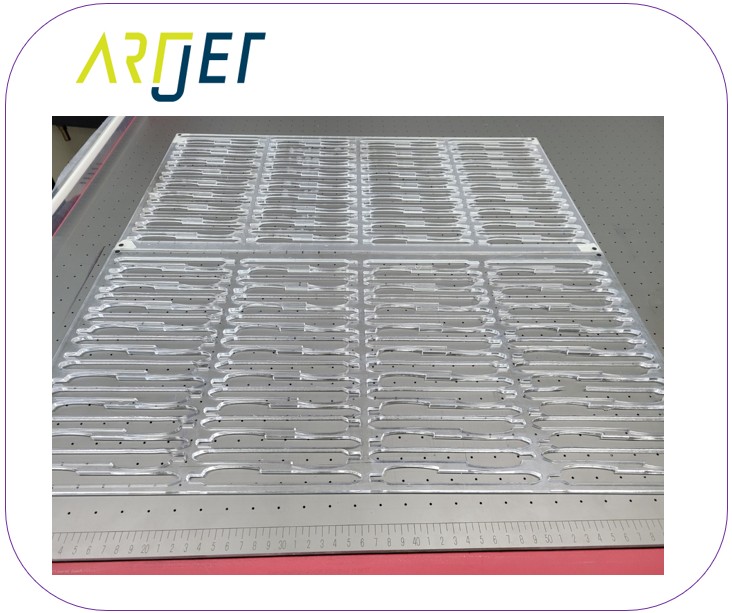
Creating Jigs for Pen Printing
2_2. Verifying Laser Cutter Squareness
- When I first printed after making the Jig, the alignment was off, so I had to tilt the Jig slightly to match the print position.
- At the time, I was new to laser cutting and didn’t know about calibrating for a perfect square.
- If the diagonal lengths of a cut square aren’t equal, your printing alignment will fail.
- Before making the Jig, cut a test square and adjust the Y-axis pulley until the diagonals match perfectly.
-

Verifying Squareness
II. UV Printing Using Dual Jigs — Creating Jigs for Pen Printing
1. Optimizing Loading Time and Printing Method
- To optimize efficiency, I used two 600×300 Jigs instead of one 600×900 Jig.
- The first was set at the Y-axis origin, and the second at the 600mm mark, secured with double-sided tape.
- As the first Jig started printing, I loaded pens onto the second.
- When the first finished and the second started, the front became clear for reloading.
- By loading pens before the previous batch finished, I eliminated idle time and maximized productivity.
-

Dual Jig Workflow
2. A Critical Mistake
- I printed White, Color, and Varnish simultaneously, running the printer nonstop all day.
- A colleague warned me: “Transparent acrylic causes high UV reflection… you should use black acrylic.”
- “Pen printing requires higher head height, which increases the reflection onto unused nozzles.”
2_1. Printing All Day Without Cleaning
- The next day, I found a clogged nozzle and several deflected nozzles on the color head.
- Because only small text was printed, only a few nozzles fired ink. The unused nozzles were repeatedly exposed to reflected UV light, curing the ink at the tips.
- White and Varnish heads were fine because they used all nozzles. If I had only printed Color, the others might have clogged too.
2_2. Why the Color Head Deteriorated
- Ink was not fired from the entire nozzle plate due to the small print area.
- The high head position and transparent material amplified UV reflection onto the nozzle plate.
- This continuous reflection cured ink around the nozzles, causing clogs and deflection.
Failure to clean frequently when printing on reflective or high-positioned substrates led to this issue.
When using acrylic Jigs, cleaning must be performed every 1-2 hours.
Ultimately, the color head could not be recovered and had to be replaced.
III. ARTJET UV Printer
After 5 years of selling and maintaining ARTJET UV printers, we’ve learned one vital lesson.
Beyond product stability, the most important factor is accumulated troubleshooting data.
Every machine can face issues depending on the environment and user skill. In production, the key isn’t a “perfect” machine, but:
How fast and how accurately you can identify and solve the problem when it occurs.
ARTJET continuously collects field data to support faster and more precise troubleshooting for our clients.
🎥 View Print Quality Samples
🧾 Complete UV Printable Product List

* Note: Exterior design has been updated.
※ This article is based on field experience. Results may vary by environment and equipment setup.