
- Anyone seeing stripe-like banding along the Y-axis during bidirectional printing
- Anyone whose unidirectional prints look fine but bidirectional prints have problems
- Anyone who set the bidirectional Offset once and has never recalibrated it since
- Anyone who changed substrates or Standoff height without recalibrating the bidirectional Offset
- Anyone who wants to learn the bidirectional Offset calibration and fine-tuning process from scratch
- The bidirectional Offset value is only valid for the Standoff at the time of calibration. If substrate thickness or head height changes, recalibration is required.
- A severely misaligned bidirectional Offset produces Y-axis stripe banding — which is easily mistaken for a Y-axis mechanical issue. Always test with unidirectional printing first to narrow down the cause.
- When adjusting the Offset value, do not jump to large changes at once. Move in steps of 2 and compare print quality at each step.
- Bidirectional printing is more sensitive to flatbed flatness and Standoff variation than unidirectional. Quality may deteriorate in zones where variation exceeds 0.1mm.
- Banding in bidirectional mode → Test with unidirectional first. If unidirectional is clean, the cause is the bidirectional Offset.
- A severely misaligned Offset looks like Y-axis banding — but the real cause is X-axis Offset misalignment.
- To adjust: print at ±2 steps from the current value, find the best result, then fine-tune in 0.5 increments.
- Whenever substrate or Standoff changes, always recalibrate the bidirectional Offset. Using the old value will always cause problems.
Symptoms of a misaligned bidirectional Offset — Offset calibration method
I. Symptom — Signs of a Misaligned Bidirectional Offset
This was an experienced customer who had been using a large-format UV printer for a long time. We assumed the basic settings would be in order.
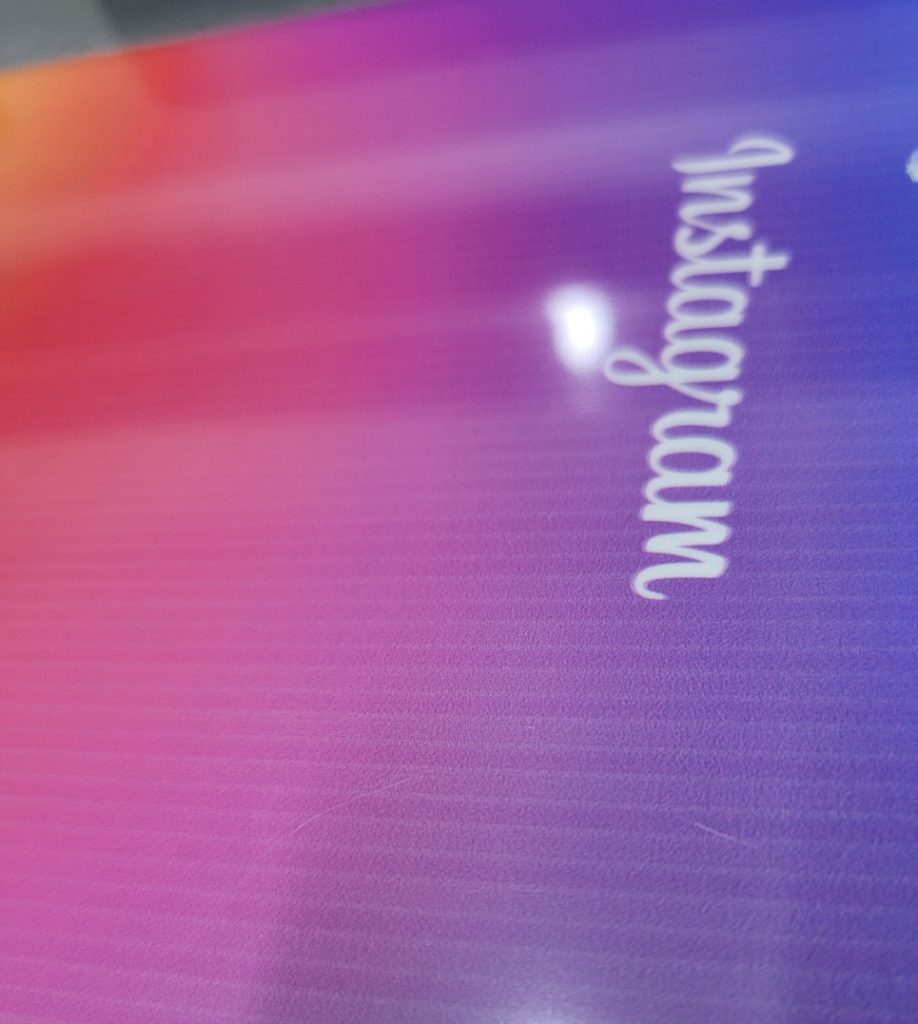
Even when the problem photos arrived, we initially looked for other causes — assuming the fundamentals were fine.
Looking at the photo alone, it was difficult to pinpoint the exact cause.
- Could a specific Color channel be dropping out?
- Could missing White nozzles be causing White banding with Color printing on top?
- Could Y-axis mechanical movement variation be the cause?
We asked about the print conditions and were told the following.
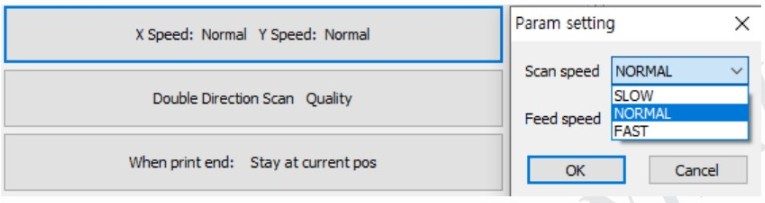
- Head carriage X-axis speed: Normal
- Flatbed Y-axis feed speed: Normal
- Print direction: Bidirectional (Double direction scan)
- G-mask mode: Quality mode — 3rd level G-mask used as default (out of 4 levels) to reduce banding
- Front-side printing: White printed first, then Color printed on top
II. Resolution — Symptoms of a Misaligned Bidirectional Offset
1. Comparing Bidirectional and Unidirectional Printing
Test 1. Is ink dropping out during printing?
- Unidirectional printing is slower than bidirectional, so ink is fired with more time between passes — making ink ejection more stable.
- To check whether a Color channel was dropping out and causing the stripes, we asked the customer to run a unidirectional print test.
A short while later, they called back. “Unidirectional printing looks completely fine.”
Test 2. Missing White nozzles?
- If ink ejection was stable in unidirectional mode, switching to bidirectional would not suddenly cause excessive White nozzle dropout.
- Both tests were run at Quality mode (G-mask level 3), so White dropout was not likely the cause.
Test 3. Y-axis mechanical movement variation?
- Y-axis movement was accurate in unidirectional mode, and switching to bidirectional does not change Y-axis behavior.
- Y-axis mechanical issues were also ruled out.
2. Root Cause
Unidirectional fine, bidirectional broken — the only difference is the bidirectional Offset
If unidirectional prints correctly and only bidirectional has a problem, the only variable between the two is the bidirectional Offset value.
“If unidirectional is fine and only bidirectional has the issue, the bidirectional Offset may be misaligned. What is your current bidirectional Offset value?”
“Ours is set to 15. But that value should be correct… I adjusted it myself after consulting with the team leader when the text wasn’t coming out sharp. At the time, the substrate had poor flatness, so we needed a higher Standoff, and I set the Offset to match that height.”
“But the banding appears as vertical stripes along the Y-axis — I’m not sure how changing an X-axis setting would fix that. Are you sure you have the X and Y axes right? Let me send the photo again.”
“I’ve looked at the photo carefully and I understand your point — but please try adjusting the bidirectional Offset as I described.”
“Alright, I’ll try.”
“Your current value is 15 — just to see what happens, change it to 10 and run a print.”
A short while later, they called back.
“It looks great now. How is that possible?”
Why this happened
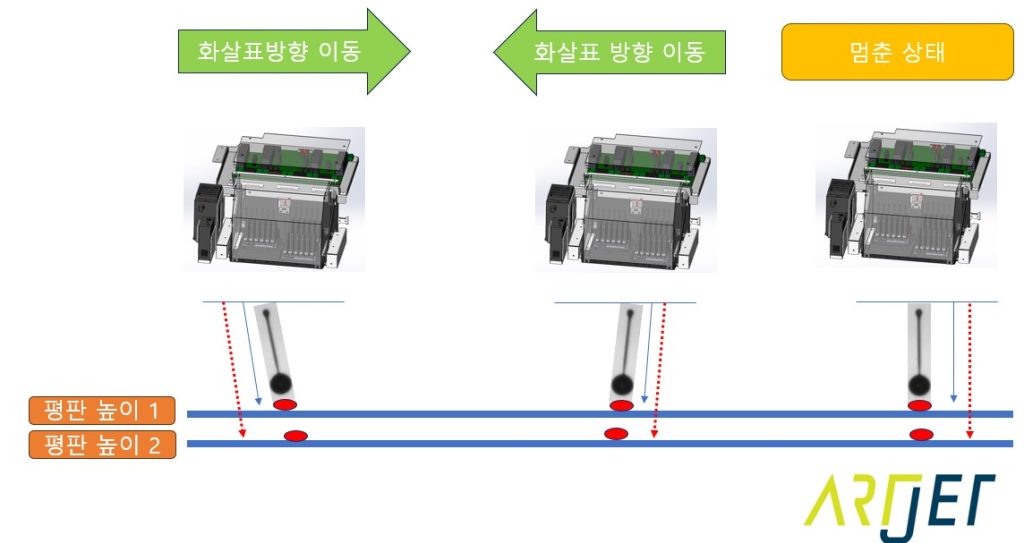
- When the bidirectional Offset is severely misaligned, the data printed left-to-right and the data printed right-to-left land at very different positions.
- When they land at completely different positions on every Y-axis pass, banding appears on every pass —
- and this is easily mistaken for a Y-axis mechanical problem rather than an X-axis Offset issue.
3. How to Calibrate the Bidirectional Offset
1. How bidirectional Offset calibration works
- The bidirectional Offset value must be recalibrated whenever either of two variables changes.
- The first is X-axis carriage speed. An Offset calibrated at Normal speed cannot be applied at Fast speed — the ink landing point shifts with speed.
- The second is Standoff (the gap between the substrate and the head). A different head height means a different ink landing point.
- In this case, the Offset had been calibrated at a higher Standoff due to a substrate with poor flatness. When a flatter substrate was later used with a lower Standoff, the Offset no longer matched — causing the problem.
2. “Under a magnifier, the text looks slightly off — how do I adjust it?”
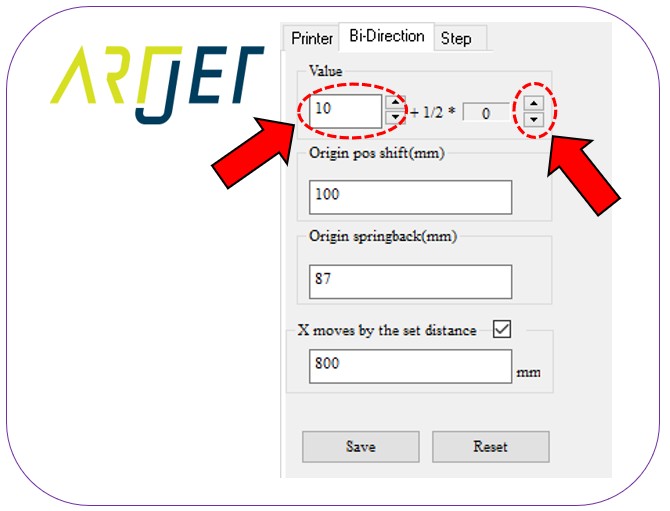
- This screen is located in the printer software at the top left, just below [Ready].
- The default setting shows [Printer]. Click [Bi-Direction] next to it to enter this screen.
- The bidirectional adjustment uses whole number values such as 10, 11, etc.
- If the current value is 10 and it’s roughly correct, print at two steps below (8, 9) and two steps above (11, 12) and compare quality.
- Find the best value among 8, 9, 10, 11, 12 —
- then if 10 is best, use the 1/2 button (0.5-step arrow) on screen for fine-tuning.
- Pressing the up arrow once changes 10 → 10.5. Pressing it again changes 10.5 → 11.
Quality limitations of bidirectional printing
- Bidirectional printing is 70–80% faster than unidirectional, but always operate with the understanding that it has inherent quality limitations.
- Flatbed flatness variation can cause print quality to differ from zone to zone.
- A Standoff variation of up to 0.1mm makes little difference — but beyond 0.1mm, the Offset value becomes misaligned, causing rough output or doubled text under magnification.
III. ARTJET UV Printer

핑백: Software Won't Connect — Mechanical Issues (EP.7) ARTJET 2026