- Anyone curious about what goes on behind the scenes before a UV printer is delivered
- Anyone who wants to understand UV printer mechanical and software settings at a technical level
- Anyone evaluating UV printer vendors and wants to know what proper pre-delivery QC looks like
- This article describes the ARTJET-specific setting process — other UV printers may follow a different sequence
- Flatbed flatness adjustment and offset alignment require significant skill — accuracy and time vary depending on the operator
- A customer PC must be provided in advance for software installation before delivery
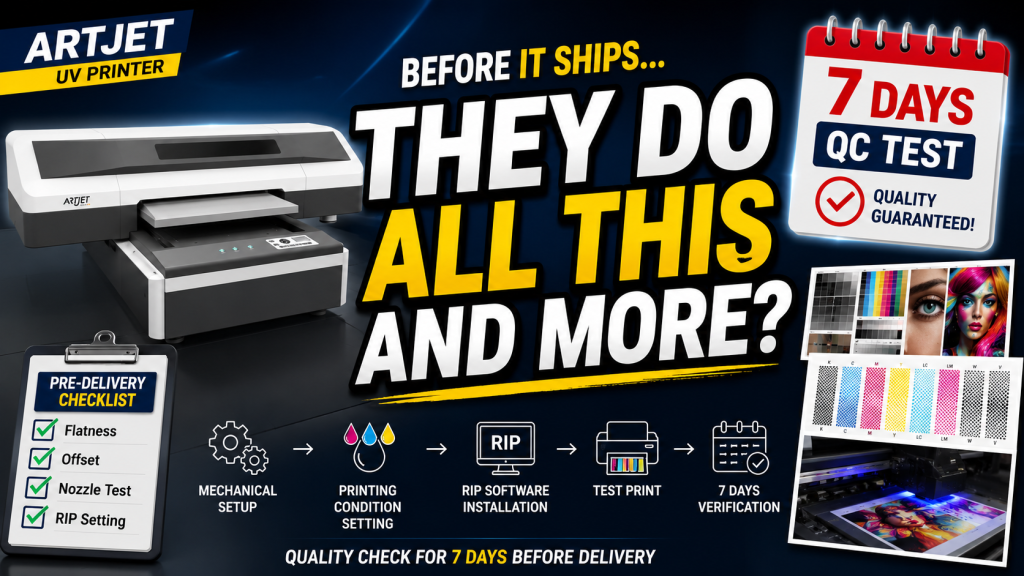
- The full setting flow is: Mechanical setup → Printing condition setup → Rip SW installation → Test print → One week of daily verification before delivery
- Flatbed flatness and Z-axis zero point must be set precisely — even laser sensors are not reliable enough on their own
- All critical files (config, ICC profile, test images) are collected in one folder for easy reinstallation if needed
I. What Do You Set Before Delivery? — ARTJET UV Printer Application 33 _ ARTJET Setting Sequence

Image files created with Photoshop and Illustrator cannot be directly printed with a UV Printer.
They must be converted to a printable file format using a program called Rip Software. Rip SW also includes a color adjustment function that must be applied for proper color expression.
You can then load the converted image file through UV Printer software and proceed with printing.
When the equipment arrives at the office, the first thing we ask the customer is:
“You can send the PC.”
In the past, a customer gave me a very old laptop and I set it up, but had a hard time because the software wouldn’t connect. Fortunately, it worked right away with another laptop.
Since then, I’ve been receiving the customer’s PC in advance and setting everything up on that PC. I install Rip Software and UV Printer software directly on the customer’s PC, and then set up the UV Printer internally through that PC.
II. UV Printer Mechanical Settings — ARTJET UV Printer Application 33 _ ARTJET Setting Sequence
Check the overall printer flatness with a leveler.
After installing ARTJET SW, raise the head carriage height and install the dial gauge. Turn off all power and scan the overall height deviation while manually moving the carriage and flatbed.
Adjustment points:
- Four adjustment sections in all directions can raise or lower the flatbed
- Two sections in the middle can only be raised
- If you adjust only one side, it affects the overall flatbed height
Through several try & error processes, adjust the flatbed to have the lowest flatness deviation possible.
⚠️ Depending on the worker’s ability, the accuracy and work time of this task will differ considerably. At my previous workplace, a colleague couldn’t get the flatness of a 2500 × 1200mm flatbed to work.
After adjusting the entire printer level and flatbed flatness, the next step is to set the Z-axis zero point. Before setting the Z-axis zero point, you must check that the bottom of the head carriage is level.
Link with ARTJET SW again, and adjust the Z-axis sensor position to match the 1.2mm standoff (the gap between the print head and the printing material).
“There is a laser sensor that detects the Z-axis height, so why do we need to set the zero point separately?”
Many people set the head carriage height by looking at the laser sensor and pressing the button. But all UV printers that use this method have laser sensors — there must be a reason to set the height manually.
III. UV Printer Printing Condition Setting — ARTJET UV Printer Application 33 _ ARTJET Setting Sequence
FA1080-a1 print head communicates with the electronic board via the DATA flat cable. The DATA flat cable connection must be secure for both the print head and the electronic board.
For this reason, we separate the printer cover, remove the print head connection electronic board, and connect the DATA flat cable to the exact location of the print head and the electronic board.
Before installing the print head, the capping station and the print head carriage X-axis zero point must be checked. When the print head is installed, the position of the captop cannot be seen, so this must be done first.
Before supplying ink to the main ink bottle, apply the previous config file of ARTJET SW to set the basic settings.
Inkload Check:
Check if the ink is properly drained into the waste ink bottle through Inkload. If the captop and print head positions are not aligned properly, ink loading may not occur properly.
⚠️ This task may take 4 hours or even a full day depending on the operator’s skills.
Print Head Cleaning and Nozzle Test:
If the ink load is good, the cleaning function will also work well in most cases.
If the cleaning function works well but the nozzle test is not good, the data cable is not properly connected to the electronic board or the print head. In some cases, you have to remove all the dampers filled with ink and check the cable condition again — which is why we connect the data cable carefully from the start.
Check if the print head is mechanically at a right angle through the test image. If there is no problem (almost all of them pass), print the ARTJET test image with the values applied from the config file.
The ARTJET test image can be used without installing Rip software because it uses an image already ripped from another Rip SW. This is to verify that the entire printing process works correctly.
If the printing is normal, set several setting values from the printing start point and proceed with the Offset operation.
IV. Rip SW Installation and File Collection — ARTJET UV Printer Application 33 _ ARTJET Setting Sequence
Rip SW requires each copy’s license to be registered on the Internet.
“Can I install Rip SW here and also on other printers?”
Of course not. To install it on another PC, you must remove the Rip license from the current PC first, then install it on the new one.
Once Rip SW is installed, the following must be configured:
- UV Printer driver settings
- ICC profile settings
- Save basic settings
After the basic settings, load the ARTJET test image, rip it, and check if it prints without any problems on the UV Printer.
Once all settings are complete, create an ARTJET folder on the PC, add the following files, and finish:
- Rip SW activate code photo
- Rip license file
- Rip ICC profile
- ARTJET SW installation file
- ARTJET UV Printer manual
- ARTJET setting value file (config file — returns to QC conditions)
- ARTJET test image file (this image contains a lot of meaning — if a problem occurs, you can roughly predict the issue by looking at the printed image)
V. One Week of Verification Before Delivery — ARTJET UV Printer Application 33 _ ARTJET Setting Sequence
This is the equipment that will be installed a week later, next Tuesday. We set it up in advance, print a test image once every morning, and check for any equipment abnormalities before delivery.
It is a fact and an objective fact that it was set up without any problems — but I felt better after confirming that there were no problems for a week and then delivering it. So we always set it up early.

VI. ARTJET UV Printer
