Head replacement video and precautions
I’m summarizing UV printer problems and solutions.
The link below is a compilation of all the problems and causes and solutions that occurred over the past 5 years, totaling 24 episodes. If you have a printer that uses the damper method, you can solve most problems by just clicking the link below.
Ink supply issue and solution summary
Now, I’m organizing the problems and symptoms related to UV Printer heads.
Before dealing with the actual problems and solutions, there are many misconceptions about heads, so I’ll explain the basic knowledge first.
If you understand only the sessions explained here, you will be able to see that you know more about inkjet heads than inkjet manufacturer salespeople or equipment distributor engineers.
Last time, I explained why the following problem occurred.
1. Banding appears on the Y axis instead of the X axis. Click here for more details.

2.”Can I clean the XP600 head, which is an Epson series head, with alcohol?”


4. “It was printing fine until yesterday, but suddenly a certain color is flying away.”

5. “Won’t the nozzle get clogged when printing on highly reflective materials such as mirrors?”


7. “It prints, but the colors are weird.”


9. “Even though I replaced the head, the same specific color doesn’t come out at all.”

10. “The printer prints, but no ink comes out.”


Today, I will tell you about the print head replacement video and precautions when replacing it.
“Do we have to replace the head ourselves?”
“It’s easier than you think. Everyone who uses ARTJET watches the video and replaces it themselves.”
I. Before replacing the print head _Head replacement video and precautions
1. Exiting the capping state _Head replacement video and precautions
In the capping state, the capping station is tightly engaged with the head.
In this state, you can loosen the screw on the head and remove the head, but when installing the head, since the captop is up, you have to tighten the bolt and push the captop in.
Because of this, you have to get out of the capping state before replacing the head.
When you press the left arrow button on the ARTJET SW,
- the capping is released,
- and the head carriage moves to the left while the capping is released.
- When it moves to the left about 20cm, press the left arrow button once more.
- It stops in that spot.
Sometimes, some people try to move the head carriage by pressing the left arrow button on the touch panel.
You have to keep pressing the left arrow button on the ARTJET touch panel to release the capping state.
For this reason, it is easier to press the left arrow button on the ARTJET SW instead of the touch panel.
2. All power OFF _Head replacement video and precautions
The print head DATA cable is connected to the head carriage board,
and this DATA cable must be separated from the head that needs to be replaced in order to remove the existing head,
and this DATA cable must be reconnected when installing a new head.
If you proceed with the work while the power is on,
- the DATA cable itself may burn and be damaged,
- and the head itself or the head carriage board may be damaged.
For your information, there was an incident where a customer proceeded with the work without turning the power off and the DATA cable was burned as shown below.
Before proceeding with the work, be sure to turn off all power and proceed according to the power off order.
- ARTJET Software Exit
- Power button, Lamp button, Suction button Off.
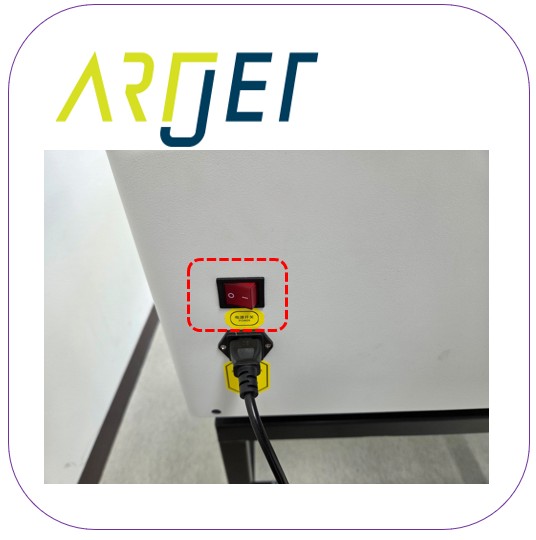
- Main switch Off.
You must turn off the main switch on the back of the printer to move the head carriage by hand.
Position the head carriage in a convenient location for working.
II. Remove the used head _Head replacement video and precautions
1. Damper separation _Head replacement video and precautions
Before separating the color damper, you must take a picture of the color order in which the damper is inserted.
If the order of the dampers is changed after replacing the head,
i.e., if Cyan is inserted into Magenta, the software sends Cyan DATA, but Magenta ink is jetted, so the color will be completely different.
When separating the damper from the head, ink may flow out from the inserted part.
- Color is connected 1:1 to the ink passage, so this does not happen often,
- but White and Varnish share the ink passage as shown in the picture below,
- so when you remove the first damper and then the second damper, ink may flow down.

If flowing ink falls on the data cable (flat cable), it can damage the DATA cable and the print head.
Place a tissue on top of the DATA cable to prevent ink from falling on the cable, and if it does, wipe it off with the tissue immediately.
In the photo below, the ink that falls on the red border can go through the cable and enter the part where the data cable and print head are connected, and it can damage not only the DATA cable but also the head itself.
If ink seeps into the connection part like this, it cannot be recovered even with alcohol cleaning.
Also, prepare two paper cups where you can place the separated damper, and put the damper separated from the head in the paper cups so that the ink does not flow to other places.

2. Disconnect the DATA cable from the head _Head replacement video and precautions
Never loosen the large bolts that you see around the head.
These bolts are the blocks that mount the head, and they are zigs that mechanically align the top, bottom, and vertical of the head.
The moment you remove these block bolts, you will have to recheck all the mechanical alignments and readjust the software offsets.
This will take a considerable amount of time.
Instead, after you detach the damper, there are four bolts at each end inside the head.
You only need to loosen these bolts and remove the head.
Sometimes ink may stick to the head and not come off easily, in which case you will need to use a 1-inch screwdriver to remove it.
You will need to reuse the bolts that you removed, so be careful not to lose them.
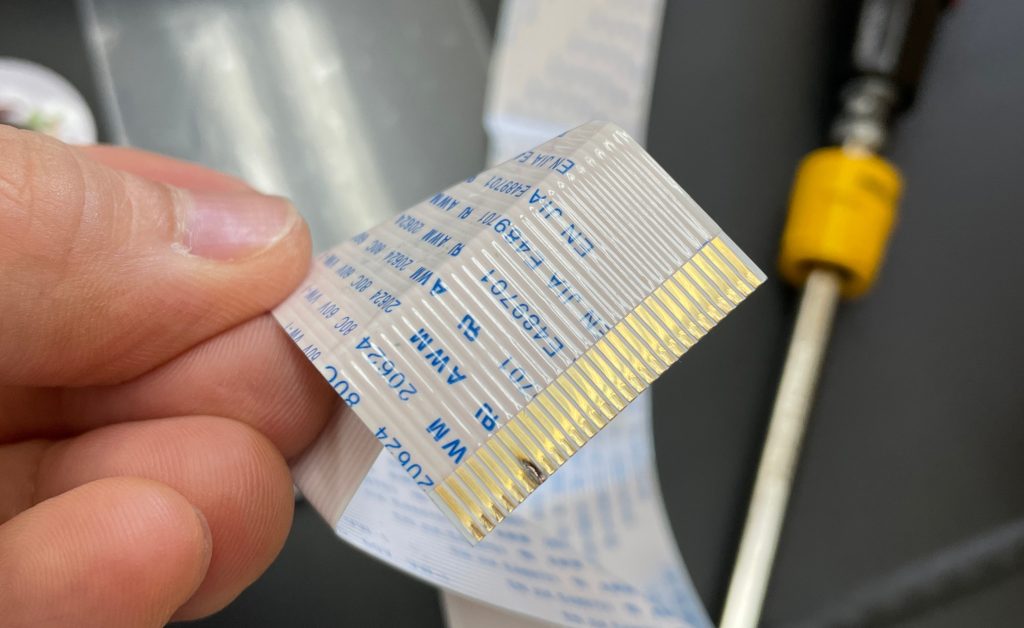
When detaching the DATA cable, support the front of the DATA cable with your fingers and make sure that the cable comes out horizontally to avoid damaging the flat cable.
When detaching, make sure to separate it with the same hand shape as in the video in each link below.
Be careful not to contaminate the detached flat cable with ink or anything else.
III. Installing the new head and what to do next _Head replacement video and precautions
1. Data Cable right left _Head replacement video and precautions
Install the DATA Cable into the new head.
The right and left sides of the DATA Cable must be inserted into the new head in the same position as the head that was removed.
If the left and right sides of the Cable are swapped, ink jetting itself will not occur.
2. Insert the bolt and tighten it. _Head replacement video and precautions
After the cable connection is complete, insert the bolt into the head and tighten the head bolt to align the position.
When aligning the position, check the exact position of the screw while looking carefully so that the head is not damaged, and tighten the bolt.
When tightening the bolt, always proceed in a diagonal direction, and do not tighten it all at once.
When tightening it appropriately, go back and forth and tighten it again.
3. Insert the damper _ Head replacement video and precautions
Before separating the head, insert the damper into the head in the order shown in the photo.
When inserting, be careful not to let ink flow into the DATA Cable.
The second damper + print head in the photo below. Sometimes, the damper is not properly inserted into the head, causing pumping and cleaning problems, so
Press the damper firmly to insert it properly into the head.

4. Power on. Move the head carriage towards the table. _Head replacement video and precautions
If the head carriage is on the X-axis side, or the left end, it may not initialize even if you turn on the ARTJET software because it has passed the X-axis limit.
Before turning on the main switch, move the head carriage about 20cm to the left (toward the flat plate) from the capping station.
Then, turn on the main power switch,
Turn on the front power button. Wait for 10 seconds after turning on the power. It takes about 10 seconds for the board to be fully powered.
If you connect the software too quickly, ink will not come out even when you print.
Then, turn on the software.
5. Ink load and head cleaning _Head replacement video and precautions
There is no ink in the replaced head,
and the ink in the damper may flow out the moment the damper is removed, so there may not be any ink in the damper.
Ink load (pumping) is used to ensure that ink flows into the damper and the head.
Ink load (pumping) is maintained for about 10 seconds after the ink flows out of the waste ink tank, and then ends.
After ink load, be sure to perform cleaning and press the Test button to check the nozzle condition.
If the nozzle falls out when printing an image,
repeat the ink load (pumping), cleaning, nozzle test, test image printing, and the same operation to establish the head condition.
You can also watch the content I’ve explained so far in video form by clicking here.
IV. This is how ARTJET supports our customers.
One thing I feel while selling and maintaining ARTJET UV Printers for 5 years is that the next most important thing after product stability is Troubleshooting DATA.
All products have problems, whether they are actual equipment problems or consumer errors, and product stability is how easily and quickly you solve those problems.
We are organizing all the troubleshooting DATA as follows.
You can see the product print quality by clicking here.

1. Complete Guide to Printhead Problems and Solutions
ARTJET UV Printer Problems and Solution _Printhead Problems Summary
Additional issue and solution
The red color does not appear at first, then appears during printing, and then does not appear again
Printhead replacement video and precautions
2. Complete Guide to Ink Supply Problems and Solutions
Previously sorted, ink supply problem summary
Updated ink supply problem summary
3. Mechanical problem and Solutions
1. How to align the print head in a straight line
2. There is a clicking noise from the X-axis
3. Banding problem in specific section
4. The Importance of Head Height in Bidirectional Printing
5. Problems that occur when the wiper height is high
6. When the cleaning belt screw is loose
7. When the capping fixing plate does not fit
8. How do I prepare the ARTJET electricity?
9.When Anti-crash becomes a jam in captop
10. Print head Anti crash system
4. Electron board and Software problem is hereunder.
1. The printer works but printing does not work
2. Resetting to default settings
3. Touch panel does not turn on
4. The printer is printing, but nothing is printed
5. Software closes when I just press the print button
6. Printing in the wrong place
7. Positioning misalignment in X-axis direction
8. How to make the Offset fine tune
9. Vertical offset is not correct only for the right section of white
10. Software turn off when click print button
5. Sai Flexi Rip software
1. How to make the Spot Color & several mistakes
2. Color is strange after applying Spot color
3. White is sticking out
4. Installation and Dongle Key Recognition Failure Measures
5. Dongle Key Recognition Failure
6. White lines appear when printing only color
7. Color Adjustment through Graph
8. Print size compensation
9. Ink Consumption Calculation
10. What is ICC profile & menu board UV Printing
11. Dongle Key recognition Failure from USB port
6. Problems and solutions from actual consumer sites
1. Paper that absorbs ink
2. A line-like thing appears at the end of the white print surface
3.Can varnish banding be reduced?
4. Are there many problems with China’s UV Printer?
7. UV Printer Application
we are explaining not only UV printer problems and solutions, but also what products are produced with UV printers.
1. Braille printing
2. Flip the material and align it
3. 2.5D UV print
4. ARTJET UV Printer Application 6 _아크릴 본딩 장비
5. I phone 14 print limitation
6. Mask printing not recommend
7. Leather Cigarette Case UV Printing
8. Round soccer strategy board UV printing
9. Primer performance & limitation
10. UV Print & Laser crop mark cutting
11. Mobil case UV print profit
12. Screen vs Digital Comparison and UV Printing on Hand Sanitizer Cases
13. Bottle zig & print
14. Canvas UV Printing
15. Applying epoxy effect with varnish
16. Making a light frame with UV Printer & Laser cutter
17. UV Printer & Laser Cutting Equipment Button Name Tag Making
18. UV Printer & Laser Cutting Making a Cell Phone GripTok
19. Making an Acrylic Keychain with UV Printer & Laser Cutter
20. UV Print with Zig
21. How to make RD WORKS CCD camera cutting Video manual
22. Acrylic bonding equipment
23. All the steps to create UVDTF
24. UVDTF TEST Result on various material
25. ARTJET CW+C Print time & Ink Cost
26. Create a white shield with different images on the front and back of the keyring
27. Keyring Business Required Equipment and Investment Costs
29. Acrylic Lighting Goods
30. Ballpoint pen jig printing
31. Staining occurs when printing on coated leather
8. Bonus
1. ARTJET UV Printer Old Model Refurbished
2. UV Printer Laser Cutter Bonding Machine Which equipment should I buy first?
3. Considerations when choosing a UV printer
4. DTF Printer Price and Specification Survey
5. Acrylic Bonding Equipment Don’t Put It Off Anymore
6. China inkjet level now
7. Thoughts on KOSIGN 2024
8. ARTJET Delivery Preparation
9. ARTJET Setting Sequence
10. UV Printer History and Future Prediction 1
11. UV Printer History and Future Prediction 2
12. UV Printer History and Future Prediction 3
13. UV Printer History and Future Prediction 4
14. UV Printer History and Future Prediction 5
15. Are there many problems with China’s UV Printer?
16. UV Printer Small Text Meaning
17. Is the XP600 head okay
18. Roland UV Printer Summary
19. Mimaki UV Printer Summary
20. UV Printer Alibaba Direct Purchase Considerations
21. Things to consider when buying a used UV Printer
22. Bi Uni Print Quality Differences
23. RDworks download install and laser head position by SW
That’s it for today.