Inkjet printing resolution
Up until last time, we have summarized 24 UV printer ink supply problems and solutions.
This is a summary of all the issues that have occurred over the past 5 years. If you have a printer that uses the damper method, you can solve most problems by just looking at the link below.
Ink supply issue and solution summary
Now, I’m organizing the problems and symptoms related to the UV Printer head.
Before dealing with the actual problems and solutions, there are too many misconceptions about the head, so I’ll explain the basics first.
1.Does the head have a lifespan? Is a head warranty available?
2. “In what cases does the head free warranty apply?’
Today I’m going to explain the exact concept of print resolution.
I. Print resolution concept _Inkjet printing resolution
1. What is print resolution? _Inkjet printing resolution
The number of ink drops (dots) that fall within 1 inch
- 1 inch is approximately 25.4 mm in terms of the familiar mm.
- How many dots fall within 25.4 mm? Depending on this, it becomes the dpi.
- If it is 720 dpi, 720 ink drops fall within 25.4 mm.
- 720 DPI is an abbreviation for 720 Dots Per 1 inch.
When we talk about print resolution, there are always two numbers.
- One is horizontal, the other is vertical.
- If it is 720 x 720 dpi, 720 ink drops fall per inch along the X-axis of the print direction,
- and 720 ink drops fall per inch along the Y-axis feeding direction.
- In a 25.4 x 25.4mm square box, 518,400 (720 x 720) drops fall to create an image.
2. “How many picos is this head?” _Inkjet printing resolution
Pico is a unit called pico, and to explain it a little more,
1m(meter) mm(millimeter), um(micrometer), nm(nanometer), pm(picometer).
Here, ‘pico’ is 10 to the -12th power.
That is, it refers to a very small unit.
And. In the answer “This head is 3 pico”
- Many people misunderstand the size of the ink droplet,
- It’s not the size, the L of liter is omitted, and it means 3 pico liter.
- In other words, it’s not the size, it’s the ink volume.
“This head is 3 pico” is the same as “This head sprays 3 picoliters of ink.”
3. Relationship between pico liter and print resolution _Inkjet printing resolution
I just explained the concept of DPI and the concept of pico.
DPI is 25.4 mm, which is a distance unit, and pl is pico liter, which is an ink volume unit, which is a volume unit.
One is distance, and the other is volume. You cannot define printing resolution with different units.
Since resolution is the number of ink drops that fall within 25.4 mm, you can only know how many drops fall on the material without any empty space by dropping ink on the printing material.
- Since there is information organized on Konica print heads, I will explain based on the Konica head.
- The head spec is 14 pico liter.
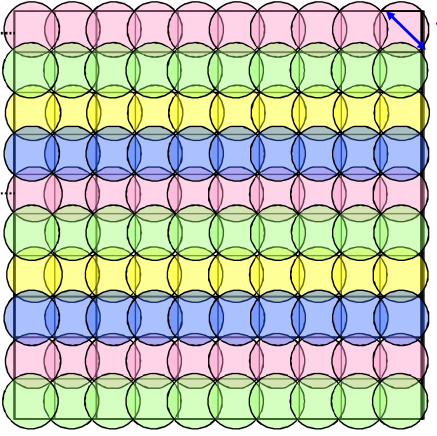
- When 14 pico liters of ink volume falls on the material, the dropped ink drops spread on the material, and you can measure the diameter of the spread ink drops.
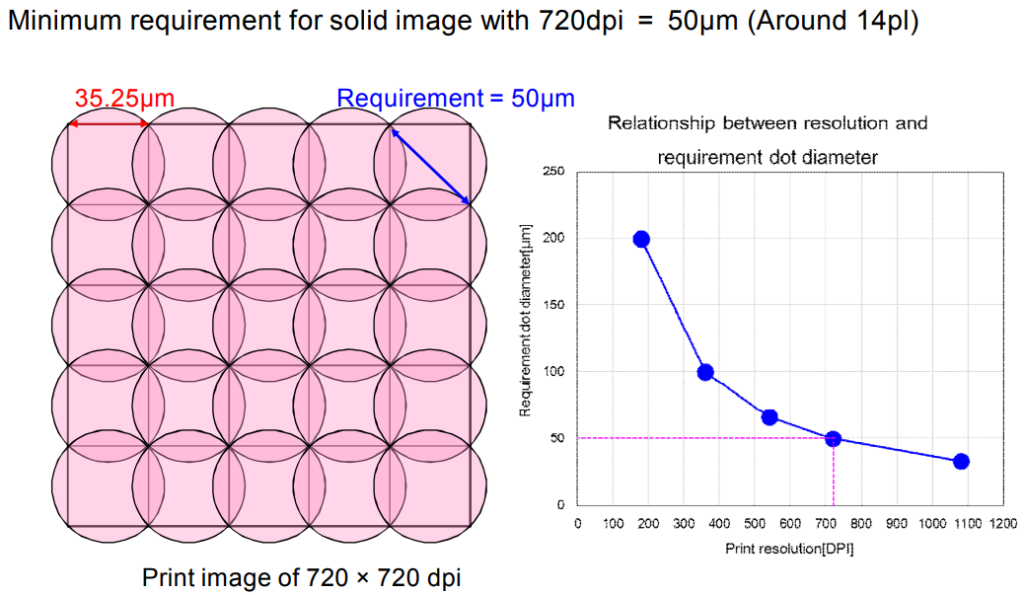
- The diameter of the spread ink drops is 50 um (micrometer) in the figure below.
However, the diameter for calculating DPI cannot be 50um.
- If 50um is used, blank spaces will occur in the printing material, and the color will not be expressed properly.
- As shown in the figure below, the ink diameter expressed without blank spaces is 35.25um.
- 25.4mm is 25400um, and 25400um ÷ 35.25um = 720.5 dpi.
Inkjet printing resolution
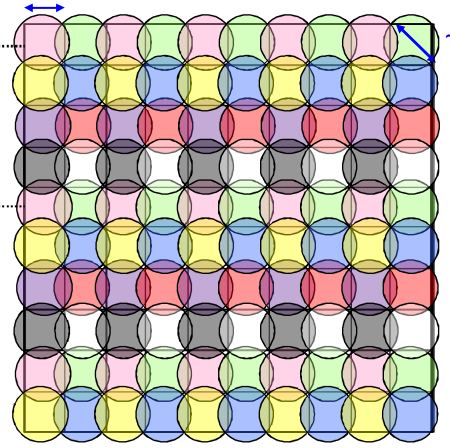
Let me explain the graph on the right briefly.
The Y-axis represents the ink droplet size, and the X-axis represents dpi.
When the ink droplet size is 50um, the X-axis becomes 720 dpi. This is a 14 pico liter head.
When the ink droplet size is 100um, the X-axis becomes 360 dpi. This is a 42 pico liter head.
When the ink droplet size is 40um, the X-axis becomes 1080 dpi. 6 pico liter, this is the head that is mostly used these days.
4. “It’s the same head, but they say it’s 2400 dpi??”_Inkjet printing resolution
“Wouldn’t it be better to drop more ink drops to increase the printing resolution?”
If you drop 2440 large ink drops to make 2440 dpi, the large ink drops will not fall between the drops,
but will fall overlapping the places where the ink fell, and the color will only become darker or blacker, and the resolution will not increase and the image will not become more refined.
As you can see in the picture above, the ink drop diameter is 50um, and if you subtract the overlapping area, the diameter is 35.25um, and the maximum DPI that can be implemented is 720dpi.
The diameter excluding the overlapping area must be about 17.63um to implement the proper printing resolution of 1440 dpi, and the ink drop size at this time is approximately 6 pl. For 2400 dpi, the diameter of the fallen ink droplets should be 9 um excluding the overlapping area, and the ink droplets should be smaller than approximately 1 pl to be feasible.
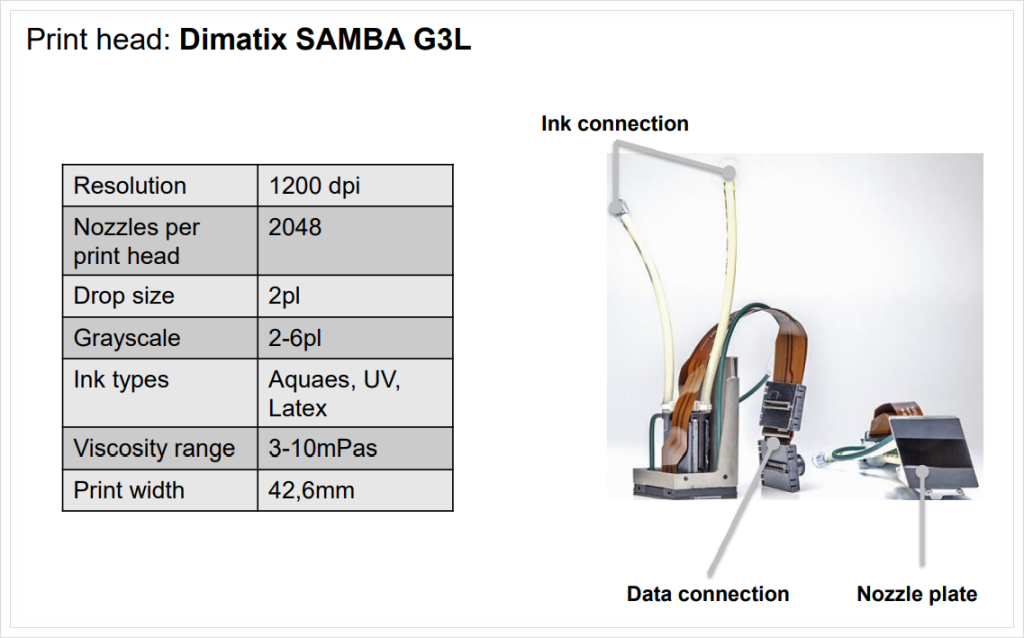
If you look at the quality of Samba 1200 dpi, a single pass print head among existing UV printers, you can quickly understand.
The result is printed at 1200 x 1200 dpi, and if you look at the 2 font letters, there are no ink dots themselves.

The print head specifications state that the ink droplet is 2pl and the maximum resolution is 1200 dpi.
II. Difference between X-axis resolution and Y-axis resolution _Inkjet printing resolution
1. X-axis resolution concept _Inkjet printing resolution
X-axis resolution can be controlled by software to determine how many ink drops will be dropped in the printing direction.
As shown below, there are some prerequisites, but SW can determine the DPI according to the ink drop size.
- Stable ink.
- Waveform tuning.
- Use within the Max frequency of the head.
- Head carriage speed adjustment
2. Y-axis resolution _Inkjet printing resolution
The Y-axis resolution is determined by the available dpi of the print head itself.
When referring to the head itself, instead of dpi, the term NPI is used.
NPI stands for Nozzle Per 1 Inch. Depending on “how many nozzles are in 1 inch (25.4 mm)”, it is called “how many npi head”.
I will explain using Konica head data.
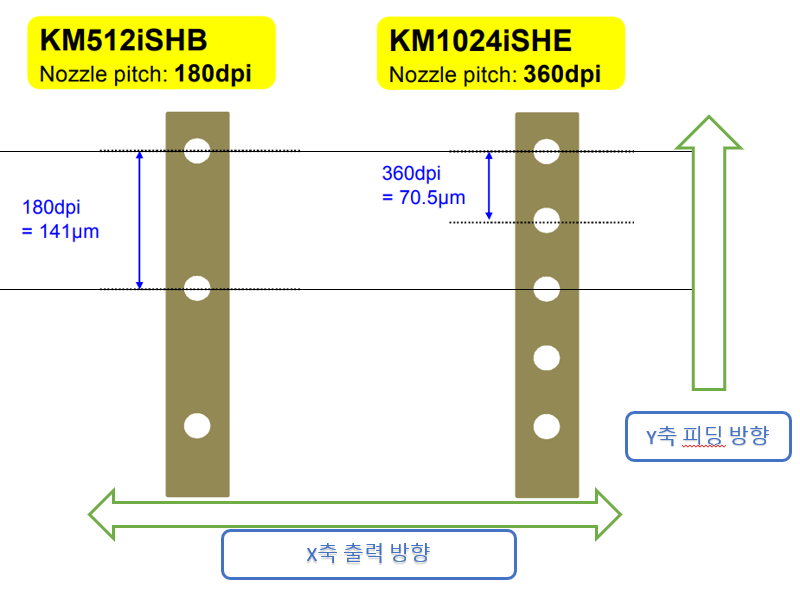
KM512i print head
- KM 512i head nozzle spacing is 141um
- 1 inch(25400um) ÷ 141um(nozzle spacing in the above figure) = 180
- Through this number, the KM512i head is said to be a 180npi (180 nozzles in 1 inch) or 180dpi head.
KM1024i print head
- KM1024i head is also the same way
- 1 inch(25400um) ÷ 70.5um(refer to the nozzle distance in the picture above) = 360
- That is, it is called a 360 nip or dpi level head.
III. Why NPI Matters in Y-Axis Resolution _Inkjet printing resolution
1. Important factors when choosing a head _Inkjet printing resolution
The X-axis resolution can be set to various DPIs depending on the maximum frequency of the head and the carriage speed.
To put it in an exaggerated way, if you keep other conditions the same and only reduce the carriage speed by half, you can jet 720dpi to 1440dpi.
However, the feeding direction, that is, the Y-axis printing resolution, is determined by the distance between the print head Y-axis nozzles.
To make the Y-axis resolution 1440npi with a 360npi-class head, you have to go through almost the same section 4 times while giving a 70.5um offset on the Y-axis.
Naturally, since you have to go back and forth through a similar section 4 times, the speed is 4 times slower.
In addition, in order to move 70.5um, the Y-axis precision must be increased, and the cost inevitably increases to create precise movement.
Since you have to select a print head considering the print quality you need to implement and the price of the equipment you are targeting, the print head Y-axis resolution, that is, NPI, is important.
2. Creating 720dpi with a 360Npi head _Inkjet printing resolution
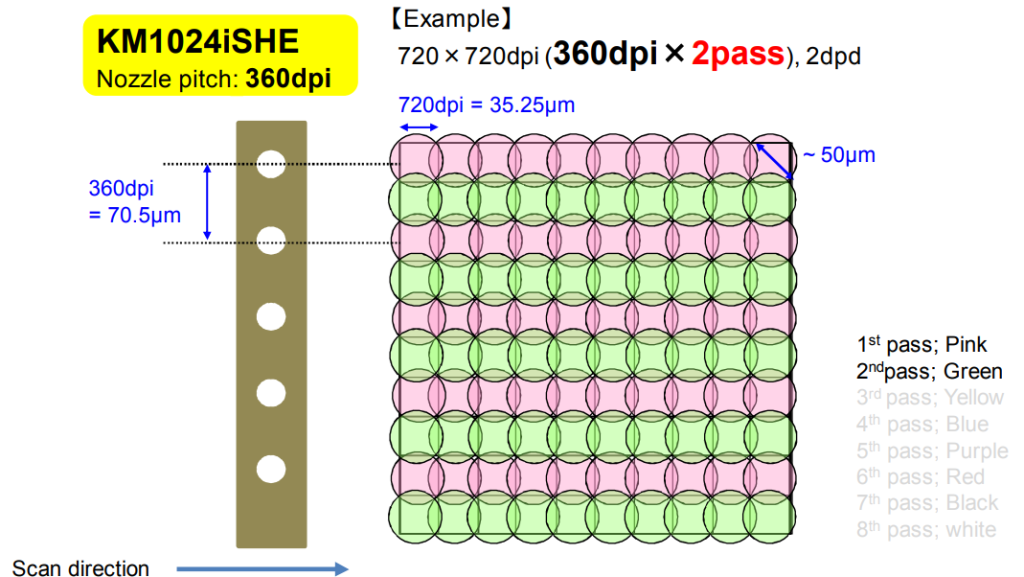
When the head passes once in the X-axis scan direction, not the Y-axis, only the pink dot is jetted.
And if you do not repeat the same section, but move the head nozzle section width of 72 mm in the Y-axis (in the case of the KM1024 head, the distance from the first nozzle to the last nozzle is 72 mm) and then jet again,
Since the ink droplets are jetted every 72.5 um (360 dpi = 70.5 um) based on the Y-axis, the Y-axis resolution becomes 360 dpi.
To make 360dpi into 720dpi,
- If you move the nozzle gap (70.5um) in the Y-axis direction by half (35.25um) and then jet the ink,
- That is, if you jet once more between the Y-axis nozzles, it will go from 360dpi to 720dpi.
- Sometimes when you see large UV printers printing, when the head carriage moves to the left, it moves along the Y-axis,
- but when it moves to the right, it doesn’t seem to move, but you can see that the light color becomes darker.
- It’s not that it doesn’t move, it moves 35.25 um in the Y-axis and prints.
3. Pass & nozzle duty _Inkjet printing resolution
The head is fixed, and the method of printing while the material passes underneath is called Single pass.
In the case of Single pass, when the material passes, all the necessary ink is sprayed at once.
In Single pass, one side’s dpi is determined through the print head Npi.
On the other hand, the method of printing while the head reciprocates is called Scanning printer method.
Scanning printers reciprocate the same section several times to print the necessary ink on the material.
Depending on the number of reciprocations, the terms 4 pass, 8 pass, and 12 pass are used.
For example, 4-pass
- It is a method of printing on the material by dividing the data to be jetted from the print head into 4 times,
- and only 25% of the ink is jetted from the entire nozzle section when passing once,
- and when going back and forth 4 times, 100% of the data is sprayed to express the image.
Likewise, 8 passes jet ink at 1/8 nozzle duty, and 12 passes jet ink at 1/12 nozzle duty.
4. Reasons for using lower nozzle duty _Inkjet printing resolution
Head manufacturers call it interlacing or interweaving.
If ink is jetted regularly, the pattern is visible to the human eye, resulting in banding, and if there is nozzle failure, the missing section is more clearly visible.
However, if the ink jetting pattern is made complex, banding and nozzle failure are not easily visible to the human eye.
In the case of 4 passes, since 25% nozzle duty is used, the 25% section is jetted randomly, not regularly,
and the remaining 3 passes also create irregular patterns.
As shown in the figure below, ink must be jetted in a complex pattern through software, so that banding and nozzle failure are not easily visible.
IV. Instrument precision and ink straightness _Inkjet printing resolution
There is no head that implements 2400 dpi yet.
Even if there is a head that implements 2400 dpi, the mechanical conditions and ink jetting conditions must be optimized to implement 2400 dpi.
1. Precision 10um _Inkjet printing resolution
Excluding the overlapping ink area, the ink diameter (25400um÷2400) should be 10.58um, and 2400dpi implementation is possible, but
even for general sign UV printers worth over 200 million won (measured at my previous workplace), if you measure the actual transfer distance with a laser, there is a difference of more than 50um.
It is important that the ink droplet is 10um, but if the actual transfer distance error is 50um, even if it is a very small dot, it will not fall on the exact impact point, so the image will not be expressed properly.
2. horizontality of flatbed _Inkjet printing resolution
Unless it is a regular plate, it is not easy to catch the entire flatbed section with an error rate of 0.3 mm, or 300 um.
Small flat plates are considered to have a basic specification of 0.5 mm, or 500 um, and
If the head carriage speed is 800 mm/second, and the flatbed horizontal difference is more than 0.2 mm (200 um), there will be a difference in the bidirectional printing quality.
In other words, the ink jetted point will be different.
No matter how small the dot falls, if the flatbed horizontal is not even, this also cannot implement the DPI of the head.
3. Constant speed and constant amount during ink jetting _Inkjet printing resolution
The ink coming out of all nozzles does not always come out at the same speed and in the same amount.
A waveform with a constant jetting speed and an appropriate volume must be applied to implement the dpi of the head spec.
The dropwatcher explanation below will help you understand.
V. This is how ARTJET supports our customers.
One thing I feel while selling and maintaining ARTJET UV Printers for 5 years is that the next most important thing after product stability is Troubleshooting DATA.
All products have problems, whether they are actual equipment problems or consumer errors, and product stability is how easily and quickly you solve those problems.
We are organizing all the troubleshooting DATA as follows.
You can see the product print quality by clicking here.

1. Complete Guide to Printhead Problems and Solutions
ARTJET UV Printer Problems and Solution _Printhead Problems Summary
Additional issue and solution
The red color does not appear at first, then appears during printing, and then does not appear again
Printhead replacement video and precautions
2. Complete Guide to Ink Supply Problems and Solutions
Previously sorted, ink supply problem summary
Updated ink supply problem summary
3. Mechanical problem and Solutions
1. How to align the print head in a straight line
2. There is a clicking noise from the X-axis
3. Banding problem in specific section
4. The Importance of Head Height in Bidirectional Printing
5. Problems that occur when the wiper height is high
6. When the cleaning belt screw is loose
7. When the capping fixing plate does not fit
8. How do I prepare the ARTJET electricity?
9.When Anti-crash becomes a jam in captop
10. Print head Anti crash system
4. Electron board and Software problem is hereunder.
1. The printer works but printing does not work
2. Resetting to default settings
3. Touch panel does not turn on
4. The printer is printing, but nothing is printed
5. Software closes when I just press the print button
6. Printing in the wrong place
7. Positioning misalignment in X-axis direction
8. How to make the Offset fine tune
9. Vertical offset is not correct only for the right section of white
10. Software turn off when click print button
5. Sai Flexi Rip software
1. How to make the Spot Color & several mistakes
2. Color is strange after applying Spot color
3. White is sticking out
4. Installation and Dongle Key Recognition Failure Measures
5. Dongle Key Recognition Failure
6. White lines appear when printing only color
7. Color Adjustment through Graph
8. Print size compensation
9. Ink Consumption Calculation
10. What is ICC profile & menu board UV Printing
11. Dongle Key recognition Failure from USB port
6. Problems and solutions from actual consumer sites
1. Paper that absorbs ink
2. A line-like thing appears at the end of the white print surface
3.Can varnish banding be reduced?
4. Are there many problems with China’s UV Printer?
7. UV Printer Application
we are explaining not only UV printer problems and solutions, but also what products are produced with UV printers.
1. Braille printing
2. Flip the material and align it
3. 2.5D UV print
4. ARTJET UV Printer Application 6 _아크릴 본딩 장비
5. I phone 14 print limitation
6. Mask printing not recommend
7. Leather Cigarette Case UV Printing
8. Round soccer strategy board UV printing
9. Primer performance & limitation
10. UV Print & Laser crop mark cutting
11. Mobil case UV print profit
12. Screen vs Digital Comparison and UV Printing on Hand Sanitizer Cases
13. Bottle zig & print
14. Canvas UV Printing
15. Applying epoxy effect with varnish
16. Making a light frame with UV Printer & Laser cutter
17. UV Printer & Laser Cutting Equipment Button Name Tag Making
18. UV Printer & Laser Cutting Making a Cell Phone GripTok
19. Making an Acrylic Keychain with UV Printer & Laser Cutter
20. UV Print with Zig
21. How to make RD WORKS CCD camera cutting Video manual
22. Acrylic bonding equipment
23. All the steps to create UVDTF
24. UVDTF TEST Result on various material
25. ARTJET CW+C Print time & Ink Cost
26. Create a white shield with different images on the front and back of the keyring
27. Keyring Business Required Equipment and Investment Costs
29. Acrylic Lighting Goods
30. Ballpoint pen jig printing
31. Staining occurs when printing on coated leather
8. Bonus
1. ARTJET UV Printer Old Model Refurbished
2. UV Printer Laser Cutter Bonding Machine Which equipment should I buy first?
3. Considerations when choosing a UV printer
4. DTF Printer Price and Specification Survey
5. Acrylic Bonding Equipment Don’t Put It Off Anymore
6. China inkjet level now
7. Thoughts on KOSIGN 2024
8. ARTJET Delivery Preparation
9. ARTJET Setting Sequence
10. UV Printer History and Future Prediction 1
11. UV Printer History and Future Prediction 2
12. UV Printer History and Future Prediction 3
13. UV Printer History and Future Prediction 4
14. UV Printer History and Future Prediction 5
15. Are there many problems with China’s UV Printer?
16. UV Printer Small Text Meaning
17. Is the XP600 head okay
18. Roland UV Printer Summary
19. Mimaki UV Printer Summary
20. UV Printer Alibaba Direct Purchase Considerations
21. Things to consider when buying a used UV Printer
22. Bi Uni Print Quality Differences
23. RDworks download install and laser head position by SW
That’s it for today.