
How to make Spot color
I. Spot color _How to make Spot color
1. How to make _How to make Spot color
There may be experts, but even people like me who are new to Ai files can create Spot colors by following the video.
In the picture below,
The text Printing & Coating Process Technology sets the White spot to print white under gray,
and the orange square sets the Varnish spot to print Varnish only on top of orange.
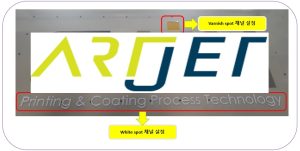
You can check the image work through the video below.
We recommend that you do not skip the content of the video and watch it carefully.
2. Caution _How to make Spot color
A. As Rip is updated
- Spot_2, white is changed to Spot_1, so the White spot layer name should be Spot_1.
- Spot_4, Varnish is changed to Spot_2, so the Varnish spot layer name should be Spot_2.
- If you set the names correctly like this, Spot_1 and Spot_2 will be immediately set to White and Varnish in Rip without separate designation.
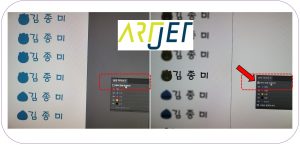
B. If you do not select [Overprint Preview] in [Separation Preview]
There is no problem with printing, but the color layer color will not be known, as shown on the left side of the image below.
Please proceed by selecting [Preview Duplicate Print].
C. After creating the Spot_1 white layer, “I can see the white, but when I check the color channel on the Rip, the original color doesn’t come out.”
When I checked the AI file itself in Illustrator, the spots were set correctly, but the overprinting of the paint was missing.
II. Issues Received _How to make Spot color
1. Why Varnish spot isn’t work _How to make Spot color
“Ah, I finally found the cause. When I made the White spot, I copied it from the original, and when I made the Varnish spot, I copied the White spot image, and that was the cause. Both the White spot and the Varnish spot work fine when I copy them from the original image.”
“As you said before, I copied the original and created a White spot channel, and copied the original and created a Varnish spot, but the Varnish doesn’t print.”
The Varnish layer is placed below the color layer, so the Varnish doesn’t print. The White Varnish layer must be placed above the color layer.
2. Solve the compound pass _How to make Spot color
The color layer color should appear, but when creating a Spot color as shown below, only the set color appears.
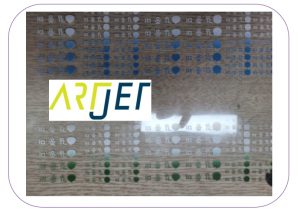
When saving a file, a message like the following appears:
“When using spot colors with transparency, changing them to blended colors outside of Illustrator can lead to unexpected results.”
I ignored this and just saved it, but it seemed to be related to the current issue.
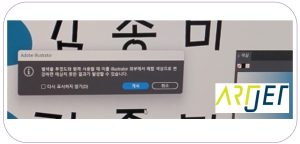
And, the compound path was solved as follows.
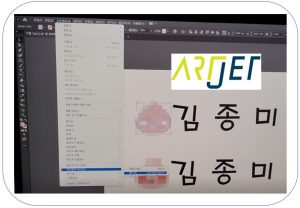
3. Clipping Mask _How to make Spot color
After searching, I found that clipping mask is an effect that overlaps two images and makes them visible at the same time.
When setting the spot for these images, it seems that only the visible part is not captured as a spot because they are two images, even though they are not visible.
It seems to work in the Ai file, but when I load it in Sai rip and check each channel, it is not captured.
If the spot channel is not captured properly in the rip, you need to release the clipping mask.
4. Why do small letters disappear? _How to make Spot color
It was a problem for which I couldn’t figure out the cause no matter how much I thought about it. In the end, it turned out that the small white letters had disappeared due to choke.
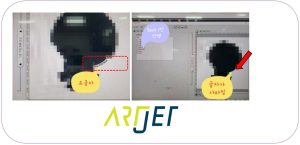
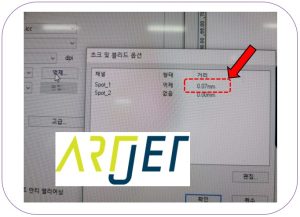
III. This is how Artjet supports our customers.
ARTJET UV Printer has been sold in Korea for 5 years, and we are organizing the printer problems we have encountered so far, their causes, and their solutions.
1. Printhead Problems and Solutions Total 10
ARTJET UV Printer Problems and Solution_Printhead Problems Summary
Additional issue and solution
The red color does not appear at first, then appears during printing, and then does not appear again
2. Ink Supply Problems and Solutions Total 17
ARTJET UV Printer Problems and Solutions_Ink Supply Problems Summary
Comprehensive application
Damper replacement time
The nozzle test is fine, but it seems that a certain color is not coming out during printing
Capping station block positioning to match the print head and captop
Can I ignore the ink alarm and use it?
UV Printer Monday Morning Routine
3. Mechanical problem and Solutions
1. How to align the print head in a straight line
2. There is a clicking noise from the X-axis
3. Banding problem in specific section
4. The Importance of Head Height in Bidirectional Printing
5. Problems that occur when the wiper height is high
6. When the cleaning belt screw is loose
7. When the capping fixing plate does not fit
8. How do I prepare the ARTJET electricity?
9.When Anti-crash becomes a jam in captop
10. Print head Anti crash system
4. Electron board and Software problem is hereunder.
1. The printer works but printing does not work
2. Resetting to default settings
3. Touch panel does not turn on
4. The printer is printing, but nothing is printed
5. Software closes when I just press the print button
6. Printing in the wrong place
7. Positioning misalignment in X-axis direction
8. How to make the Offset fine tune
9. Vertical offset is not correct only for the right section of white
5. Sai Flexi Rip software
1. Sai Flexi Rip _ How to make the Spot Color & several mistakes
2. Sai Flexi Rip _ Color is strange after applying Spot color
3. Sai Flexi Rip _ White is sticking out
4. Sai Flexi Rip _ Installation and Dongle Key Recognition Failure Measures
5. Sai Flexi Rip _ Dongle Key Recognition Failure
6. Sai Flexi Rip _ White lines appear when printing only color
7. Sai Flexi Rip _ Color Adjustment through Graph
8. Sai Flexi Rip _ Print size compensation
9. Sai Flexi Rip _ Ink Consumption Calculation
10. What is ICC profile & menu board UV Printing
11. Sai Flexi Rip _ Dongle Key recognition Failure from USB port
6. Problems and solutions from actual consumer sites
1. Paper that absorbs ink
2. White Motor Pump Does Not Turn
3. A line-like thing appears at the end of the white print surface
4.Can varnish banding be reduced?
5. Are there many problems with China’s UV Printer?
7. UV Printer Application
we are explaining not only UV printer problems and solutions, but also what products are produced with UV printers.
1. Braille printing
2. Flip the material and align it
3. 2.5D UV print
4. ARTJET UV Printer Application 6 _아크릴 본딩 장비
5. I phone 14 print limitation
6. Mask printing not recommend
7. Leather Cigarette Case UV Printing
8. Round soccer strategy board UV printing
9. Primer performance & limitation
10. UV Print & Laser crop mark cutting
11. Mobil case UV print profit
12. Screen vs Digital Comparison and UV Printing on Hand Sanitizer Cases
13. Bottle zig & print
14. Canvas UV Printing
15. Applying epoxy effect with varnish
16. Making a light frame with UV Printer & Laser cutter
17. UV Printer & Laser Cutting Equipment Button Name Tag Making
18. UV Printer & Laser Cutting Making a Cell Phone GripTok
19. Making an Acrylic Keychain with UV Printer & Laser Cutter
20. UV Print with Zig
21. How to make RD WORKS CCD camera cutting Video manual
22. Acrylic bonding equipment
23. All the steps to create UVDTF
24. UVDTF TEST Result on various material
25. ARTJET CW+C Print time & Ink Cost
26. Create a white shield with different images on the front and back of the keyring
27. Keyring Business Required Equipment and Investment Costs
29. Acrylic Lighting Goods
30. Ballpoint pen jig printing
31. Staining occurs when printing on coated leather
8. Bonus
1. ARTJET UV Printer Old Model Refurbished
2. UV Printer Laser Cutter Bonding Machine Which equipment should I buy first?
3. Considerations when choosing a UV printer
4. DTF Printer Price and Specification Survey
5. Acrylic Bonding Equipment Don’t Put It Off Anymore
6. China inkjet level now
7. Thoughts on KOSIGN 2024
8. ARTJET Delivery Preparation
9. ARTJET Setting Sequence
10. UV Printer History and Future Prediction 1
11. UV Printer History and Future Prediction 2
12. UV Printer History and Future Prediction 3
13. UV Printer History and Future Prediction 4
14. UV Printer History and Future Prediction 5
15. Are there many problems with China’s UV Printer?
That’s it for today.