- Anyone who pours alcohol on the Captop and pumps, only to see the alcohol come out but no ink reach the waste tank
- Anyone whose pumping still fails even after replacing the yellow tube, Captop, and Captop lower tube
- Anyone curious about unusual symptoms caused by material collisions on shared, multi-user equipment (schools, workshops, etc.)
- Anyone wondering how to handle a bent or protruding head protection plate
- Never push a protruding protection plate back in place by hand — it will lead to bigger problems later, including a damaged Captop or scratched material
- A dented protection plate means the head took a severe impact — the head itself may already be damaged
- Before any head-related work, always turn off the software, the touch panel power button, and the main switch
- After removing the protection plate, always reinstall the bolts in their original positions
- If pumping still fails after inspecting and replacing everything below the Captop (yellow tube, Captop, lower tube, head position), suspect a deformed head protection plate
- A protection plate bent open by a material collision can break the seal between the head and Captop, causing poor pumping
- The plate is only a secondary device protecting the head nozzle — the head still works without it, though the risk of future impact damage increases
- Fix: remove the four mounting bolts, take off the plate, and reinstall the bolts — pumping returns to normal
I. Background _ Head Protection Plate Crumpled
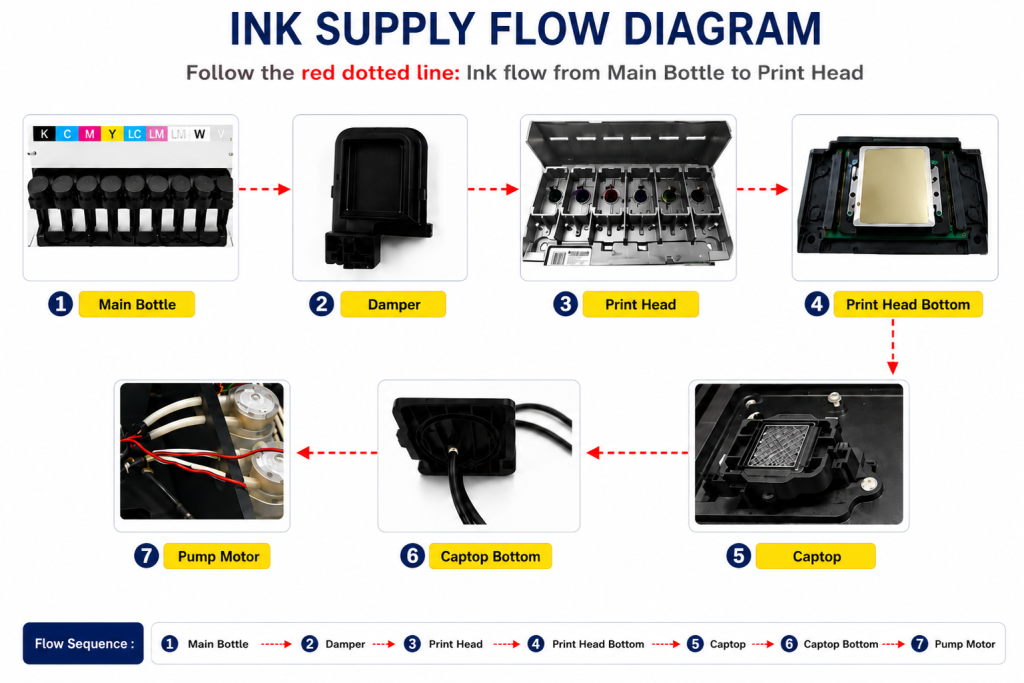
- When ink enters the Damper from the main ink bottle via the ink tube, it passes through the print head, flows to the captop, moves through the motor pump, and finally drains into the waste ink bottle.
- This article covers Head Protection Plate Crumpled in the full ink supply problem series.
- This follows Part 1 Captop Lower Tube, Part 2 How to Replace the Captop, Part 3 Damper, Part 4 Pump Motor and Yellow Tube, Part 5 Captop and Head Position, Part 6 Aligning the Captop and Head Position, Part 7 When the Capping Station Level Is Not Correct, Part 8 Captop Surface Drying, Part 9 Degraded Ink Inside the Captop, Part 10 Time for Ink to Fill the Damper, Part 11 Ink Tube Burst, Part 12 How to Replace a Motor Pump Tube, Part 13 Why White Cleaning Doesn’t Work Well, and Part 14 Why It’s Important to Replace the Yellow Tube and Captop.
- In this article, we explain a real service case where pumping still failed after every consumable had been checked and replaced.
II. Problem Symptoms _ Head Protection Plate Crumpled
- This unit has been in use at Hongik University’s Sejong Campus for 1 year and 5 months.
- Equipment delivered to schools is used not only by students but also by the general public after a brief training session, so this is a setting where various issues can arise from multiple users.
- We checked things over the phone and worked through it together, but pumping still didn’t work.
The company’s on-site representative reached out.
III. Problem-Solving Process _ Head Protection Plate Crumpled
- We started by inspecting the head underside and Captop position.
- Visually, nothing seemed out of alignment.
- When alcohol was poured on the Captop and pumped, the alcohol reached the waste ink tank,
- so we concluded the Captop and head were correctly positioned.
- When pumping that used to work suddenly stops — especially when alcohol flows fine but ink doesn’t follow —
- it’s often because the Captop lower tube has loosened, letting air in.
- The Captop hadn’t been replaced in over a year, so while replacing it, we also replaced the Captop lower tube with a new one and connected it firmly.
- We expected this to solve the problem, but no matter how long we pumped, ink still wouldn’t reach the waste ink tank.
- The yellow tube (motor pump tube) also hadn’t been replaced in over a year, so we replaced it as well.
- We poured alcohol on the Captop and pumped again, but the problem persisted.
- The yellow tube, Captop lower tube, Captop, and head-to-Captop position — everything below the Captop had now been checked and the consumables replaced.
- In other words, everything below the Captop was normal. What remained was checking above the Captop.
- We were fairly sure this wasn’t the cause, but with nothing else to check, we inspected the upper section.
- After disconnecting the Damper from the head, we drew ink with a syringe to check for air leaks — the ink flowed smoothly into the syringe with no bubbles,
- and the head was firmly reseated.
- Still, the pumping problem remained.
IV. Could This Be the Cause? _ Head Protection Plate Crumpled
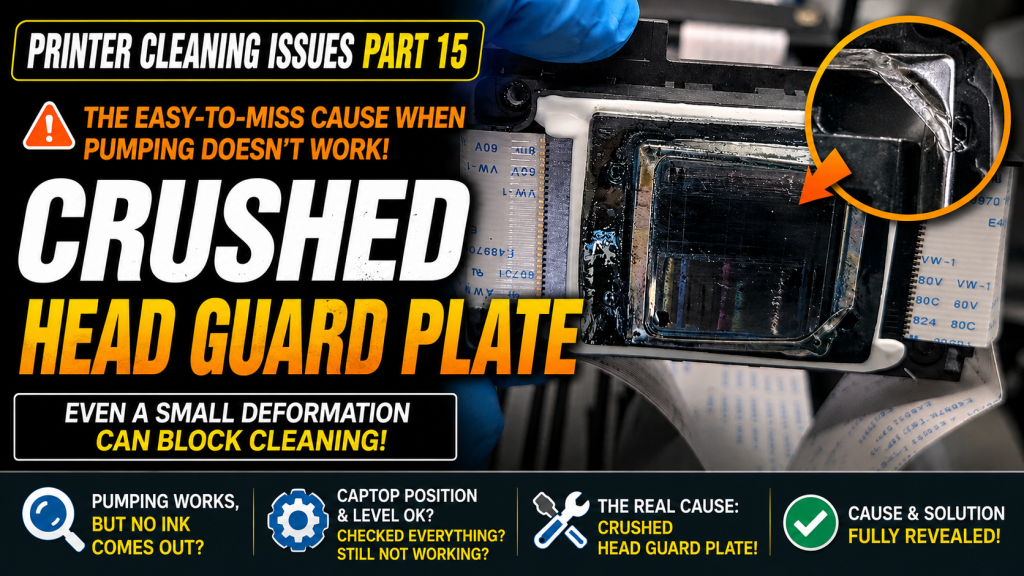
Before starting the repair, we noticed the aluminum plate on the head underside was slightly protruding, but it looked fine.
We thought “this shouldn’t be a major issue” and started checking other areas first. But once the problem persisted, we wondered whether that slightly protruding aluminum near the head might be the cause after all.
While the head was installed in the machine, the aluminum only looked slightly bent — but once the head was removed and viewed from underneath, the dent was far worse than expected.

Other users occasionally hit the head with material as well, and when the protection plate gets damaged this way, we’re often asked, “Do I need to replace the head?” Here’s the answer:
- The aluminum plate on the underside of the head is a secondary device that protects the head’s nozzles.
- It’s simply a protective plate bolted onto the head.
- Having this aluminum plate is nice, but the head still works without it.
- That said, if the print head hits material again during printing, it’s more likely to sustain damage.
There are, however, a few things to keep in mind.
- A dented protection plate means the sensitive head took a severe impact, and the head itself may already be damaged as a result.
- If you remove the plate and run the printer, it will work right away — but symptoms from that earlier impact could show up over time.
- When this kind of collision has occurred, it’s worth treating that head as a temporary solution and expecting it may need replacement before long.
V. How to Remove the Protection Plate _ Head Protection Plate Crumpled
If the print head hits material and the aluminum plate protrudes, similar to the photo above,
- It may seem fine for a while, but after some time, the pushed-back aluminum will protrude again,
- and it can later catch on material, causing a bigger problem.
- Also, when the protection plate is left open like this, the head and Captop can no longer form a seal, which can prevent pumping.
- Even with nippers, the cut won’t be clean.
- The rough, sharp edge can scratch material during printing, and the snagged edge can get tangled with the material, creating a bigger problem.
- A sharp cut edge can also tear the Captop’s rubber blade, and once the Captop is damaged this way, pumping will fail.
See the video below for how to remove the protection plate from the head. The video covers the head on its own — if it’s still mounted in the printer, follow the steps below first.
1. Manually move the head carriage and lower the Captop
- With the software connected, press the left button to send the head carriage toward the platen.
- As the capping station lowers, the Captop holding the head also lowers, so it won’t interfere when the head is reinstalled later.
- Exit the software, and turn off every button on the touch panel, including the power button.
- Since this is head-related work, turn off the main switch on the back as well.
2. Removing the print head
- This job only involves removing the protection plate, re-tightening the bolts, and reinstalling the head, so —
- there’s no need to disconnect the DATA cable.
- Only disconnect the Damper needed to remove the head, then reconnect it.
- Remove the four mounting bolts holding the head to the carriage, and lift the head straight up with the DATA cable and Damper still connected.
3. Removing the plate and reinstalling the bolts
- With the removed head facing you, use a screwdriver to take out the four bolts on the protection plate.
- After removing the protection plate, be sure to reinstall the bolts in their original locations.
4. Reinstalling the head
- Reinstall the head, now without the protection plate, onto the head carriage in reverse order.
- Be careful not to shift the DATA cable’s connection position during the process, and check that all alignment marks line up before installing.
- After mounting the head on the carriage, press firmly to make sure the Damper is fully seated.
- Move the carriage back near the platen’s starting point (if the head carriage sits at the far right or far left, be careful it hasn’t passed the X-axis limit sensor, which can cause a malfunction when the software connects).
- Turn the main switch on, then the touch panel’s power button on (since the DATA cable was handled during this work), and confirm both lights on the board turn off together within 7 seconds before connecting the software.
VII. ARTJET UV Printer

핑백: Head protection plate cracked _ Printer Cleaning Issues Part 16 ARTJET 2026
핑백: When ink runs out during printing - Printer Cleaning Issues Part 17 ARTJET 2026
핑백: When to replace the damper - Printer Cleaning Issues Part 20 ARTJET 2026
핑백: How to Find the Problem Color When the Color is Strange - Printer Cleaning Issues Part 21 ARTJET 2026
핑백: Problems that occur when ignoring the low ink alarm - Printer Cleaning Issues Part 22 ARTJET 2026
핑백: White cleaning methods that might clogged - Printer Cleaning Issues Part 23 ARTJET 2026
핑백: The color has faded - Printer Cleaning Issues Part 18 ARTJET 2026
핑백: White flies around the image - Printer Cleaning Issues Part 19 ARTJET 2026