How to Replace a Motor Pump Tube – Printer Cleaning Issues Part 12
So far, I have summarized the information related to UV Printers below. If you click on the article, you will be taken to the link for related information.
- 9 articles on head basics,
- 12 articles on actual head issues and their solutions,
- 10 actual mechanical Machine Problems and Solutions.
- 12 Problems and Solutions of Electronic Boards and SW Actually Issued
- 11 Problems and Solutions: Sai Rip Installation and Basic Settings, Spot Color Creation, and More
- We’ve compiled a list of products that can be made with a UV printer.
I. Background information
We’re updating previous content.
The full text of Part 24 of the Ink Supply Issues series can be found through the link below.
24 articles on ink supply issues,
This article addresses the motor pump issues highlighted in red in the full table of contents for ink supply issues.
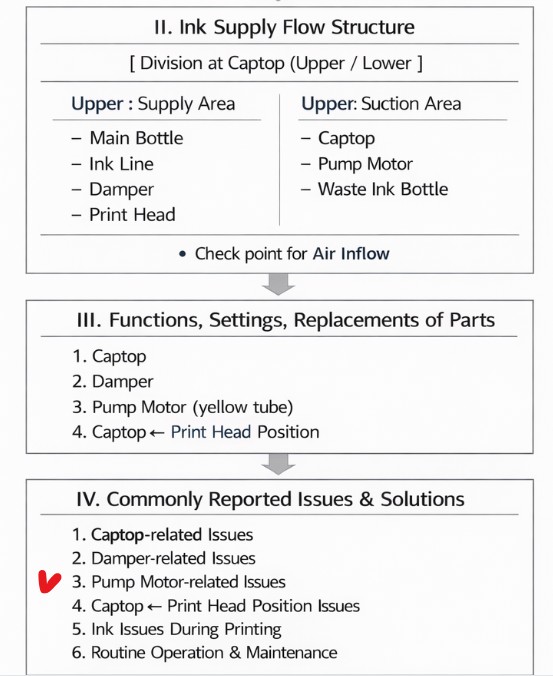

When ink flows from the main ink bottle through the ink tube to the damper, it flows through the print head to the captop, then through the motor pump to the waste ink tank.
- The first session covered the captop lower tube,
- The second session covered how to replace the captop,
- The third session covered the damper.
- In the fourth hour, the pump motor and the yellow tube.
- In the fifth hour, Captop and head position.
- In the sixth hour, how to manually align the captop and head position.
- In the seventh hour, the capping station is not level and how to level it.
- In the eighth hour, the problem of the Captop surface drying out and its solution.
- In the ninth hour, the problem and solution that occurs when deteriorated ink remains inside the Captop.
- In the tenth hour, the problems caused by too frequent pumping and cleaning.
- In the eleventh hour, we explained the symptoms and solutions that occur when the main ink tube torn.
You can check the details by clicking the link.
Today, I’ll explain the replacement cycle and method for the motor pump tube (yellow tube).
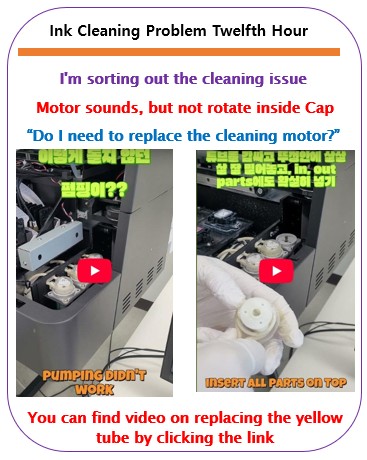
II. ‘Do I need to replace the motor pump?’ _ How to Replace a Motor Pump Tube
1. Problem symptoms
This is a symptom from a demo unit I’ve been using for a year and a half.
- For the past three months, white cleaning has been working, but it hasn’t been as thorough as before.
- When I run the cleaning function, the cylinders on top should rotate, but they didn’t.
- I loosened the plastic cap slightly by turning it to the left, then tightened it again.
- The cylinders started turning, and that’s how I continued using it.
- Until then, I suspected the pump motor itself was at the end of its lifespan, and I thought replacing it would solve the problem.
2. The motor pump itself, with replacement in mind
Finally, I briefly loosened the plastic cap and re-locked it, but the cylinder didn’t rotate properly. I considered replacing the motor pump and began inspecting the equipment.
First, I checked to see if the pump motor itself was working.
- I disconnected the connected ink tube and exposed the pump motor itself.
- As shown in the photo below, I found a blue square on the bottom of the motor pump, a point that could be turned with a screwdriver.
- Not knowing what it was, I tried using the screwdriver while the power was on.
- The motor pump’s rotation speed changed, and I discovered that this was the motor pump speed control.
- In the photo below, I turned the cross symbol in blue to make the motor pump rotate more quickly.
- However, the cylinder inside the cap didn’t turn.
I thought the problem was caused by a slow pump speed, so I considered replacing the pump.
- However, the pump motor operated normally with speed control,
- and even when I increased the pump speed, the cylinders inside the cap didn’t rotate properly,
- so the pump motor wasn’t the cause of the problem.
I decided to stop the pump motor replacement and look for other causes.

III. Why doesn’t the cylinder rotate? _How to Replace a Motor Pump Tube
1. How it works
It’s not a crucial point, but the official name for the component we’re talking about is a peristaltic pump motor.
I started observing them one by one.
“Where does the gear on top connect to create the next movement?”

For testing purposes, I removed the yellow tube (peristaltic pump tube) from the cap and tried running the motor.
- The three cylinders, engaged with the gears of the pump motor, simply rotated in place, but the cylinders did not rotate clockwise.
- With the yellow tube in place, the three cylinders rotated clockwise, pressing against the yellow tube. However, when the tube was removed, the cylinders stopped rotating and just rotated in place.
- I now believe the problem is related to the yellow tube.
As you can see, the long gears on the motor pump, as shown in the photo below, engage with the gears inside the cap, allowing the three cylinders to rotate in place.

2. If three cylinders are rotated clockwise,
Why do three self-rotating cylinders only rotate in place? Why don’t they rotate clockwise?
- Cylinders can only rotate on their own; they can’t rotate clockwise.
- For the cylinders to rotate clockwise, they must touch the yellow tube (the peristaltic pump tube).
- However, the yellow tube contracted over time, and because the cylinders had no contact surface, they couldn’t rotate clockwise.
- The problem was solved after replacing the tube, as shown on the right side of the photo below.

The tube inside the cap is constantly compressed by the cylinders during pumping and cleaning, so it shrinks more than the tube visible from the outside.
- Just because it looks fine from the outside doesn’t mean the tube inside the cap is fine.
- If the cylinders don’t rotate properly,
- cleaning isn’t working properly,
- or pumping isn’t working properly,
- you should replace the yellow tube first.

IV. How to replace the yellow tube (peristaltic pump tube) _How to Replace a Motor Pump Tube
The difference in motor pump speed before and after replacing the yellow tube.
With just one yellow tube replacement, the cylinders start spinning cleanly like this.
I tried a variety of methods, and this is the easiest way to replace the yellow tube.
V. ARTJET UV Printer
One thing I’ve noticed after five years of sales and maintenance of ARTJET UV printers is that troubleshooting data is second only to product stability.
All products have issues, whether they’re caused by actual equipment problems or consumer error. Product stability hinges on how quickly and easily you can resolve those issues.
ARTJET compiles all troubleshooting data.
You can see the product print quality by clicking here.
Click here for ARTJET pricing and terms of sale. The exterior design has changed.

핑백: Why White Cleaning Doesn't Work Well - Printer Cleaning Issues Part 13 ARTJET 2026
핑백: Why it's important to replace the yellow tube and captop - Printer Cleaning Issues Part 14 ARTJET 2026
핑백: Head protection plate crumpled _ Printer Cleaning Issues Part 14 ARTJET 2026
핑백: Head protection plate cracked _ Printer Cleaning Issues Part 16 ARTJET 2026
핑백: White flies around the image - Printer Cleaning Issues Part 19 ARTJET 2026
핑백: When to replace the damper - Printer Cleaning Issues Part 20 ARTJET 2026
핑백: How to Find the Problem Color When the Color is Strange - Printer Cleaning Issues Part 21 ARTJET 2026
핑백: Printer Cleaning Problems Part 23 Table of Contents ARTJET 2026