Cleaning Problem Summary 1 Captop Lower Tube
So far, I have summarized the information related to UV Printers below. If you click on the article, you will be taken to the link for related information.
9 articles on head basics,
12 articles on actual head issues and their solutions,
10 actual mechanical Machine Problems and Solutions.
12 Problems and Solutions of Electronic Boards and SW Actually Issued
11 Problems and Solutions: Sai Rip Installation and Basic Settings, Spot Color Creation, and More
We’ve compiled a list of products that can be made with a UV printer.
I. Background information _Cleaning Problem Summary 1 Captop Lower Tube
We’re updating previous content.
The full text of Part 24 of the Ink Supply Issues series can be found through the link below.
24 articles on ink supply issues,
This article describes the Captop section highlighted in red in the full table of contents for ink supply issues.

Large-format UV printers using industrial print heads, such as those from Konica Minolta or Ricoh,
clean the head by injecting air to flush the ink inside the head and wiping the head with a cloth.
However, small UV printers using Epson print heads
- The captop rises from the bottom of the head, sealing the head and captop.
- With the captop sealed, the motor pump rotates,
- and the ink flows from the damper through the head, captop, tube underneath the captop, and the yellow tube of the motor pump, into the waste ink tank.
- Then, a wiper automatically wipes the ink underneath the head, cleaning the head.
The problem is that if the ink isn’t being drawn into the waste ink tank by the motor pump, there’s no way to clean the head.
In the first part of this series on ink supply issues, I’ll explain the captop.
I. Captop location _Cleaning Problem Summary 1 Captop Lower Tube
The photo below shows the ink flow from the main bottle to the waste ink tank.
All parts must be completely sealed so that the motor pump can run and the ink flows into the waste ink tank.
The location of the cap top can be seen in the photo below.

When looking at the printer from the front, this is the part that seals the bottom of the head.

II. Captop bottom tube _Cleaning Problem Summary 1 Captop Lower Tube
1. Ink tube at the bottom of the captop _Cleaning Problem Summary 1 Captop Lower Tube
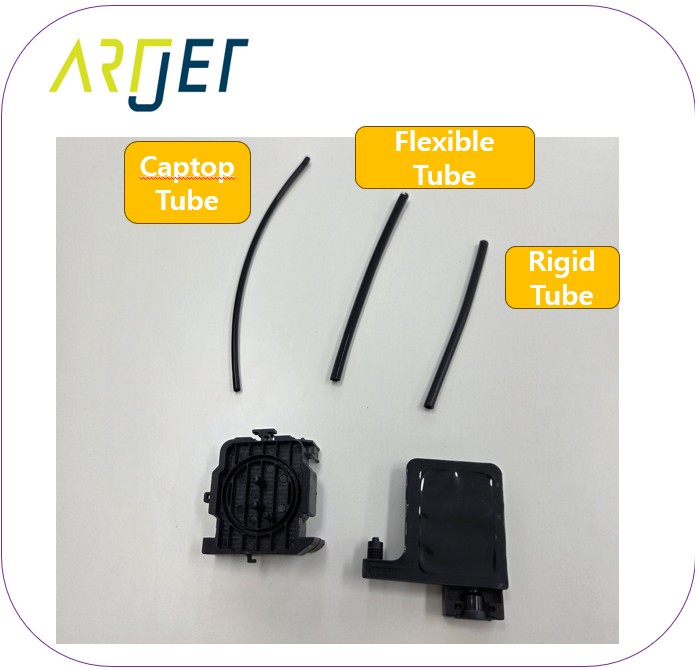
There are two common types of ink tubes used in UV printers.
One type is a rigid tube,
- connected from the main ink tank, passing through the cable carrier and ending at the bottom of the head carriage board.
- It’s made of a hard material that resists pressure even when pressed with the hand.
- This hard material is used because friction occurs as the X-axis reciprocates during printing,
- and this friction can wear out the tube. Therefore, it’s made of a hard, wear-resistant material.
- Because of this hard material, inserting or removing the tube from a fitting requires significant force.
- It’s important to note that if you connect a rigid tube directly to a damper, it lacks flexibility, so even if it’s tightly connected to the damper, air will be drawn in over time.
- This air intrusion can cause ink supply problems, so connecting a rigid tube directly to the damper is not recommended.
- While it may be fine now, it’s highly likely to cause problems later.
The other is a soft ink tube.
- The final ink tube, connecting to the damper, must be soft.
- Because of its soft nature, it fits tightly when connected to the damper, and once inserted, it is difficult to pull out from the damper.
- This condition prevents air from entering over time.
2. Another Captop bottom tube _Cleaning Problem Summary 1 Captop Lower Tube
This was a story from 2020, shortly after I started selling my UV printer.
I naturally assumed there were two types of ink tubes: soft and hard.
When I replaced the cap top, I also replaced the tube that goes into the bottom with a soft ink tube.
However, the ink loading (pumping) that had been working fine stopped working.
After tightening the connection with a cable tie, it sometimes worked, sometimes not.
At the time, I didn’t know what was causing it.
A while later, I had personally repaired and sold eight used machines, and it was time to replace all the consumables.
While replacing the consumables on five of the eight machines, I noticed that the Captop lower tubes were thinner than the soft ink tubes.
It was then that I remembered what the Chinese manufacturer had said:
“You don’t buy Captop lower tubes?”
Click here to see a video of how it feels to connect rigid, soft, and captop bottom tubes
The Captop lower tube must be a thin, soft tube.
III. Very small gap _Cleaning Problem Summary 1 Captop Lower Tube
1. Alcohol comes out,,, _Cleaning Problem Summary 1 Captop Lower Tube
“Team Leader, when I pour alcohol on the captop and pump ink, the alcohol comes out, but no ink comes out.”
There are typically three causes:
- A loose tube connected to the damper, allowing air to enter;
- A slight misalignment between the captop and the print head;
- A loose tube at the bottom of the captop, allowing air to enter;
There are countless reasons why ink suddenly stops loading (pumping) after a period of good operation.
Check if the tube connected to the damper is tight, and if replacing the captop doesn’t solve the problem,
the most likely cause is a loose tube at the bottom of the captop.
Here’s how to check:
- After removing the captop, pull the tube connected to the bottom of the captop with your hand. If it detaches easily, air is entering.
- The tube should not come out easily when pulled, which is normal.
- If the tube detaches easily, it’s best to replace it with a new one. However, if the captop lower tube is missing, simply cutting off the end connection and reattaching it is fine.
- Don’t assume it’s normal if it doesn’t detach after a moderate pull. Be sure to check that the tube can withstand slight stretching.
- Ignoring this will result in wasting countless hours checking other areas before finally resolving the inkload (pumping) issue after replacing the captop lower tube.
3. Various factors contributing to inkload (pumping) problems _Cleaning Problem Summary 1 Captop Lower Tube
Here are some actual problems reported on consumer sites, including ink leaking from the main ink tank to the waste ink tank:
- The ink line connected to the waste ink tank is clogged or kinked.
- The peristaltic pump tube (yellow tube) is compressed (a common problem; the yellow tube is a consumable), or it is torn inside the cap.
- The captop’s lower tube is torn, or the connection is loose (as explained today).
- The captop itself is defective.
- The side frame metal protecting the print head is damaged, preventing the captop rubber from sealing the head.
- The head and captop are misaligned.
- The damper connection is poor (you must use a flexible ink tube, and even then, you should check the connection).
- A clog somewhere in the ink line, causing air leakage.
- Ink solidified inside the ink line, preventing ink supply.
Today,
in the first part of our ink cleaning discussion,
I explained why you should use a smaller diameter tube instead of a standard flexible tube for the Captop lower tube.
IV. ARTJET UV Printer
One thing I’ve noticed after five years of sales and maintenance of ARTJET UV printers is that troubleshooting data is second only to product stability.
All products have issues, whether they’re caused by actual equipment problems or consumer error. Product stability hinges on how quickly and easily you can resolve those issues.
ARTJET compiles all troubleshooting data.
You can see the product print quality by clicking here.
Click here for ARTJET pricing and terms of sale. The exterior design has changed.

핑백: Ink that has deteriorated inside the captop - Printer Cleaning Issues Part 9 ARTJET 2026
핑백: Time for ink to fill the damper - Printer Cleaning Issues Part 10 ARTJET 2026
핑백: Ink tube torn - Printer Cleaning Issues Part 11 ARTJET 2026
핑백: How to Replace a Motor Pump Tube - Printer Cleaning Issues Part 12
핑백: Why White Cleaning Doesn't Work Well - Printer Cleaning Issues Part 13 ARTJET 2026
핑백: Head protection plate crumpled _ Printer Cleaning Issues Part 14 ARTJET 2026
핑백: When to replace the damper - Printer Cleaning Issues Part 20 ARTJET 2026
핑백: Problems that occur when ignoring the low ink alarm - Printer Cleaning Issues Part 22 ARTJET 2026
핑백: Printer Cleaning Problems Part 23 Table of Contents ARTJET 2026