Problems that occur when ignoring the low ink alarm – Printer Cleaning Issues Part 22
So far, I have summarized the information related to UV Printers below. If you click on the article, you will be taken to the link for related information.
- 9 articles on head basics,
- 12 articles on actual head issues and their solutions,
- 10 actual mechanical Machine Problems and Solutions.
- 12 Problems and Solutions of Electronic Boards and SW Actually Issued
- 11 Problems and Solutions: Sai Rip Installation and Basic Settings, Spot Color Creation, and More
- We’ve compiled a list of products that can be made with a UV printer.
I. Background information
We’re updating previous content.
The full text of Part 24 of the Ink Supply Issues series can be found through the link below.
24 articles on ink supply issues,

When ink flows from the main ink bottle through the ink tube to the damper, it flows through the print head to the captop, then through the motor pump to the waste ink tank.
- The first session covered the captop lower tube,
- The second session covered how to replace the captop,
- The third session covered the damper.
- In the fourth hour, the pump motor and the yellow tube.
- In the fifth hour, Captop and head position.
- In the sixth hour, how to manually align the captop and head position.
- In the seventh hour, the capping station is not level and how to level it.
- In the eighth hour, the problem of the Captop surface drying out and its solution.
- In the ninth hour, the problem and solution that occurs when deteriorated ink remains inside the Captop.
- In the tenth hour, the problems caused by too frequent pumping and cleaning.
- In the eleventh hour, the symptoms and solutions that occur when the main ink tube torn.
- In the twelfth hour, how to replace the motor pump tube.
- In the third session, why white cleaning did not work well and tips for improvement.
- In the fourteenth hour, real-life cases where white cleaning did not work well and how to resolve them.
- In the fifteenth hour, the problem and solution that could not be solved even after using all of my knowledge.
- In the sixteenth session, a pumping issue caused by a cracked head protection plate and its solution.
- In the seventeenth hour, the problem of a specific color suddenly disappearing during printing and how to resolve it.
- In the eighteenth hour, the issue of faded Color.
- In the nineteenth hour, the issue of white ink flying around the image.
- In the twentieth hour, two problems that arise when you miss the damper replacement period.
- In the twenty-first hour, we covered how to identify problematic colors when they don’t appear correctly during printing.
You can check the details by clicking the link.
Today, I’ll talk about the problems that arise when you ignore the alarm from the main ink tank and continue using it, and the remaining ink level after the alarm.
II. Can I ignore the ink alarm? _ Problems that occur when ignoring the low ink alarm
1. Questions we occasionally receive
“I hear an alarm sound from the back of the printer. Does this mean the ink is low?”
“Yes. Which color is the light blinking?”
“It’s blinking in White 1.”
“The first White bottle has four channels, and the second White bottle has two channels. The first White ink bottle is using more ink than the second.”
“Yes. How long can I expect to use this ink in this condition?”
“It depends on the amount of White ink printed, but roughly speaking, about an hour should be fine.”
2. Main ink bottle alarm structure
Here’s a quick explanation:
- Most small inkjet printers manufactured in China use the same ink bottle.
- Color is connected to one channel per ink bottle.
- For example, if you use CMYK, Lc, and Lm (six colors), the main ink bottles also have one CMYK, Lc, and Lm bottle, connected 1:1.
- White has two main ink bottles. The first white bottle has four channels, and the second white bottle has two channels.
- Varnish has one main ink bottle connected to six channels.
- There’s a sensor inside the main ink bottle that indicates when the ink level is low.
- When the sensor is activated, an alarm sounds, and a light on the back indicates which main ink bottle is low.
- When you refill the ink, the sensor stops operating, the alarm sounds, and the blinking light stops.
III. Ink remaining after alarm _Problems that occur when ignoring the low ink alarm
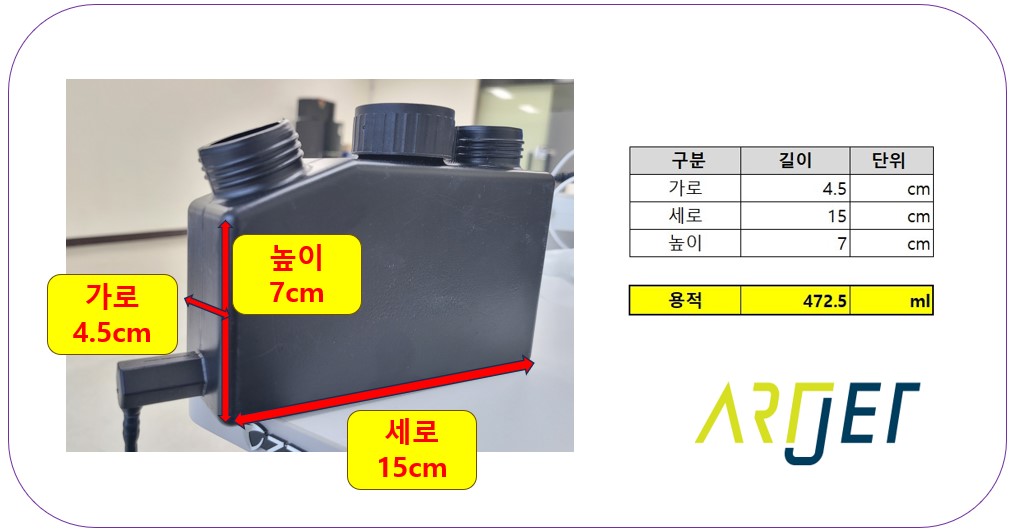
1. Main ink bottle capacity
As shown in the photo below, the outer diameter is measured to be 427.5 ml, and the inner diameter is estimated to be approximately 400 ml.
The main ink bottle holds approximately 400 ml of ink.
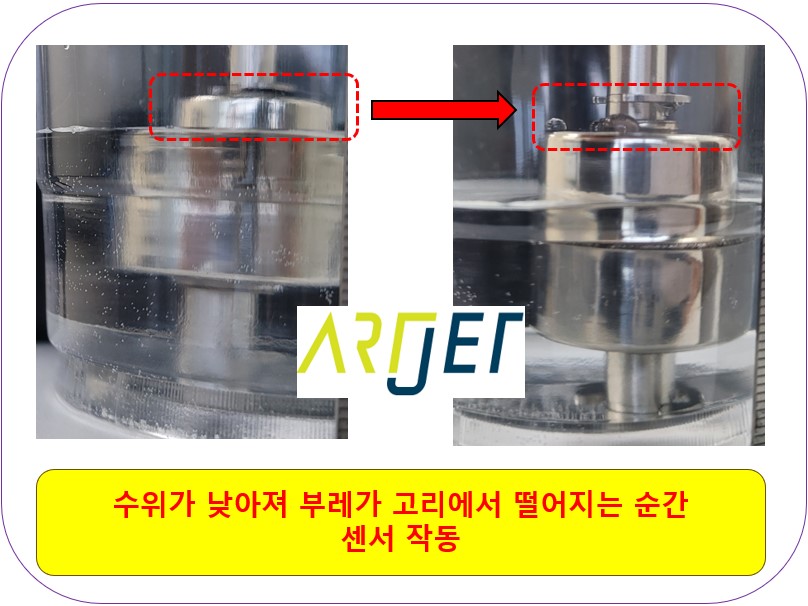
2. When the alarm sounds
Most inkjet printers have a float sensor attached to the main ink bottle.
- When the ink level is high, the float sensor remains attached to the sensor, preventing the alarm from sounding.
- When the ink level drops, the float sensor detaches from the sensor, triggering an alarm.
- Each bottle has a float sensor, and the alarm sounds and blinks a light to indicate which bottle is low on ink.
- When the ink level in a bottle drops, the float sensor attached to the hook detaches, triggering an alarm indicating low ink.
- When ink is refilled, the float sensor reattaches to the hook, stopping the alarm.
- In the photo below, the left side has enough ink to prevent the low ink alarm from sounding, and the right side has low ink.
3. Amount of ink available after alarm
Let’s calculate the amount of ink remaining in the main ink bottle when the float sensor is activated.
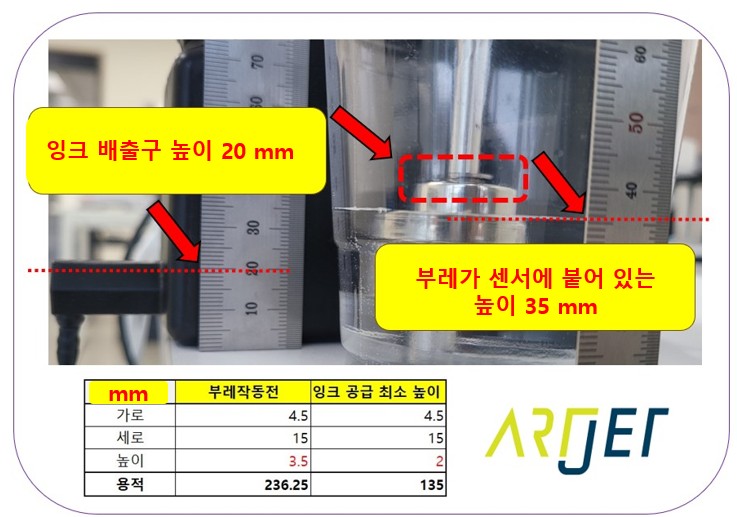
While the float sensor’s activation height is important, so is the height at which the ink flows out.
1. The height at which the ink bottle float sensor operates is 35mm.
- The total height of the main ink bottle is 70mm.
- In the photo above, the float sensor activates when the ink level drops below 35mm.
- That’s when the alarm starts to sound.
- “If the total height of the ink bottle is 70mm, and the alarm sounds at 35mm, that’s exactly halfway, so doesn’t that mean half the ink is left?”
- Yes, that’s correct. Half the ink is left.
- However, the usable ink isn’t the same.
2. Ink discharge height from the ink bottle: 20mm
- The discharge height from the ink bottle is not located above the bottom of the main ink bottle.
- Looking at the left side of the photo above, the ink discharge port is located above the bottom, with its highest point being 20mm.
- This means that if the ink level in the ink bottle falls below 20mm, ink and air are supplied together into the ink tube.
- If ink is supplied together with air, the ink is not fully filled, which can cause printing problems.
3. After the low ink alarm sounds, the available ink is 100ml, not half.
- At the time the ink float sensor activates, remaining ink at a height of 35mm: 236.25ml
- At the minimum ink supply height of 20mm, remaining ink is 135ml.
- From a height of 35mm to 20mm, available ink is 101.25ml (236.25ml – 135ml).
- After the ink alarm sounds, approximately 100ml of ink is available.
IV. Problems that occur when ignoring the low ink alarm
1. Problems that occur during printing
Most small UV printers use convection and dampers instead of pneumatics to supply ink.
Convection systems, in particular, require ink to be fully filled from the main ink tank through the ink tube to the damper for stable ink jetting from the head.
If you ignore the ink alarm and continue using the printer, exceeding the 100ml limit,
- the ink level will drop below the 20mm height of the outlet, causing air to enter the ink tube along with the ink.
- If the ink tube is not fully filled with ink and fills with air intermittently,
- and this air reaches the damper, the damper will not be able to properly hold the ink,
- and the ink will drip onto the floor during printing, as shown in the photo below.
- This dripping prevents subsequent ink jetting, resulting in poor color reproduction.
- The photo below shows the varnish problem, not the color problem.
- If the main ink bottle is low on color, the same problem occurs as in the varnish problem below.
2. How to recover
“Shouldn’t I just clean it and print again?”
“No.”
I thought the same thing and proceeded without much thought, but I was flustered when it didn’t work.
- After cleaning, I did a nozzle test and it was fine. I printed, but at first, it was fine, but then the same problem occurred.
- This time, I briefly pumped the printer, cleaned it, checked the nozzle test, and printed again, but the same problem occurred again.
- ‘Why on earth is this happening?’
The reason the problem remains unresolved is that:
- Once air enters the ink tubes, cleaning alone cannot completely remove it.
- Because air is trapped in the ink tubes, cleaning alone cannot completely remove all the air.
- The remaining air then re-enters the ink tubes, creating air pockets in the ink tubes.
- Short pumping also fails to completely remove the air trapped in the ink lines.
- For this reason, cleaning or short pumping does not resolve the problem.
Until all the air in the ink tubes is expelled,
- Pump for a long time to completely replace all the ink and air in the ink tubes with new ink. This will completely expel all the air inside the ink tubes.
- After pumping, do not stop immediately after the ink is properly discharged into the waste ink tank. Allow approximately 30 seconds for the ink to be supplied from the bottle to the head before stopping.
- If you continue using the ink tubes without completely expelling the air, the same problem may recur.
V. ARTJET UV Printer
One thing I’ve noticed after five years of sales and maintenance of ARTJET UV printers is that troubleshooting data is second only to product stability.
All products have issues, whether they’re caused by actual equipment problems or consumer error. Product stability hinges on how quickly and easily you can resolve those issues.
ARTJET compiles all troubleshooting data.
You can see the product print quality by clicking here.
Click here for ARTJET pricing and terms of sale. The exterior design has changed.

핑백: White cleaning methods that might clogged - Printer Cleaning Issues Part 23 ARTJET 2026