
UV printer ink supply problem pump motor operation principle — Pump Motor _ Ink Supply Problems (Part 4)
✅ Who Should Read This
- Anyone curious about the operating principle and role of the motor pump
- Anyone wanting to understand the difference in head cleaning methods between large-format inkjets and small printers
- Anyone troubleshooting why the internal cylinders are not rotating or why pumping fails
- Anyone wondering about the replacement schedule and method for the yellow peristaltic pump tube
⚠️ Precautions
- Regular replacement of the yellow tube every 3 months is highly recommended — even if it still operates, a collapsed tube reduces cleaning performance compared to a new one.
- When replacing the yellow tube with a new one, it might initially be too tight, causing only a humming sound without the cylinders turning — slightly loosening and re-closing the pump cap will normalize operation.
- Even if the pump motor is normal, if air infiltrates the captop lower tube or the damper connection, inkload (pumping) may fail.
- For printers using a damper, pumping must function normally to enable head cleaning and printing.
🧭 Key Summary (Field Insight)
- The pump motor operates by using 3 cylinders to press and rotate the yellow tube, forcing ink to flow in a single direction.
- Large-format inkjets (pneumatic system, Purge button) vs. Small printers (convection system, Damper) — the core head cleaning principles are completely different.
- If the motor spins but the cylinders do not → suspect excessive contraction of the yellow tube. If the cylinders spin but pumping fails → suspect weak pressure or micro-tears in the tube.
- If a humming noise occurs after a new tube replacement → solve it by slightly opening and re-closing the cap.
📋 Ink Supply Problems — Full Series List
We are documenting ink supply problems in order. This list is updated with each new part.
In our fourth look at ink supply problems, we explain the pump motor.
We cover the operating principles and role of the pump motor, the differences in cleaning methods between large and small printers, and real-world field problems alongside their solutions.
I. Background _ UV printer ink supply problem pump motor operation principle
1. Ink Supply Flow Diagram

- This article covers the Pump Motor section highlighted in the full ink supply problem index.
II. Pump Motor Location _ UV printer ink supply problem pump motor operation principle
1. Ink Supply Route and Series Guide

- When ink enters the Damper from the main ink bottle via the ink tube, it passes through the print head, flows to the captop, moves through the motor pump, and finally drains into the waste ink bottle.
- In Part 1, we explained the Captop Lower Tube; in Part 2, the How to Replace the Captop; and in Part 3, the Damper.
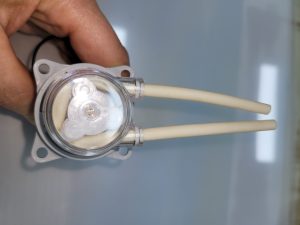
- You can identify each component name in the photo below.

- In this session, we will explain the operating principle and the role in ink supply of NO.3 Pump Tube & Motor shown in the photo above.
III. Inkjet Printer Head Cleaning Methods _ UV printer ink supply problem pump motor operation principle
1. Pneumatic Method (Large-Format Printers)
This method is primarily used in large-format inkjet printers.1_1. From Main Ink Bottle to Sub-Ink Tank
- In large-format inkjets, when ink is replenished in the main ink bottle, it is secondary-stored in a sub-ink tank before reaching the head.
- The sub-ink tank regulates the ink flow to ensure stable jetting from the print head.
- Depending on the printer size, the main ink bottle and the sub-ink tank are connected by an ink tube stretching 5 to 7 meters.
- A relatively high-power pump motor transports ink across this 5-to-7-meter section.
- Once the sub-ink tank is full, the pump motor next to the main bottle stops, and it runs again to refill as ink is consumed during printing.
1_2. From Sub-Ink Tank to Head, and Cleaning
- A different mechanism is used from the sub-ink tank to the print head nozzles — it is controlled by positive air pressure, negative air pressure, and convection pressure.
- By breaking the vacuum state that keeps the ink in the sub-ink tank from flowing downward and momentarily injecting air, ink is pushed out through the head.
- This button is called Purge. Pressing the Purge button injects air for 2 to 3 seconds before restoring the vacuum state.
- After ink flows out through the head for 2 to 3 seconds, cleaning is completed by wiping the head surface with a cloth.
2. Convection Method and Damper (Small Printers)
This method is used in small printers and shares the same principle as standard desktop printers.2_1. Ink Supply Principle of Small Printers
- The ink tube originating from the main ink bottle connects to the Damper, which then plugs into each print head channel connection.
- To make ink flow from the main bottle to the final waste ink tank, the captop moves upward to fit tightly against the bottom of the print head, establishing an airtight vacuum seal.
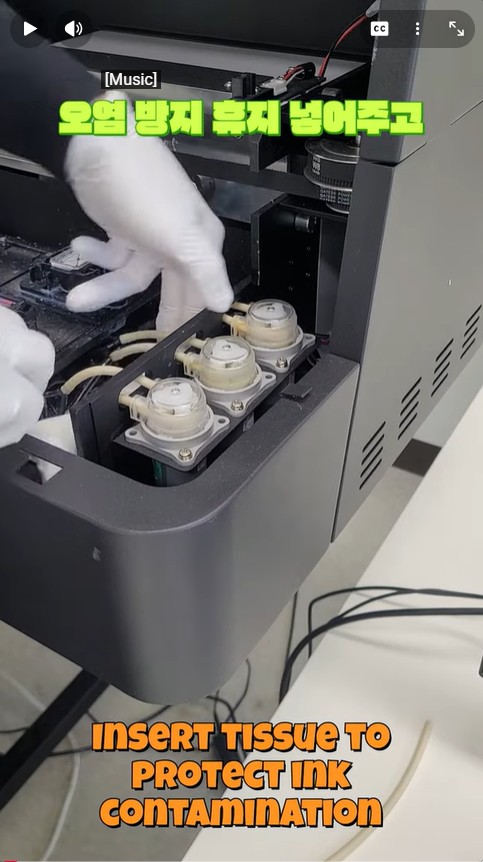
- When the pump motor rotates in this state, three rotating cylinders inside the motor pump press against the yellow peristaltic pump tube in a single direction.
- This physical force draws ink held in the damper through the print head into the captop, and pushes it through the yellow tube into the waste ink tank.
- Inkload (pumping) proceeds via this principle, and wiping the bottom of the head with a wiper completes the print head cleaning.
2_2. Convection and Damper Control System
- Once ink fills all lines from the main ink bottle to the head via the pump motor, the damper retains the ink, maintaining the print head’s jetting readiness.
- You can think of the damper in small printers as serving the role of the sub-ink tank found in large-format printers.
- It stably controls ink by combining a convection pressure system (which allows ink to flow from high to low positions) with desktop-proven damper technology.
2_3. Importance of the Pump Motor
- If the pump motor fails to draw ink due to various factors, printers using this method cannot perform head cleaning, making proper printing impossible.
- For printers using a damper, pumping must work normally.
- Because this is so critical, we are explaining the Captop, Damper, and Pump Motor related to ink supply in this dedicated series.
IV. Pump Motor Principles and Problem Summary _ UV printer ink supply problem pump motor operation principle
1. Operating Principle
- As the motor spins the central gear, the three internal cylinders rotate on their own axes while moving together in one direction.
- When the yellow peristaltic pump tube makes contact with these spinning cylinders, the cylinders press tightly against the tube while revolving.
- This squeezing action forces the ink to flow continuously in a single direction.
- Through this mechanism, ink from the main bottle travels all the way to the waste ink tank.

2. Common Pump Motor Issues in the Field
2_1. When the Motor Spins but Cylinders Do Not Rotate
- If the inside of the motor pump cap is clean and the motor runs fine but the cylinders fail to turn, the yellow tube may be completely worn and contracted.
- The three cylinders need external resistance (pressing against the tube) to revolve in a direction; if the yellow tube is overly collapsed, there is no compression, preventing the cylinders from turning.
- It is recommended to replace the yellow tube every 3 months.
- If it still runs but fails to function properly, cleaning performance will drop significantly compared to a brand-new state.
2_2. When Cylinders Turn but Pumping Fails
- The yellow tube might be just contracted enough to let the cylinders spin, but too weak to compress properly, meaning ink won’t be drawn through.
- Alternatively, there might be micro-tears in the yellow tube inside the pump cap.
2_3. When Only a Humming Sound Occurs After Replacing a New Tube
- When a new yellow tube is first installed, it is uncompressed and rigid, which can cause it to bind up tightly and exhibit this symptom.
- After a fresh replacement, slightly twisting the cap open and re-closing it will get it spinning.
- If air enters the captop lower tube or the damper connection point, inkload (pumping) may fail even if the pump motor operates perfectly.
- Watch the Video on How to Replace the Motor Pump Tube (Peristaltic Pump Tube, Yellow Tube)
V. UV Printer Basics · Troubleshooting · Product Guides
We have organized our UV Printer content below. Click an item to read the full post.
1) Ink Supply
23 articles on ink supply issues, including cleaning and pumping
2) Print Head Issues
12 articles on head-related problems, from replacement methods to symptoms
For deeper printhead study: Printhead Basics — 10 Articles
3) Electronics / Software Issues
4) Mechanical Issues
5) Sai Flexi RIP Installation, Spot Color, Troubleshooting
6) UV Printable Products — Full Summary
VI. ARTJET UV Printer
After selling and maintaining ARTJET UV printers for over 5 years, we have learned one vital lesson.
The most important factor next to product stability is accumulating troubleshooting data.
Problems can occur with any equipment depending on the environment, working conditions, and user skill level. What matters in the field is not “trouble-free equipment,” but:
How fast and how accurately you can find the cause and solve the problem when it occurs.
ARTJET continuously collects and organizes real-world problem data from the field to support faster and more accurate problem resolution.
🎥 View Print Quality Samples
🧾 Full List of UV Printable Products

* Note: Exterior design has been updated.
※ This article is based on actual field cases. Results may vary depending on the environment and equipment configuration.
핑백: UV Printer printing is fine at first, suddenly color is changed
핑백: UV Printer White comes out well or not ARTJET 2025
핑백: UV Printer ink pumping worked fine, but suddenly it doesn't ARTJET 2025
핑백: UV Printer nozzle is normal, but a specific color is missing during printing ARTJET 2025
핑백: UV Printer When to Replace the Damper ARTJET 2025
핑백: UV Printer Monday Head Cleaning ARTJET 2025
핑백: UV Printer White cleaning every day for a month ARTJET 2025