
The Color Has Faded — Ink Supply Problems (Part 18)
✅ Who Should Read This
- Anyone whose Color prints come out overall pale even though cleaning and pumping both work fine
- Anyone whose prints start out faded and gradually become the right color partway through
- Anyone whose prints look dull and dark after leaving White ink unused for a few days
- Anyone curious how White pigment separates over time, and how to use ink load (pumping) to fix it
⚠️ Precautions
- Faded colors look like a Color ink problem, but the real cause is usually insufficient White density
- Only White needs pumping — Color and Varnish don’t need it
- Stop pumping 15–20 seconds after White ink starts flowing into the waste tank, not right when you press the button
- Printing right after pumping without cleaning can leave the nozzle pattern unstable, since the Damper is temporarily empty
🧭 Key Summary (Field Insight)
- White ink has large, heavy pigment loaded in high concentration, so a few idle days let it settle and separate inside the ink tube
- The lighter, separated White flows into the Damper first, making the Color printed on top look dull — it’s not a Color ink problem
- Fix: pump White only for 15–20 seconds → clean → wait 5 minutes → clean White 1–2 more times → print a test image → proceed if it looks right
- This rarely happens with daily use — check this first whenever the printer sat idle for a few days
📋 Ink Supply Problems — Full Series List
We are documenting ink supply problems in order. This list is updated with each new part.
03Damper
18The Color Has Faded
In our eighteenth look at ink supply problems, we cover why Color prints can look faded even when cleaning and pumping both work fine.
This is a question first-time UV printer users almost always ask — and the real cause usually turns out to be White density, not Color.
I. Background _ The Color Has Faded
1. Ink Supply Flow Diagram
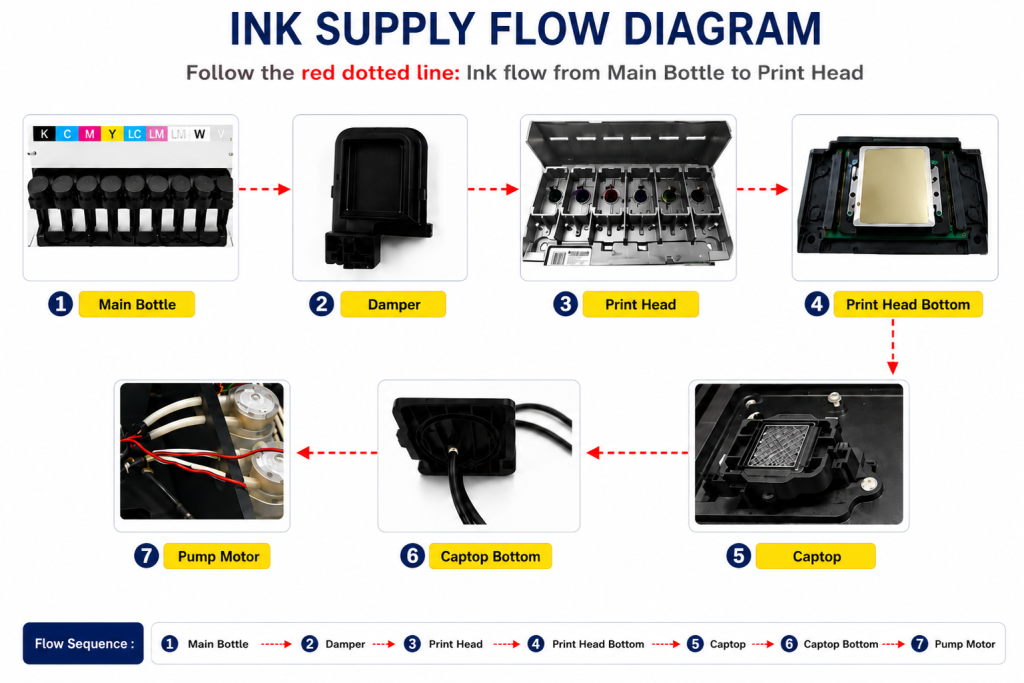
- When ink enters the Damper from the main ink bottle via the ink tube, it passes through the print head, flows to the captop, moves through the motor pump, and finally drains into the waste ink bottle.
- This article covers The Color Has Faded in the full ink supply problem series.
- This follows Part 1 Captop Lower Tube, Part 2 How to Replace the Captop, Part 3 Damper, Part 4 Pump Motor and Yellow Tube, Part 5 Captop and Head Position, Part 6 Aligning the Captop and Head Position, Part 7 When the Capping Station Level Is Not Correct, Part 8 Captop Surface Drying, Part 9 Degraded Ink Inside the Captop, Part 10 Time for Ink to Fill the Damper, Part 11 Ink Tube Burst, Part 12 How to Replace a Motor Pump Tube, Part 13 Why White Cleaning Doesn’t Work Well, Part 14 Why It’s Important to Replace the Yellow Tube and Captop, Part 15 Head Protection Plate Crumpled, Part 16 Head Protection Plate Cracked, and Part 17 When a Specific Color Drops Out During Printing.
II. Problem Symptoms and Solutions _ The Color Has Faded
1. Problem symptoms
This is a question first-time UV printer users inevitably ask.
“Cleaning and pumping both work fine.”
“Both Color and White print fine on a nozzle test.”
“But whenever I print, the whole thing comes out lighter overall.”
“Oddly, the beginning is pale, and it gradually gets to the right color as I get toward the middle of the print.”
“Both Color and White print fine on a nozzle test.”
“But whenever I print, the whole thing comes out lighter overall.”
“Oddly, the beginning is pale, and it gradually gets to the right color as I get toward the middle of the print.”
2. Follow-up questions and the fix
When someone says the color has faded, we first need to check whether a specific ink is actually missing, or whether it’s a different symptom entirely. At this point we usually ask for a nozzle test pattern or a photo of the printed image.
“Could you send a photo?”

After seeing this issue reported a few times, here’s the fix we now give:
- Pump White ink only, and stop 15 seconds after ink starts flowing into the waste tank,
- then clean and run a nozzle test.
- If the White nozzle still isn’t right, repeat cleaning once or twice and test again.
- Once the nozzle test pattern looks reasonably good, print a test image.
- If that’s fine, go ahead with the actual job.
💬 A few more things worth noting:
- Color and Varnish don’t need pumping — pump White only.
- Don’t count from when you press the White pump button — count 15–20 seconds from when White ink actually starts flowing into the waste tank, then stop.
- After pumping, ink is left on the underside of the head, so cleaning is essential.
- Since only White was pumped, clean only White.
- Pumping forcibly drains White ink from the Damper, so even after cleaning, the nozzle pattern can be unstable since the Damper is empty.
- Wait about 5 minutes, run 1–2 White cleanings, then print a test image.
- During the test image print, the Damper refills with ink and White jetting condition improves.
- One or two more cleanings after the test print will restore the nozzle condition significantly.
III. Why the Color Appears Pale _ The Color Has Faded
1. Is it Color that’s pale, or is it White that’s lost its opacity?
This one caught us off guard the first time it was reported.
- Looking at the photo above, the left side looks dull and the right side looks bright.
- Looking only at the Color makes it easy to mistake this for a Color-specific problem.
- But if you look closely at the White instead of just the Color,
- the White on the left is dark, and the White on the right is bright.
💬 In both photos shared above, the White density simply wasn’t high enough, making the Color printed on top look dull.
- Just like printing Color on a dark background makes the whole thing look dark and unsaturated,
- think of it as printing on paper with a darker undertone instead of pure white paper — that’s what a diluted White looks like.
- “The colors look faded” and “the right color starts showing up partway through the print” — both come from the same cause: diluted White density.
2. Why does White come out pale?
CMYK, Lc, Lm — the pigment in Color ink is relatively small in amount and particle size, so it doesn’t settle to the bottom.
- To render color properly, just the right amount of pigment needs to be added.
- Too much makes it dark and muddy; too little fails to render the color properly.
- In other words, there’s no need to load Color ink with heavy pigment.
- Because Color ink doesn’t carry much pigment, it stays evenly dispersed compared to White pigment and doesn’t settle.
White ink, on the other hand, is far more demanding when it comes to the pigment that renders white.
- First, achieving true white requires a White pigment that actually renders as white (other inks tend to carry a slight yellow undertone).
- Second, White printing needs to create proper opacity, even over transparent or colored materials.
- For these reasons, White ink’s pigment particles are larger than Color’s.
- It also carries as much pigment as stability allows — up to the maximum safe amount.
- So compared to Color ink, White ink has both larger and more abundant pigment.
- Because of this, if White ink isn’t stirred regularly, the heavier pigment settles to the bottom, leaving dense White below and thin, pigment-poor White above.
In printer terms:
- Most main ink tanks have a built-in stirring device, so White ink stays well mixed inside the tank itself.
- But the roughly 2.5-meter ink tube running from the main tank to the Damper has no stirrer or circulation device at all.
- With daily use, ink keeps moving through the tube, so heavy pigment has no chance to settle.
- But after 2–3 days without use, the heavy pigment in the White ink sitting in the tube settles toward the bottom.
- As White pigment collects at the bottom, the White at the bottom of the tube becomes dense, while the White near the top becomes thin.
- That thinner White at the top is lighter and flows more easily, so convection pressure carries it into the Damper first — which is why thin White comes out initially.
- During a nozzle test, this thin White still prints fine since it’s technically intact, so printing proceeds.
- When that thin White gets printed as the base layer and Color goes on top, the Color ends up looking dull because of the weak White underneath.
3. The Ink Load function
Ink load, or pumping, is the process of forcibly draining out ink.
- Running an ink load drains the separated ink sitting in the ink tube into the waste ink tank,
- and refills the ink tube and Damper with fresh ink from the ink bottle.
- Printing in this state produces White at a higher, more consistent density.
- Note that the White ink inside the Damper can also separate into layers over time, so rather than running a longer White clean in some cases,
- a short ink load followed by cleaning can restore the White nozzle condition more quickly.
IV. UV Printer Basics · Troubleshooting · Product Guides
We have organized our UV Printer content below. Click an item to read the full post.
1) Ink Supply
23 articles on ink supply issues, including cleaning and pumping
2) Print Head Issues
12 articles on head-related problems, from replacement methods to symptoms
For deeper printhead study: Printhead Basics — 10 Articles
3) Electronics / Software Issues
4) Mechanical Issues
5) Sai Flexi RIP Installation, Spot Color, Troubleshooting
6) UV Printable Products — Full Summary
V. ARTJET UV Printer
After selling and maintaining ARTJET UV printers for over 5 years, we have learned one vital lesson.
The most important factor next to product stability is accumulating troubleshooting data.
Problems can occur with any equipment depending on the environment, working conditions, and user skill level. What matters in the field is not “trouble-free equipment,” but:
How fast and how accurately you can find the cause and solve the problem when it occurs.
ARTJET continuously collects and organizes real-world problem data from the field to support faster and more accurate problem resolution.
🎥 View Print Quality Samples
🧾 Full List of UV Printable Products

* Note: Exterior design has been updated.
※ This article is based on actual field cases. Results may vary depending on the environment and equipment configuration.
핑백: Printer Cleaning Problems Part 23 Table of Contents ARTJET 2026