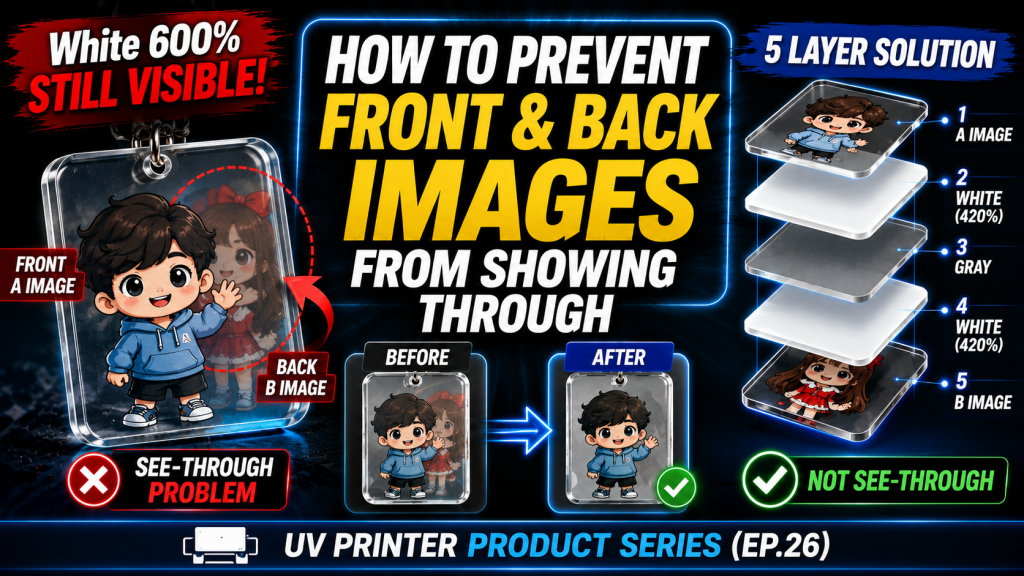
- Those who need to print different images on the front and back of transparent materials such as acrylic keyrings
- Those struggling with the back image showing through even after increasing White density
- Those who want to learn layer configurations for blocking show-through between front and back images
- Increasing White density above 600% can cause the ink surface to become uneven, resulting in rough Color reproduction
- Thicker ink layers may cause defects during acrylic bonding, so do not raise White density excessively
- The darker the front and back images (black or dark colors), the worse the show-through becomes — if complete blocking is required, consider a 7-layer configuration and higher pricing
- Increasing White density alone cannot block show-through between front and back images (show-through occurred at both 300% and 600%)
- Optimal field configuration: Image A → White(420%) → Gray → White(420%) → Image B (5 Layers)
- For complete blocking: Image A → White → Gray → Black → Gray → White → Image B (7 Layers), but with increased time and cost
- The lighter the front and back images, the less noticeable the show-through; the darker they are, the worse it gets
Today, we will explain how to create a blocking layer to prevent show-through when printing different images on the front and back sides.
I. Request for Printing Different Images on Front and Back — How to Prevent Show-Through When Printing Different Images on Front and Back
“Team Leader, this keyring order has different images on front and back, and they can’t show through — is that possible?”
“No matter how much White you apply, if the background color is dark it will still show through. To completely block show-through when printing different images on front and back,
A Image => white => gray => black => gray => white => B Image — they print it with 7 layers like this.”
“If we do that, the ink thickness will be too much, and it probably won’t bond well during acrylic lamination.”
“Let me first test by increasing the White density.”
You might expect that simply printing White thickly would prevent the front and back images from showing through each other,
but think of it like painting a wall. You have to apply white paint several times over a black wall before it turns white.
With inkjet printing, you have to block it with ink droplets, which makes it even more difficult.
After several rounds of testing, we minimized the show-through of different front and back images.
We will explain the testing process and the final print conditions used for the delivered sample.
II. Adjusting White Density and Final Sample Conditions — How to Prevent Show-Through When Printing Different Images on Front and Back
1. White Density Test
1_1. White Density 300%
- White density can be adjusted by going to the left Menu => Spot Colors Setting window as shown in the image below, which opens the screen on the right,
- and moving the cursor inside the red dashed area labeled “White Ink Density” at the bottom of the screen.
-

How to Prevent Show-Through When Printing Different Images on Front and Back - A Image => White 300% => B Image, we first proceeded with printing at White 300%, the default mode.
- Looking at the right screen in the image above, Channels 1 through 6 are K, C, M, Y, Lc, Lm,
- and Channels 7 through 12 are all White channels — there are 6 channels that jet White.
- Because of this, when White Ink Density is set to 50%, the actual White output relative to Color becomes 300% (6ch × 50% = 300%).
- After printing at White 300% and slightly lifting the piece to check, Image B on the back was visible through Image A on the front.
1_2. White Density 600%
- We tested by raising White density to its maximum.
- In other words, we printed as A Image => White 600% => B Image.
- We raised the White Ink Density inside the red dashed area in the image above to 100% (6ch × 100% = 600%), printing at White 600%.
- Since only the channel ink density was changed from 50% to 100%, print speed remained the same.
- While the back image showed through less than at White 300%, Image B on the back was still visible through Image A on the front.
- Additionally, because the White density was too high, the White ink surface became uneven, making the Color image appear slightly rough.
- In other words, White 600% failed to block show-through between front and back images, and also caused rough Color reproduction.
2. “Other companies add a gray layer in the middle”
2_1. Layer Configuration
- Increasing White density alone could not block show-through between front and back images.
- At this point, the client who requested the printing provided information that other companies “add a gray layer in the middle.”
- In other words, when printing: A Image => white => gray image => white => B Image, they print with a total of 5 layers.
- To proceed with the same method, we created layers in an AI file.
- We created the AI file with 4 layers total: A Image Layer, B Image Layer, White Spot layer, and Gray Image layer,
- and saved the print files divided into three parts.
- First print file: White spot, A Image => Using reverse printing, Image A is laid down first with White printed on top,
- Second print file: Gray, White spot => On top of the first print, i.e., Gray image is printed on top of White, then White is printed on top of that,
- Third print file: B Image, Crop mark => On top of the second print, i.e., Image B is finally printed on top of White
- In this way, through 3 prints, we printed 5 layers: A Image => white => gray => white => B Image.
2_2. 5-Layer Print Results
- Using the auto-print function that automatically continues to the next image after each print is complete, we printed files 1, 2, and 3 in sequence, and tested with two different White density settings.
- With 5-layer printing at White density 300%, there was improvement, but the front and back images still seemed to show through.
- With 5-layer printing at White density 420%, it was noticeably better than before, but complete blocking was not achieved.
- The most perfect method would be Image A => white => gray => black => gray => white => Image B, but in practice, the time and cost were too high, so we did not proceed that way.
- Instead, accepting slight show-through, we proceeded as follows, the sample was confirmed, and actual production was carried out the same way.
- A Image => white(420%) => gray => white(420%) => B Image
3. A Few Tips3_1. Tips on Acrylic Bonding
- If the ink layer is too thick, defects may occur during acrylic bonding, so we used 420% instead of 600% for White.
- Since White was printed twice — before and after the Gray layer — the total White density was 840%.
- There was a possibility of defects during acrylic bonding due to the thick White layer, but fortunately, no bonding defects occurred.
- If acrylic bonding is required for final delivery, be careful not to make the White density too thick.
3_2. Tips on Image Selection
- Given that even at 840% White density the front and back images still showed through slightly, White alone cannot achieve complete blocking.
- Additionally, the darker the front and back images — that is, the closer to black or dark colors — the worse the show-through problem becomes, while lighter images on both sides showed less visible show-through.
- If both sides have dark images and the customer requires complete blocking, you should set a higher price and proceed with: A Image => white => gray => black => gray => white => B Image.
III. ARTJET UV Printer
