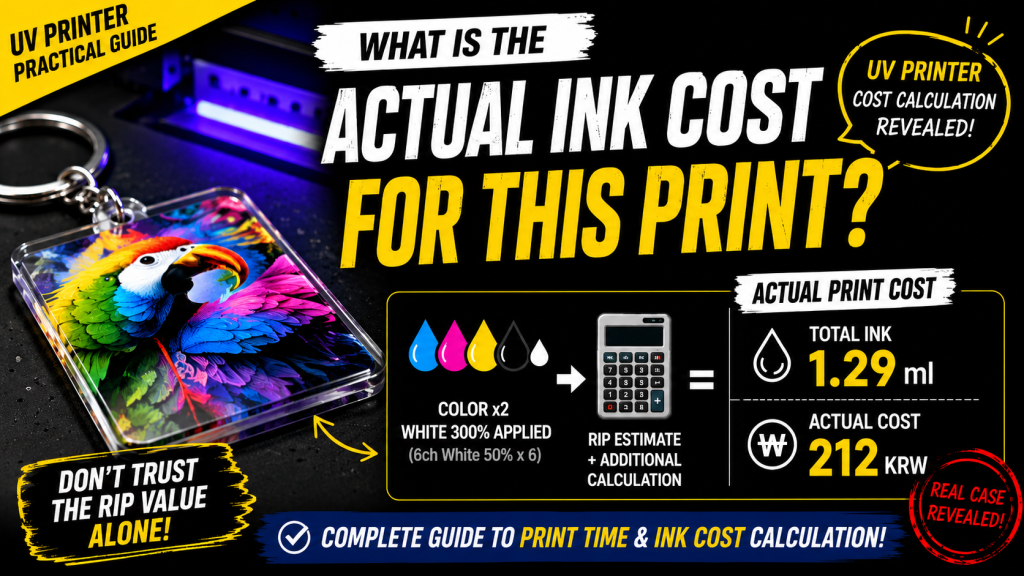
- Those curious about CWC (Color+White+Color) double-sided printing methods
- Those wanting to calculate actual ink consumption and cost for printed images
- Those wanting to evaluate profitability based on printing time and ink cost when adopting a UV printer
- The single-pass CWC printing method divides the head nozzles into thirds, which slows print speed and may cause unused nozzles to deteriorate from continuous LED lamp exposure.
- Ink consumption values provided by RIP software are based on a single print pass, so for CWC printing, you must separately calculate Color at 2× and White density settings (e.g., 300%).
- Ink costs are based on pure printing consumption only — ink consumed during cleaning, pumping, and other maintenance is separate.
- CWC Printing Method Comparison: Single-pass CWC printing divides nozzles into thirds and is actually slower. Printing CW first, then Color separately is faster and safer for the print heads.
- Print Time: For a 596×287mm image, total CW+C bidirectional printing time is approximately 21–22 minutes, with the second image printing automatically.
- Ink Cost Calculation: Use the RIP software’s estimation function to check ink volume for a single print pass, then apply Color at 2× and White at 3× (based on 300% setting) to calculate the actual CWC ink cost. In this case study, total ink was 1.29ml at a cost of approximately $0.27 USD.
Today, we will explain the printing time and ink cost for Color+White printing followed by Color printing — in other words, double-sided printing.
I. Can You Print Color White Color in a Single Pass? — How to Calculate Ink Cost for Actual Printed Images
1. CWC Printing vs. CW Then C Printing Methods
Customers sometimes ask this question:
“Can CWC be printed in a single pass?”
“It cannot be done in one pass — you need to print CW first, then print Color again.”
“That seems like an inferior feature.”
This is a technical topic that requires some explanation, but it is not easy to explain over the phone, so we will explain it here.
First, you need to understand how the CWC single-pass printing method differs from the CW-first-then-Color printing method.
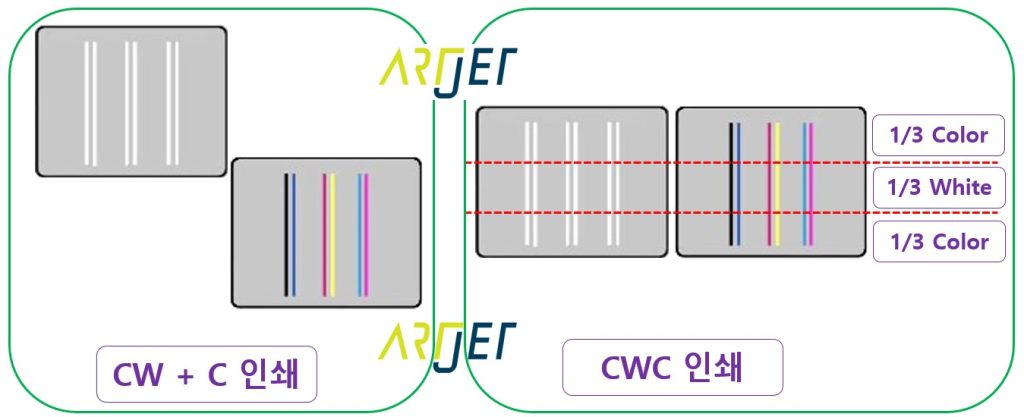
1_1. CWC Single-Pass Printing Method
- To print Color White Color in a single pass, the Color heads and White heads must be arranged in the same row, as shown on the right side of the diagram above.
- During CWC printing, only the front 1/3 of the Color head jets ink to print the front Color layer,
- then only 2/3 of the White head is used to print White while covering the Color printed in front.
- After that, only the rear 1/3 of the Color head jets ink onto the White layer to print the final Color layer.
- People unfamiliar with UV printers may think that CWC printing does not reduce print speed,
- but in reality, CWC printing does not use all nozzles — it uses only 1/3 at a time to print Color + White + Color, so print speed is reduced by a factor of 1/3.
1_2. CW-First-Then-Color Printing Method
- As shown on the left side of the diagram above, the Color heads are positioned in front and the White heads are positioned behind.
- To achieve CWC printing, Color and White are printed first,
- and after the CW printing is complete, only Color is printed again to produce the CWC result.
- In other words, there is no speed difference between single-pass CWC printing and CW-then-Color printing — in fact, CW-then-Color printing may actually be faster.
- Whether you split the same-sized head into thirds and use it once, or use the full head twice. Splitting into thirds for one pass results in 3× slower speed, while using the full head twice results in only 2× slower speed. That is why the two-pass method (CW then Color) can actually be faster.
- Additionally, most UV printers have a function that automatically starts the next Color image, so from a usability standpoint, CW-then-Color printing is no less convenient than single-pass CWC printing.
1_3. Risk Factors of CWC Printing
- Since only 1/3 of the nozzles are used at a time, the remaining 2/3 of unused nozzles are continuously exposed to the LED lamp during printing, which may cause the condition of unused nozzles to deteriorate during extended jobs.
- Additionally, using only 1/3 of the print head in a narrow band increases the likelihood of print banding.
2. If You Only Need to Print Color + White

- If you only need to print Color + White (not CWC), the left configuration uses the full print head, while the right configuration can only use 1/2 of the head.
- With the inline head arrangement on the right that enables single-pass CWC printing, when printing Color + White, 1/2 of the print head is used for Color and the other 1/2 for White, so print speed becomes 2× slower.
II. Calculating Print Time and Ink Cost Using Actual Images — How to Calculate Ink Cost for Actual Printed Images
1. Image File Information and Print Time
1_1. Image File Information and Ripping Method
- Print image size: 596 × 287mm
- Resolution: 720 × 1080 dpi
- First Ripping: Color + White spot Ripping
- Second Ripping: Reload the same image file in the RIP, set Spot 1 to None and Spot 2 to None, then RIP Color only
-

How to Calculate Ink Cost for Actual Printed Images
1_2. Print Method and Print Time
- The printers we sell have a section in the printer software that shows print time for all jobs completed during the day.
- Printing was performed using bidirectional (double direction) printing.
- First RIP file (Color + White) print time: 10 minutes 28 seconds
- Second RIP file (Color) print time: 9 minutes 37 seconds
- Adding approximately 1 minute for the transition between the first and second image, the total time based on bidirectional printing is approximately 21–22 minutes.
- The second image prints automatically — after Color + White printing is complete, the printer automatically prints the next image (Color only).
- For the related video, please refer to the link below.
- Auto-printing the Second Image After the First Image
-

How to Calculate Ink Cost for Actual Printed Images
2. Ink Cost Calculation
2_1. How to Obtain Ink Consumption and Cost from RIP Software
- Most UV printers consume a significant amount of ink through maintenance, but occasionally when preparing quotes, some users want to know the actual ink consumption for the printed image.
- The estimated ink consumption for today’s printed image can be checked using a function available in the RIP software.
-

How to Calculate Ink Cost for Actual Printed Images
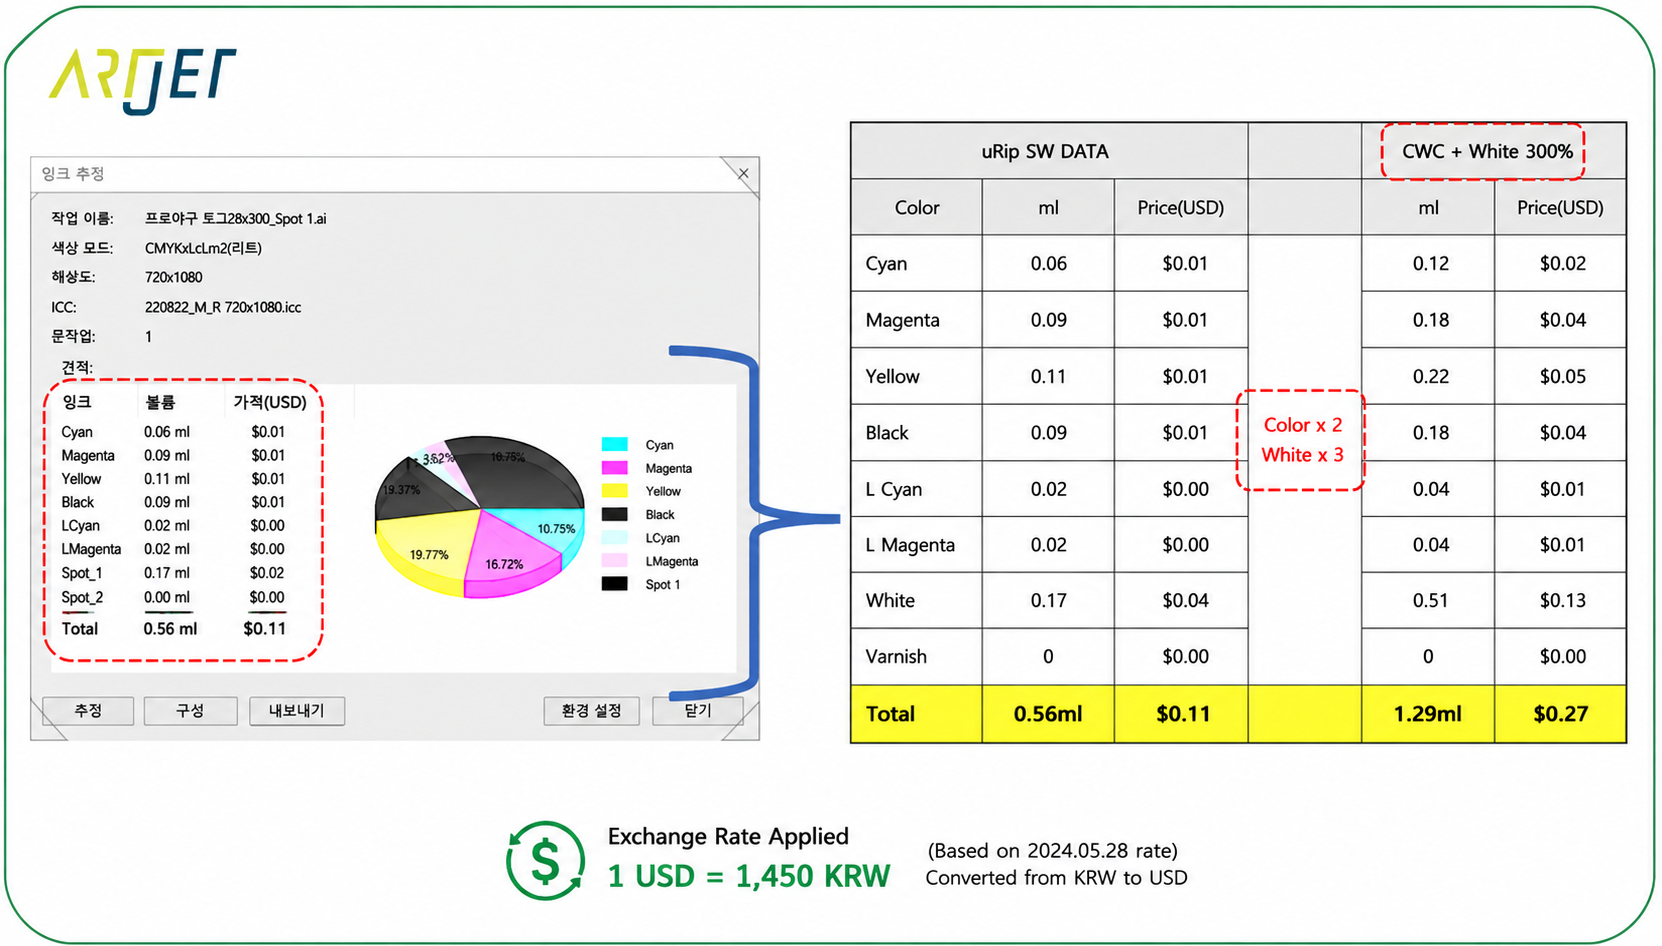
- As shown in the image above, for a RIP-completed image (the Estimate button will not be activated unless you load a new image and perform Ripping), you can press the “Estimate” option to check ink consumption.
- By referring to the site below and entering the volume and price of the ink you are currently purchasing, you can view not only ink consumption but also ink cost at a glance.
- For instructions on how to use the ink estimation option, please refer to the link below.
- View Ink Consumption and Ink Cost Instantly
2_2. Additional Calculation Method for Actual Ink Consumption
- The DATA on the left side of the diagram below is the value provided by the RIP software, and this value is based on a single Color + White print.
- Now let us explain how to calculate ink consumption for Color White Color printing.
- The printed image was produced by printing Color + White simultaneously, then printing Color one more time, so Color was printed a total of 2 times.
- White was printed only once, but at 3× the base value. In the printer program (not the RIP software), the White ink density was set to 300% — all 6 White channels set to 50% each (50% × 6 White channels = 300%).
- In other words, for CWC printing, Color was printed twice so it is multiplied by 2×,
- and White was printed once but at 300% density, so it is multiplied by 3×.
- The Excel sheet on the right side of the diagram below shows the calculated values with Color at 2× and White at 3× applied to the RIP DATA.
- In summary, the total ink used for CW printing followed by separate Color printing of the keyring image above was 1.29ml, and the ink cost was approximately $0.27 USD.
III. ARTJET UV Printer
