
Driver and basic settings after installing Sai Rip
So far, UV printer-related issues, We’ve compiled
24 articles on ink supply issues,
9 articles on head basics,
12 articles on actual head issues and their solutions,
10 actual mechanical Machine Problems and Solutions.
12 Problems and Solutions of Electronic Boards and SW Actually Issued
For related information, click on the article to go to the link.
Starting today, I’ll explain the issues, solutions, and features related to the Sai lip.
In the first part, I’ll explain how to install Sai Rip and configure the driver after installation.
I. Sai Rip installation _Driver and basic settings after installing Sai Rip
1. Sai Rip Installation Dongle USB Version and Preparation _Driver and basic settings after installing Sai Rip
Until a year ago, the UV Printer and Rip Box were provided together as shown below.
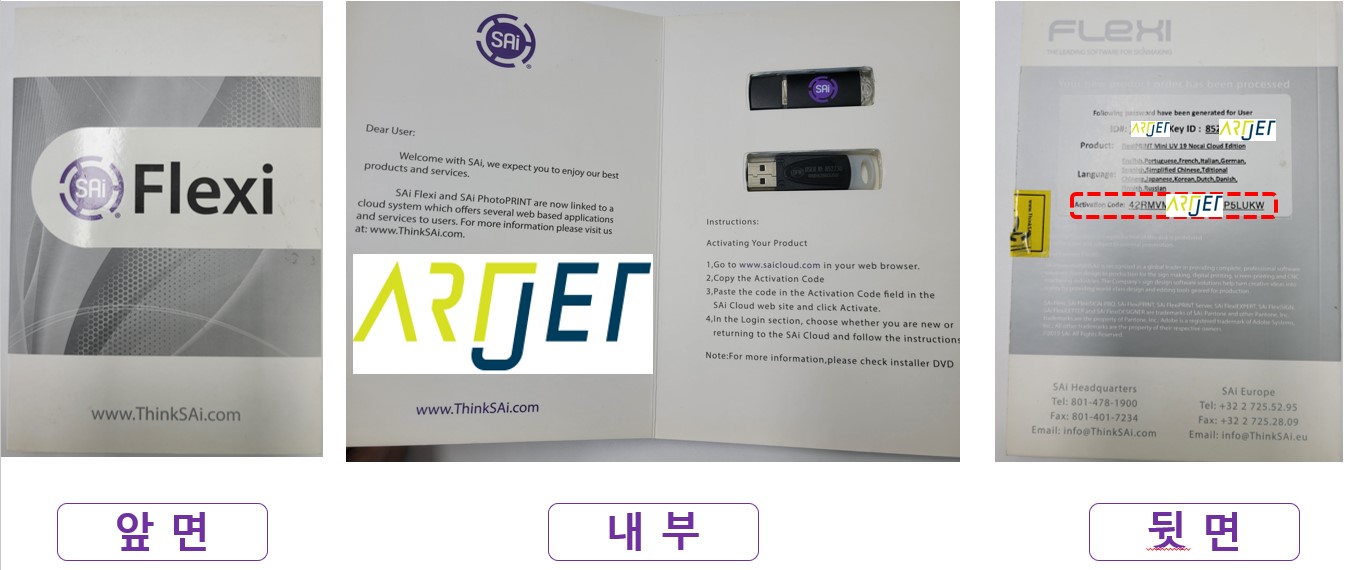
One customer moved and, although he had the lock key, lost the box containing the activation code, ultimately ending up buying a new Rip at a high price.
Please make sure you have the lock key and activation code, shown in the image below.

Additionally, you’ll need to use the Internet when installing programs or uninstalling existing ones.
Your PC must be connected to the Internet.
2. Install the Sai rip program _Driver and basic settings after installing Sai Rip
When installing the program, do not plug the Lock Key into your computer.
Rip installation requires three things: an internet connection, an installation USB drive, and an activation code.
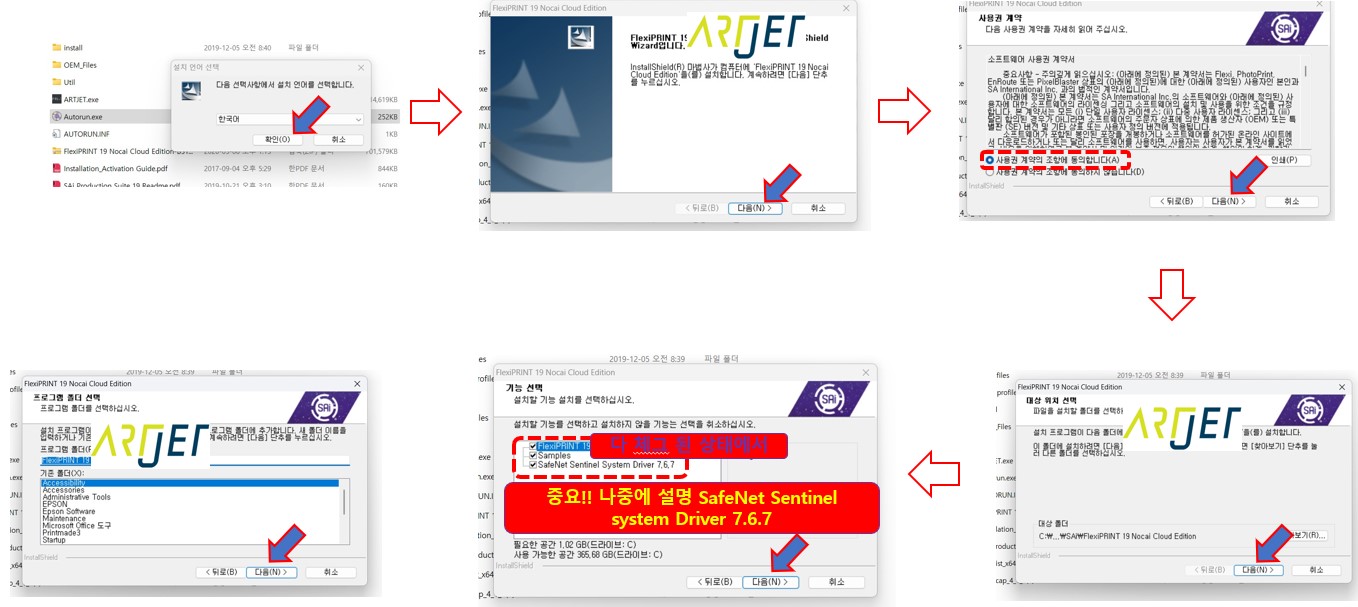
- Insert the USB drive containing the SAi RIP installer from the RIP box into your computer.
- You will see a folder called Flex. Go inside and double-click Autorun.exc to begin the program installation.

- Select Korean and click “Confirm.”
- The screen will move to the next screen, then click “Next.”
- Select [I agree to the terms of the license agreement (A)] and click “Next.”
- A screen will appear asking for the Sairip program installation location, then click “Next.”
- On the feature selection screen, check all blank spaces and click “Next.”
- The screen will move to the next screen, then click “Next.”
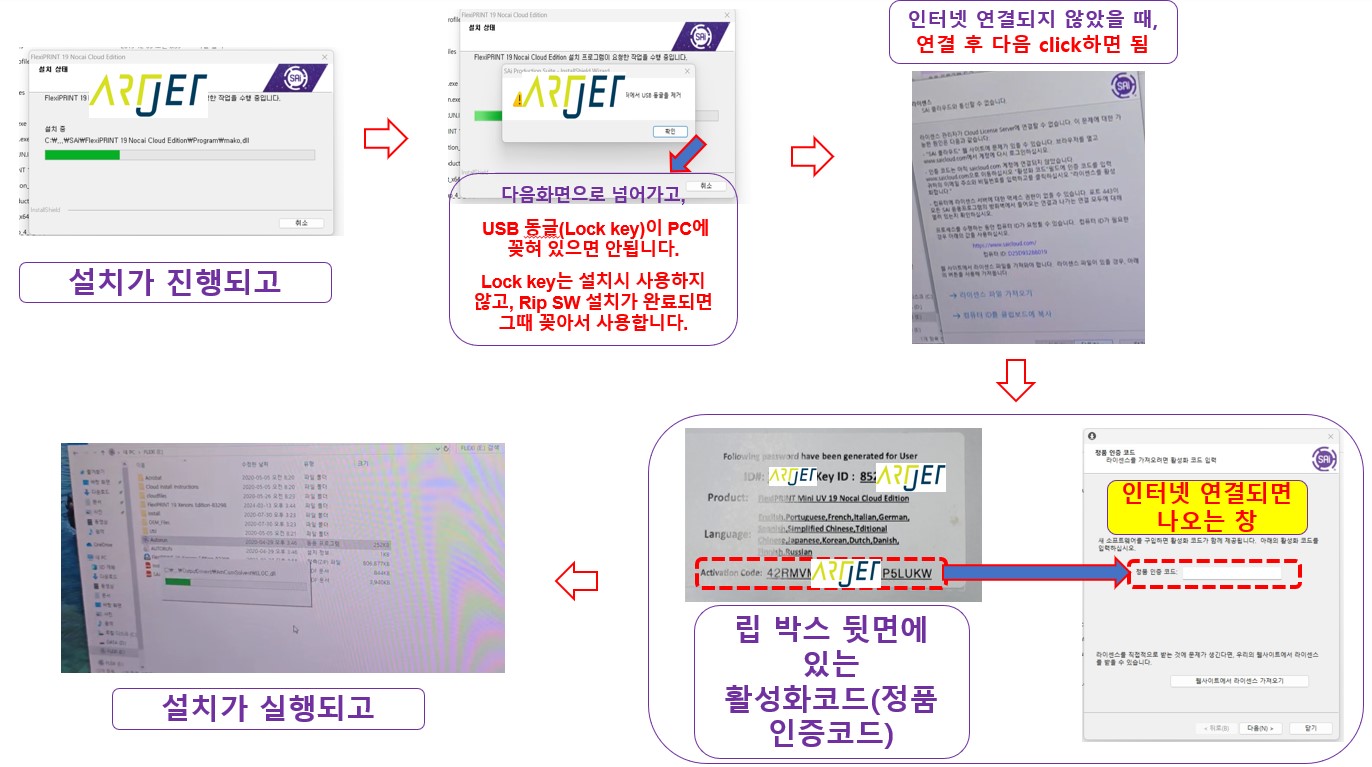
- The program will now begin installing.
- You’ll be asked if the USB dongle is plugged into your PC. If so, remove it.
- The Rock key will not be used during installation. It will be inserted and used once the Rip software installation is complete.
- If you’re not connected to the Internet, a third window will appear.
- If you are connected to the Internet, a fourth window will appear, prompting you to enter the Activation code located on the Rip box.
- Once you enter the Activation code, the installation will continue.
- Even after the icon is created on your desktop, the program is still installing,
- so you’ll need to wait patiently until the installation wizard closes, as shown in the image below.
- When the PM icon appears, do not run it immediately.
- Insert the dongle USB (Lock key) into your computer and double-click PM to launch it.
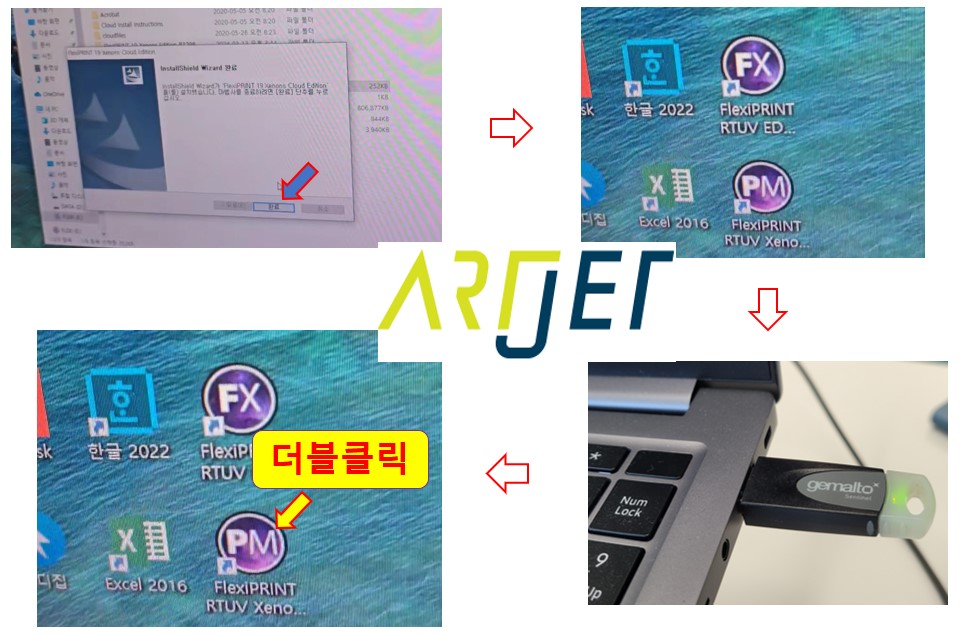
This is how the Sai rip program is installed.
II. Rip default settings after setting up the printer driver _Driver and basic settings after installing Sai Rip
1. Get the Printer Driver _Driver and basic settings after installing Sai Rip
To print a RIP file, you need to set up the printer driver used by RIP Software.
It’s almost identical to setting up a printer driver on your desktop.
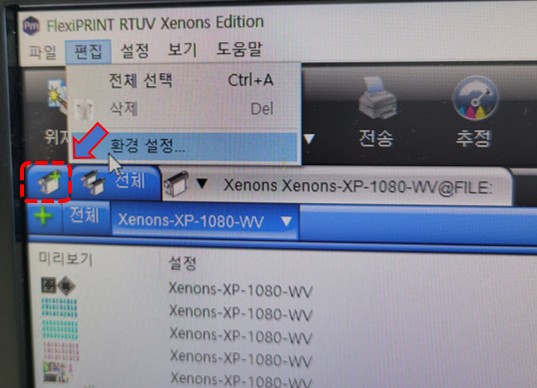
Click on the printer picture in Rip software.
The first and second pictures in the photo below:
- What is the brand name of your color printer? Xenons
- What is the Xenons model name? Select Xenons-XP-1080-WV and click “Next.”
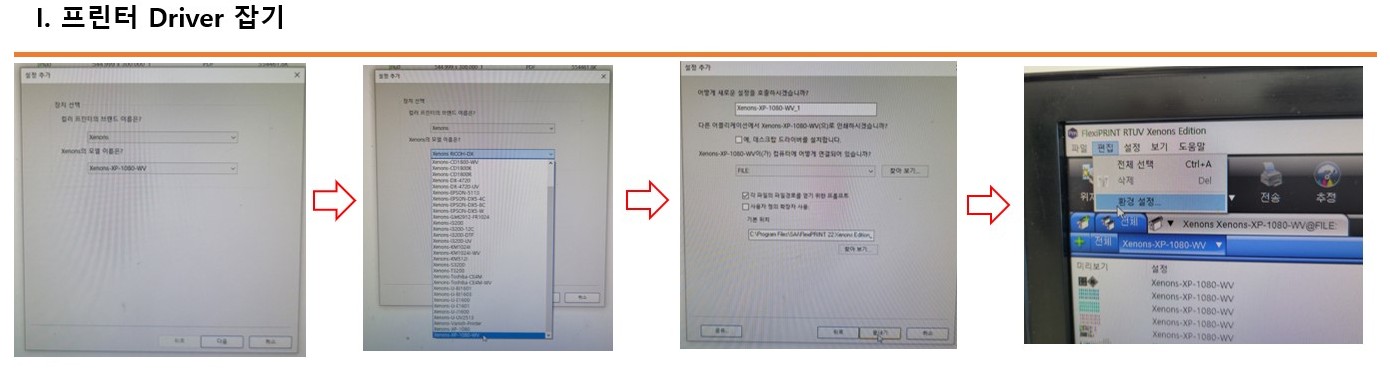
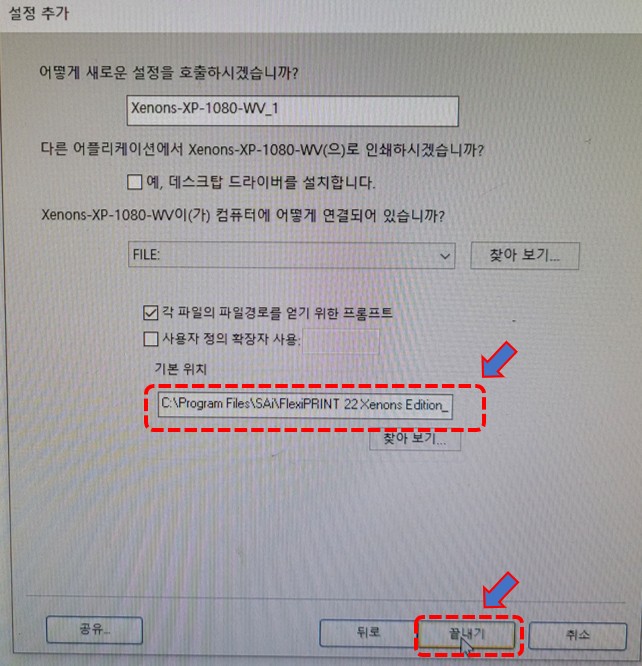
Zooming in on the third window,
- Leave all other settings as default.
- If you want to change the location where the red-bordered rip file will be saved, change it and click “Finish.”
- You can change it at any time when you actually save the ripped file, even if you don’t change it here.
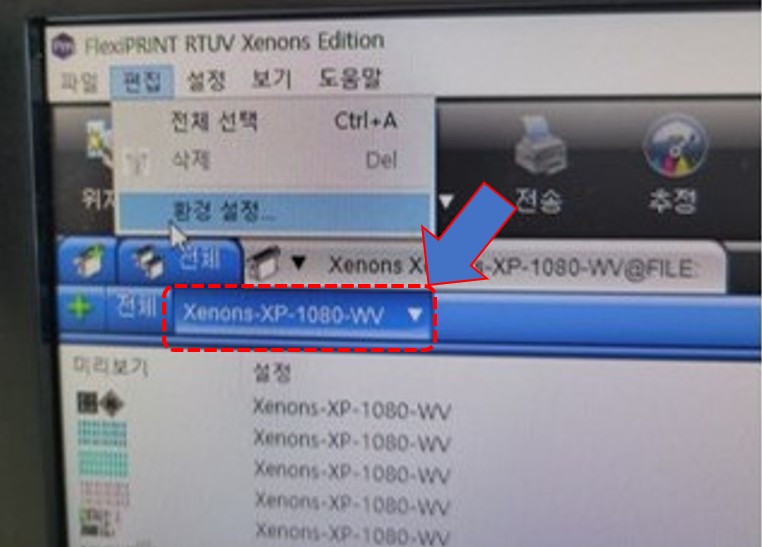
When you create a Driver like this, a Xenons-XP-1080-WV window will appear, like the red border in the picture below.
2. ICC Profile, put in Sai rip _Driver and basic settings after installing Sai Rip
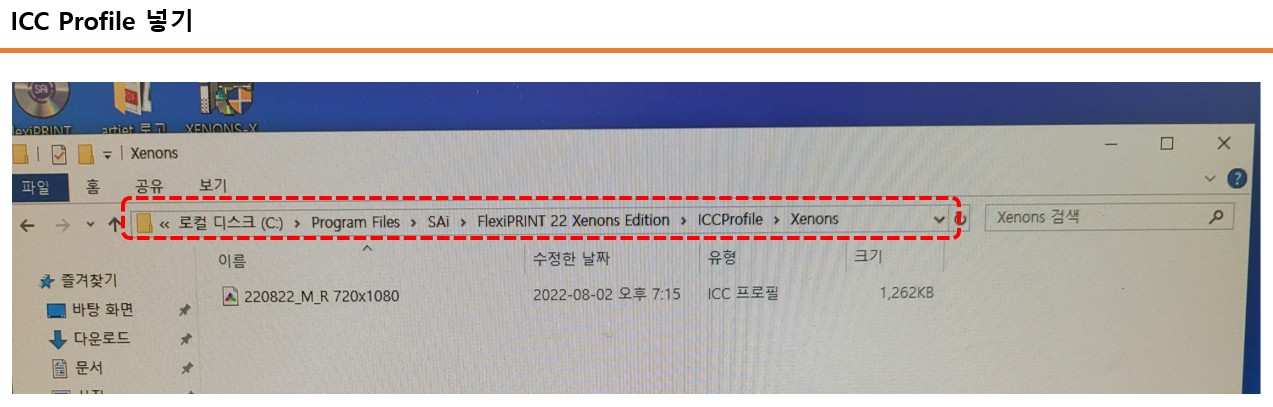
I placed the ICC profile in the ARTJET folder on your desktop. Unless you changed your computer information, you can find out it.
We didn’t install the ICC profile through the Rip software program.
We went to My Computer, went to C:, and found the folder outlined in red above. Initially, there’s nothing there.
Copy the [220822_M_R 720 x 1080] ICC profile from the ARTJET folder on your desktop, and pasted it into the folder.
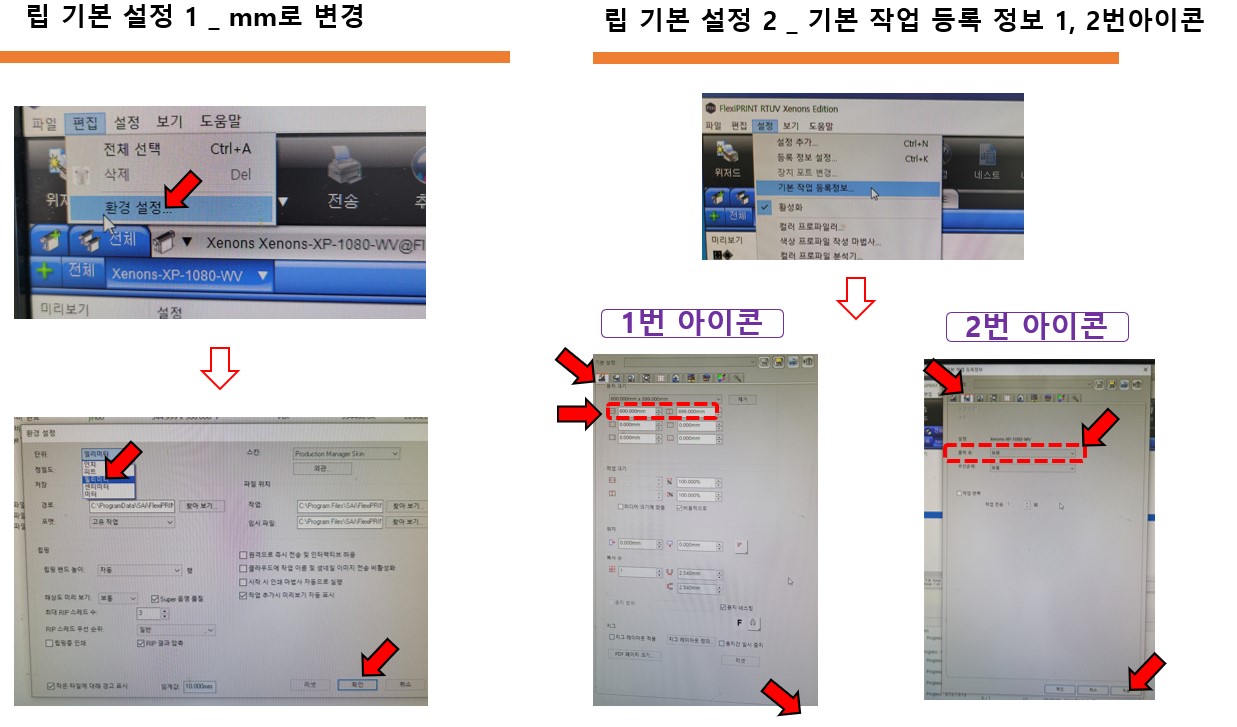
3. Setting up Rip Basics _Driver and basic settings after installing Sai Rip
Go to [Edit => Preferences] on the first screen and change the cm unit to mm.
Go to [Settings => Basic Job Properties] on the second screen.
In icon 1, change the overall flatbed size to 600 and 899, then click [Apply] in the bottom right corner.
In icon 2, set “Pending” after printing and click [Apply] in the bottom right corner.
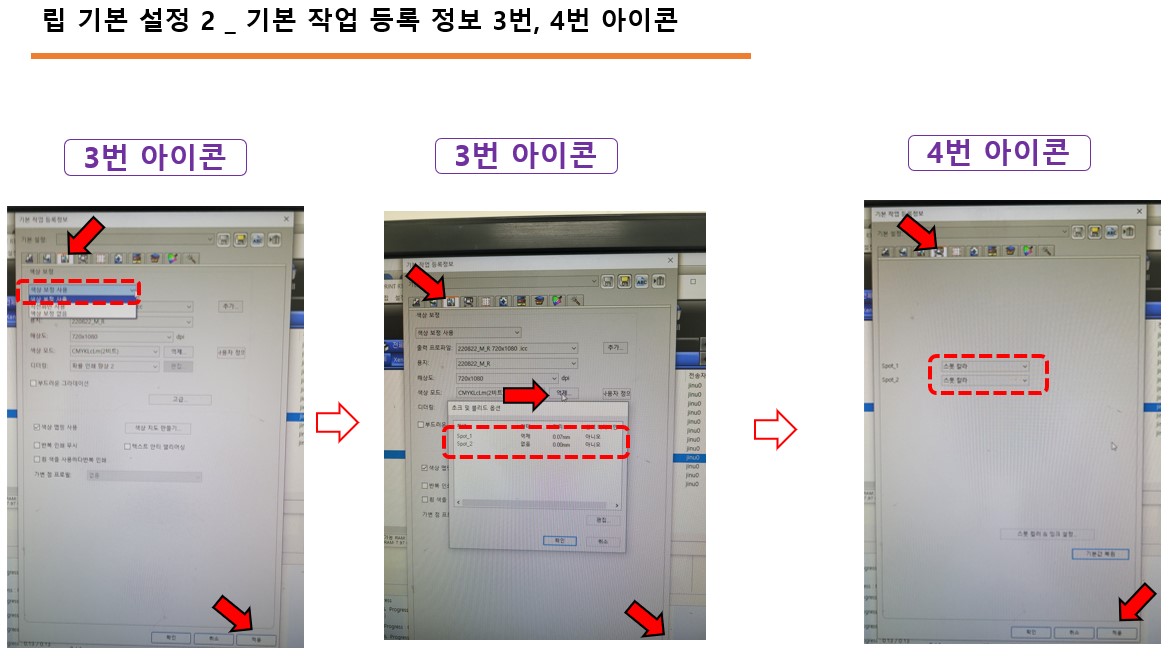
In the first image of icon #3, select [Use Color Correction] within the red border to apply the ICC profile. Click [Apply] in the bottom right.
In the second image of icon #3, set the White choke to the default value of 0.09mm. Click [Apply] in the bottom right.
In icon #4, set both Spot_1 and Spot_2 to Spot Color and click [Apply] in the bottom right.
After installing Sai rip,
- you must install the driver,
- enter the ICC profile,
- and then configure the rip software program as above to use it as before.
You can also check out the information I’ve explained so far through the video below.
Driver and basic settings after installing Sai Rip
III. This is how ARTJET supports our customers.
One thing I feel while selling and maintaining ARTJET UV Printers for 5 years is that the next most important thing after product stability is Troubleshooting DATA.
All products have problems, whether they are actual equipment problems or consumer errors, and product stability is how easily and quickly you solve those problems.
We are organizing all the troubleshooting DATA as follows.
You can see the product print quality by clicking here.

1. Additional information on printhead problems
Please refer to the information summarized above, and there is no additional information summarized yet.
2. Additional information on ink supply issues
Please refer to the information summarized above, and the additional information summarized below is as follows.
Addition
“no clogged nozzles, but banding in the red ARTJET 2025”
“When I print it, the whole thing has a yellow tint to it”
3. Additional information on Mechanical issues
Please refer to the information summarized above, and there is no additional information summarized yet.
4. Additional information on Electron board and Software issues
Please refer to the information summarized above, and there is no additional information summarized yet.
5. Sai Flexi Rip software
1. How to make the Spot Color & several mistakes
2. Color is strange after applying Spot color
3. White is sticking out
4. Installation and Dongle Key Recognition Failure Measures
5. Dongle Key Recognition Failure
6. White lines appear when printing only color
7. Color Adjustment through Graph
8. Print size compensation
9. Ink Consumption Calculation
10. What is ICC profile & menu board UV Printing
11. Dongle Key recognition Failure from USB port
6. Problems and solutions from actual consumer sites
1. Paper that absorbs ink
2. A line-like thing appears at the end of the white print surface
3.Can varnish banding be reduced?
4. Are there many problems with China’s UV Printer?
7. UV Printer Application
we are explaining not only UV printer problems and solutions, but also what products are produced with UV printers.
1. Braille printing
2. Flip the material and align it
3. 2.5D UV print
4. ARTJET UV Printer Application 6 _아크릴 본딩 장비
5. I phone 14 print limitation
6. Mask printing not recommend
7. Leather Cigarette Case UV Printing
8. Round soccer strategy board UV printing
9. Primer performance & limitation
10. UV Print & Laser crop mark cutting
11. Mobil case UV print profit
12. Screen vs Digital Comparison and UV Printing on Hand Sanitizer Cases
13. Bottle zig & print
14. Canvas UV Printing
15. Applying epoxy effect with varnish
16. Making a light frame with UV Printer & Laser cutter
17. UV Printer & Laser Cutting Equipment Button Name Tag Making
18. UV Printer & Laser Cutting Making a Cell Phone GripTok
19. Making an Acrylic Keychain with UV Printer & Laser Cutter
20. UV Print with Zig
21. How to make RD WORKS CCD camera cutting Video manual
22. Acrylic bonding equipment
23. All the steps to create UVDTF
24. UVDTF TEST Result on various material
25. ARTJET CW+C Print time & Ink Cost
26. Create a white shield with different images on the front and back of the keyring
27. Keyring Business Required Equipment and Investment Costs
29. Acrylic Lighting Goods
30. Ballpoint pen jig printing
31. Staining occurs when printing on coated leather
8. Bonus
1. ARTJET UV Printer Old Model Refurbished
2. UV Printer Laser Cutter Bonding Machine Which equipment should I buy first?
3. Considerations when choosing a UV printer
4. DTF Printer Price and Specification Survey
5. Acrylic Bonding Equipment Don’t Put It Off Anymore
6. China inkjet level now
7. Thoughts on KOSIGN 2024
8. ARTJET Delivery Preparation
9. ARTJET Setting Sequence
10. UV Printer History and Future Prediction 1
11. UV Printer History and Future Prediction 2
12. UV Printer History and Future Prediction 3
13. UV Printer History and Future Prediction 4
14. UV Printer History and Future Prediction 5
15. Are there many problems with China’s UV Printer?
16. UV Printer Small Text Meaning
17. Is the XP600 head okay
18. Roland UV Printer Summary
19. Mimaki UV Printer Summary
20. UV Printer Alibaba Direct Purchase Considerations
21. Things to consider when buying a used UV Printer
22. Bi Uni Print Quality Differences
23. RDworks download install and laser head position by SW
That’s it for today.
핑백: Sai rip Lock key recognition failure ARTJET 2025
핑백: How to adjust colors in Sai Rip ARTJET 2025
핑백: Can you print the exact size? ARTJET 2025
핑백: Rip security key not found ARTJET 2025
핑백: Printing two images together in Rip ARTJET 2025
핑백: After applying Spot color, the color appears strange ARTJET 2025
핑백: Sai Rip Installation Spot Color ARTJET 2025