UV Printer Capping Station Level and Gap
For your reference, Ink pumping and inkload is same meaning of this article.
We are looking at UV Printer ink supply problems and solutions.
So far, we have explained each part related to ink supply.
If you are curious about the content, click on the article.
1. the importance of the Captop lower tube.
2. the function of the Damper and problematic points.
3. the operating principle of the pump motor.
4. we explained the Captop and Print head positions.
5. we explained how to replace the Captop.
For the time being, we will cover the problems and solutions that actual users are talking about.
6. “Last week, the colors were bright, but today, I would say they’re too muddy? The colors overall feel like they’ve been toned down.
7. “White inkload and cleaning, even after repeating the same process 5 times, white does not survive”
8. “Inkload and cleaning are both working well, but white nozzle recovery is not working well.”
9. “The motor pump is running well, but the ink load (pumping) is not working.”
10. “Even if I change the captop and yellow tube, and check the position of the head and captop several times, the ink load (pumping) does not work.”
11.”I used it without any problems yesterday, but suddenly the ink load (pumping) is not working.”
12. “White is blown around the image”
13. “Inkload is working well, cleaning well, and White just doesn’t seem to live.”
14. “Inkload and cleaning work, but channels 1,2,3,4 come out sometimes and sometimes not.”
15. “Inkload(pumping) worked fine until yesterday but does not work at all today.”
16. “Nozzle test is OK. but specific color is missing during printing”
17. “When should I replace the pump tube? Is there a video showing how to do it?”
18. “It’s so hard to keep the White 1,2,3,4 nozzles alive. It’s okay once OK, but the next day again, it is hard”
19. “When I run Cleaning, the motor pump motor turns slightly and stops immediately, but it works when removing ink.”
20. ” Ink alarm is triggering. Can I ignore it and continue printing?
21. “Is there any white head cleaning routine after weekend or 2~3days off ?”
22. “What I learned from doing white cleaning every day for a month”
Today I’m going to talk about a problem I’ve been struggling with for two months without being able to find the cause.
I. Problem _UV Printer Capping Station Level and Gap
1. The equipment in question _Ink Supply 18 Importance of capping station level
This equipment was installed at a Japanese dealer in May 2024.
Two weeks after installation, the problem started to appear.
Pumping and cleaning were both good, but the problem was that White channels 1, 2, 3, and 4 did not work well.
We tried many things, but there was no improvement, and the problem was solved after replacing the Captop.
However, after 3-4 days, the same problem started to appear again.
II. Solve _UV Printer Capping Station Level and Gap
1. Mechanical setting _UV Printer Capping Station Level and Gap
When setting up the printer, the mechanical setting is as follows.
- Check the level of the entire printer
- Check the level of the entire flatbed
- Check the level of the head carriage
- Check the zero point of the head height at 1.2mm
- Check the position of the captop and print head (Important points when loading ink and cleaning the print head)
Once the mechanical check is completed, I begin mounting the head, supplying ink, and setting the offset.
2. Issues with Captop _UV Printer Capping Station Level and Gap
Since the equipment is in Japan, the Japanese CEO found the cause of the problem.
“It seemed that the capping station was tilted to one side, so I adjusted the tilted gap to a certain level and solved the problem.
I learned for the first time that I had to check not only the captop and print head positions, but also the capping station and carriage gap.
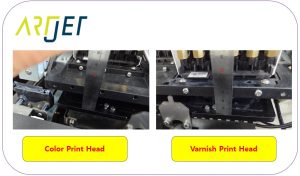
The cause of the problem is guessed as follows.
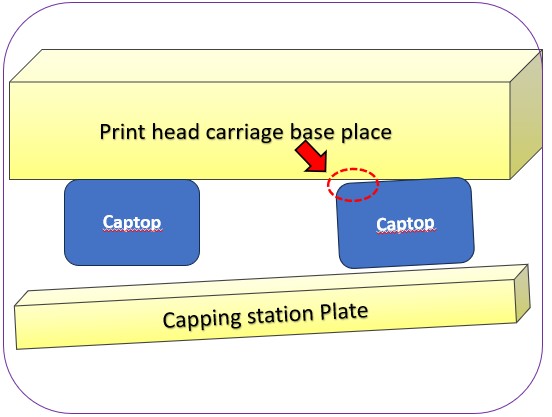
The Captop is kept horizontal by the bottom spring,
but as time passes, the spring force weakens on the tilted side, breaking the vacuum between the Captop and the bottom of the head.
The non-tilted part produces more ink when loading ink, and the tilted part has a weak vacuum, so ink does not come out well.
Because of this, the nozzle condition of White channels 1,2,3,4 is not good.
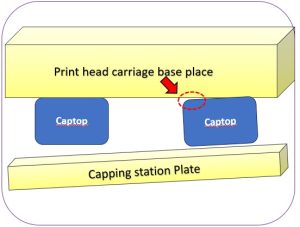
Click here to watch the video, it will help you understand.
III. How to adjust the head base and capping station gap _UV Printer Capping Station Level and Gap
1. Full order _UV Printer Capping Station Level and Gap
The order of adjusting the capping station and the bottom of the head carriage to the same gap is as follows.
You can measure the gap by sight at the front, but you cannot tell how much the gap is at the back.
- First, adjust the entire capping station to the level,
- and measure the gap at the front with a ruler, and when adjustment is necessary, apply the same amount of the front adjustment height to the back.
- After adjusting the gap, check the entire gap again through the software program.
2. Capping station horizontal _UV Printer Capping Station Level and Gap
There are a total of 3 fixing bolts and 4 adjusting screws.
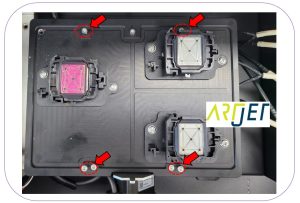
White Do not touch the height adjustment screw, and adjust the other screws to adjust the level!!
This is to prevent the height from changing too much overall, as a reference point is needed.
Where there are two bolts, the left is the adjustment bolt, and the right is the fixed bolt.
The adjustment order is to loosen the fixed bolt, turn the adjustment screw to adjust the height, and then fix the fixed bolt again.
3. Gap adjustment _UV Printer Capping Station Level and Gap
After the capping station leveling is completed, measure the left and right gaps in the capping state.
For example, if you adjust the left side, the same height is applied to the back as the height adjusted in the front.
If you remember the angle at which the adjustment bolt was turned, it will be convenient when applying it to the back.
The bolt is M2.5. one turn is move to 0.45mm.
4. Full Gap Adjustment _UV Printer Capping Station Level and Gap
After adjusting the left and right gaps, the overall gap can be adjusted via software.
Assuming that cleaning and pumping are good, lowering the height will help extend the life of the captop.

IV. This is how ARTJET supports our customers.
One thing I feel while selling and maintaining ARTJET UV Printers for 5 years is that the next most important thing after product stability is Troubleshooting DATA.
All products have problems, whether they are actual equipment problems or consumer errors, and product stability is how easily and quickly you solve those problems.
We are organizing all the troubleshooting DATA as follows.
You can see the product print quality by clicking here.

1. Complete Guide to Printhead Problems and Solutions
ARTJET UV Printer Problems and Solution _Printhead Problems Summary
Additional issue and solution
The red color does not appear at first, then appears during printing, and then does not appear again
Printhead replacement video and precautions
2. Complete Guide to Ink Supply Problems and Solutions
ARTJET UV Printer Problems and Solutions _Ink Supply Problems Summary
Comprehensive application
Capping station block positioning to match the print head and captop
3. Mechanical problem and Solutions
1. How to align the print head in a straight line
2. There is a clicking noise from the X-axis
3. Banding problem in specific section
4. The Importance of Head Height in Bidirectional Printing
5. Problems that occur when the wiper height is high
6. When the cleaning belt screw is loose
7. When the capping fixing plate does not fit
8. How do I prepare the ARTJET electricity?
9.When Anti-crash becomes a jam in captop
10. Print head Anti crash system
4. Electron board and Software problem is hereunder.
1. The printer works but printing does not work
2. Resetting to default settings
3. Touch panel does not turn on
4. The printer is printing, but nothing is printed
5. Software closes when I just press the print button
6. Printing in the wrong place
7. Positioning misalignment in X-axis direction
8. How to make the Offset fine tune
9. Vertical offset is not correct only for the right section of white
10. Software turn off when click print button
5. Sai Flexi Rip software
1. Sai Flexi Rip _ How to make the Spot Color & several mistakes
2. Sai Flexi Rip _ Color is strange after applying Spot color
3. Sai Flexi Rip _ White is sticking out
4. Sai Flexi Rip _ Installation and Dongle Key Recognition Failure Measures
5. Sai Flexi Rip _ Dongle Key Recognition Failure
6. Sai Flexi Rip _ White lines appear when printing only color
7. Sai Flexi Rip _ Color Adjustment through Graph
8. Sai Flexi Rip _ Print size compensation
9. Sai Flexi Rip _ Ink Consumption Calculation
10. What is ICC profile & menu board UV Printing
11. Sai Flexi Rip _ Dongle Key recognition Failure from USB port
6. Problems and solutions from actual consumer sites
1. Paper that absorbs ink
2. White Motor Pump Does Not Turn
3. A line-like thing appears at the end of the white print surface
4.Can varnish banding be reduced?
5. Are there many problems with China’s UV Printer?
7. UV Printer Application
we are explaining not only UV printer problems and solutions, but also what products are produced with UV printers.
1. Braille printing
2. Flip the material and align it
3. 2.5D UV print
4. ARTJET UV Printer Application 6 _아크릴 본딩 장비
5. I phone 14 print limitation
6. Mask printing not recommend
7. Leather Cigarette Case UV Printing
8. Round soccer strategy board UV printing
9. Primer performance & limitation
10. UV Print & Laser crop mark cutting
11. Mobil case UV print profit
12. Screen vs Digital Comparison and UV Printing on Hand Sanitizer Cases
13. Bottle zig & print
14. Canvas UV Printing
15. Applying epoxy effect with varnish
16. Making a light frame with UV Printer & Laser cutter
17. UV Printer & Laser Cutting Equipment Button Name Tag Making
18. UV Printer & Laser Cutting Making a Cell Phone GripTok
19. Making an Acrylic Keychain with UV Printer & Laser Cutter
20. UV Print with Zig
21. How to make RD WORKS CCD camera cutting Video manual
22. Acrylic bonding equipment
23. All the steps to create UVDTF
24. UVDTF TEST Result on various material
25. ARTJET CW+C Print time & Ink Cost
26. Create a white shield with different images on the front and back of the keyring
27. Keyring Business Required Equipment and Investment Costs
29. Acrylic Lighting Goods
30. Ballpoint pen jig printing
31. Staining occurs when printing on coated leather
8. Bonus
1. ARTJET UV Printer Old Model Refurbished
2. UV Printer Laser Cutter Bonding Machine Which equipment should I buy first?
3. Considerations when choosing a UV printer
4. DTF Printer Price and Specification Survey
5. Acrylic Bonding Equipment Don’t Put It Off Anymore
6. China inkjet level now
7. Thoughts on KOSIGN 2024
8. ARTJET Delivery Preparation
9. ARTJET Setting Sequence
10. UV Printer History and Future Prediction 1
11. UV Printer History and Future Prediction 2
12. UV Printer History and Future Prediction 3
13. UV Printer History and Future Prediction 4
14. UV Printer History and Future Prediction 5
15. Are there many problems with China’s UV Printer?
16. UV Printer Small Text Meaning
17. Is the XP600 head okay
18. Roland UV Printer Summary
19. Mimaki UV Printer Summary
20. UV Printer Alibaba Direct Purchase Considerations
21. Things to consider when buying a used UV Printer
22. Bi Uni Print Quality Differences
23. RDworks download install and laser head position by SW
That’s it for today.