Camera cutting principle after UV printing
So far, UV printer-related issues, We’ve compiled
24 articles on ink supply issues,
9 articles on head basics,
12 articles on actual head issues and their solutions,
10 actual mechanical Machine Problems and Solutions.
12 Problems and Solutions of Electronic Boards and SW Actually Issued
11 Problems and Solutions: Sai Rip Installation and Basic Settings, Spot Color Creation, and More
For related information, click on the article to go to the link.
Now, I’m explaining about the products that can be made with a UV Printer
Expressing gradients and three-dimensionality with white
4. “It is not easy to print a phone case because of the height of the iPhone 14 camera.”

5. “Do not print masks with a UV printer.”
7. I will explain how to print on the round name tags used on the soccer strategy board.

8. Description of Primer functionality and limitations

“They say after UV printing, they use a camera to adjust the position and cut only the desired area… How does that work? I don’t understand.”
It’s easy for those who know, but even I, a UV printer salesman, didn’t know the exact mechanism, so I’ll explain it here.
I. “The equipment isn’t even connected, so how can I set the location?” _Camera cutting principle after UV printing
When I worked for a UV printer manufacturer, I did overseas sales.
Sometimes, at overseas dealer demo rooms, I saw Konsberg and Jund cutters cutting precisely along the UV printed surface.
I asked the dealer:
“But how do they cut so accurately?”
“They read the black circle and cut according to the cutting file.”
I wasn’t interested, so I didn’t ask any further questions, and I didn’t understand what he meant.
“After UV printing, and move the printed material to the cutter, the positioning values are off. Even with a camera, how did it get the exact position?”
Because I didn’t know AI files,
‘When the printed material placed on the cutter, does the camera automatically read it and cut it?”
“The UV printer and cutter aren’t even connected via USB or anything…”
For over 10 years, I’d see a cutter and think, ‘I’ll check it out,’ but then forget about it the moment I left.
II. How the cutter recognizes the print position _Camera cutting principle after UV printing
1. Linking two devices _Camera cutting principle after UV printing
The UV printer and laser cutter are not directly connected.
- The UV printer simply prints,
- while the laser cutter uses a camera to read the printed material’s position and moves according to the AI file to cut.
The two are connected by the crop marks layer in the AI file and the camera.
2. Role of crop mark in Ai file _Camera cutting principle after UV printing
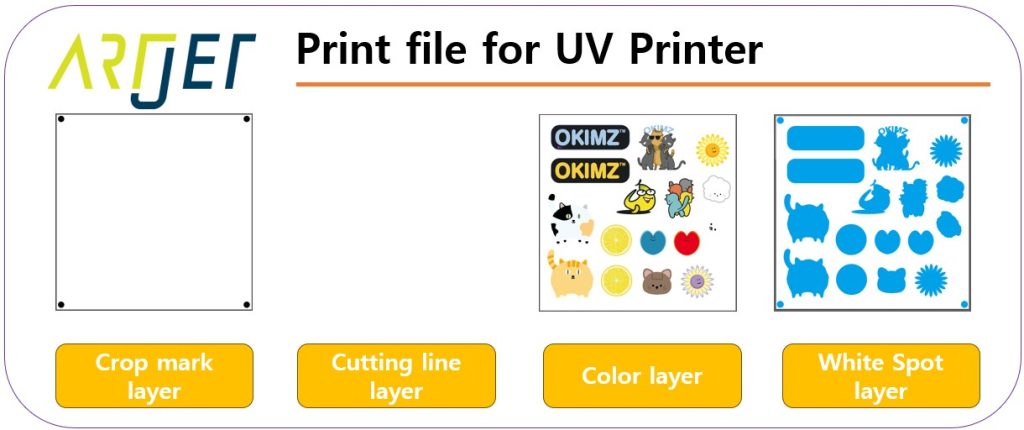
Since the AI file requires both white and color, I understand the need for a color layer and a white layer.
Since cutting is also required, I also understand the need for a cutting layer with only the cutting lines drawn.
An additional crop marks layer is needed to read the camera position and cut along the cutting lines.
In other words, for camera cutting after UV printing in an AI file, a registration mark layer is required in addition to the print and cutting files.
As shown below, for camera cutting after Color & white printing, the AI file consists of four layers.

The image below shows only the layers that need to be printed with a UV printer.
Only the cutting line layer is excluded, and the crop mark, color, and Color & white layers are included.
The image below shows only the layers used when cutting with a laser cutting machine.
Includes the Crop Mark + Cutting Line layers.
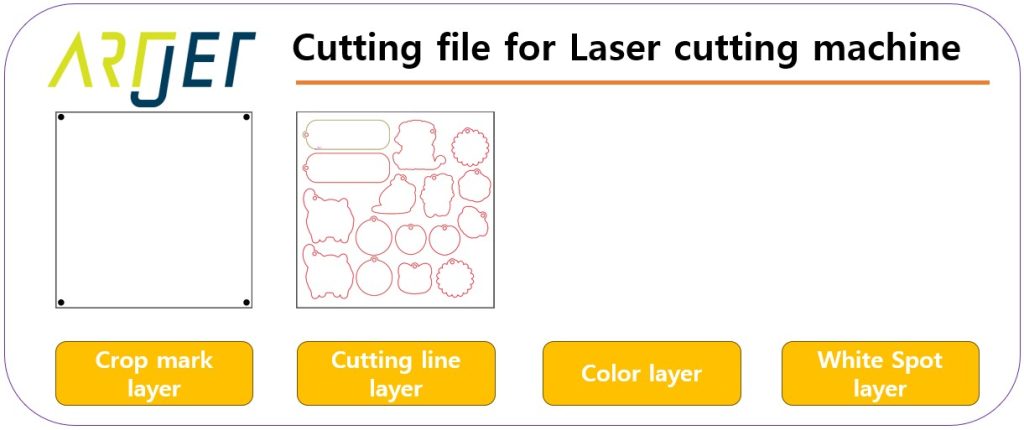
Only the crop mark layer is included in both the UV printer print file and the laser cutting file.
The print surface and cutting line are aligned 1:1, with a certain gap between them, based on the crop mark.
The AI file explanation alone is not fully comprehensible. The actual cutting execution sequence below will help you understand.
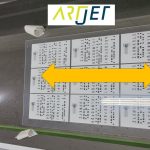
3. Laser camera cutting _Camera cutting principle after UV printing
The operation sequence of the camera-equipped laser cutting equipment is as follows:
- Place the printed material on the plate to be cut.
- Load the file with the crop mark + cutting line into the program.
- Select one of the four circles (crop marks) on the printed material and position it so that the camera can see it.
- Using the function in the program, recognize one circle that is shown to the camera.
- Once one circle is recognized, use the same automatic circle recognition function in the program to recognize the remaining three.
- Once the four circles are recognized, press the “Start” button to proceed with cutting.
- When the “Start” button is pressed, the laser cutting equipment does not cut immediately, but moves the X and Y axes until the camera recognizes all four crop marks,
- and then proceeds with cutting according to the cutting line in the file.
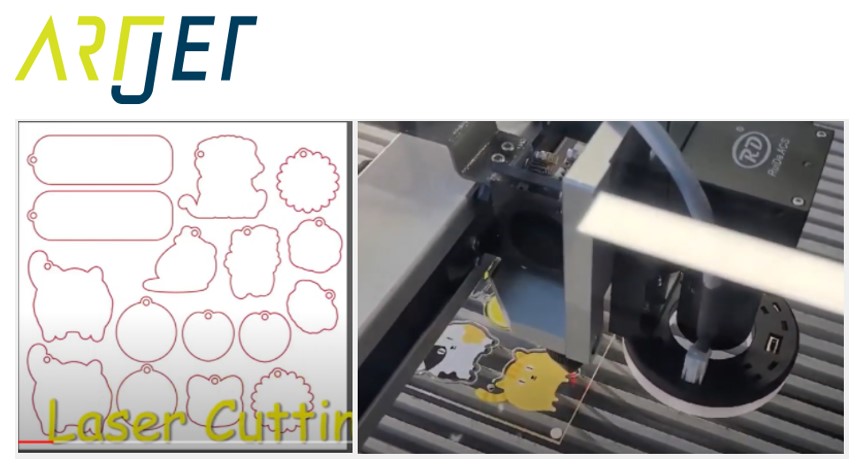
By reading the four Crop marks on the printed material with the CCD camera,
- Laser recognizes the exact location of the UV Printer printed material placed on the laser cutter,
- and from then on, the laser cutter will only cut along the cutting lines in the file.
“So, even if there are only crop marks on the unprinted acrylic, will it cut along the cutting lines, the red lines in the picture above?”
“That’s right. If the laser properly recognizes the Crop marks, it will start cutting along the cutting lines in the file, regardless of whether there is an image on the acrylic.”
Click here to watch the video explaining today.
III. Some details _Camera cutting principle after UV printing
1. UV Printer _Camera cutting principle after UV printing
I told you that UV Printer only prints, and Laser only cuts according to the cutting file.
“If there is a slight error in the printing size printed by UV Printer,”
If the crop mark in the printed image is within the allowable error range, the laser cutter will successfully complete the process of reading the crop mark and proceed with cutting according to the cutting file.
In other words, the cutter ignores the printed size error and proceeds with cutting only according to the cutting file.
Then, some products have the same margin based on the image, but some images have the margins concentrated on one side.
For this reason, I strongly recommend that you perform [Size Correction] on the UV Printer.
ARTJET UV Printer Application 5 Sai rip print size compensation
2. Laser cutting machine _Camera cutting principle after UV printing
Laser cutters also have mechanical errors because they move along the X and Y axes to cut.
Camera tolerances also apply, so this should be taken into account.
For this reason, I’ve seen some users use five or even eight crop marks instead of four.
More crop marks reduce the margin of error, and
cutting smaller acrylic pieces has a smaller margin of error than cutting larger ones.
3. The completed key ring _Camera cutting principle after UV printing
“We previously purchased an expensive laser cutter, but it didn’t have a registration mark feature. Why can’t we just align it properly and start cutting?”
Some people cut without a CCD camera, but after a few tries, they find, “No matter how well I align it, it always drifts to one side at the end…”
If you’re buying a new machine, I recommend including the simultaneous cutting feature.

IV. This is how ARTJET supports our customers.
One thing I feel while selling and maintaining ARTJET UV Printers for 5 years is that the next most important thing after product stability is Troubleshooting DATA.
All products have problems, whether they are actual equipment problems or consumer errors, and product stability is how easily and quickly you solve those problems.
We are organizing all the troubleshooting DATA as follows.
You can see the product print quality by clicking here.

1. Additional information on printhead problems
Please refer to the information summarized above, and there is no additional information summarized yet.
2. Additional information on ink supply issues
Please refer to the information summarized above, and the additional information summarized below is as follows.
Addition
“no clogged nozzles, but banding in the red ARTJET 2025”
“When I print it, the whole thing has a yellow tint to it”
3. Additional information on Mechanical issues
Please refer to the information summarized above, and there is no additional information summarized yet.
4. Additional information on Electron board and Software issues
Please refer to the information summarized above, and there is no additional information summarized yet.
5. Additional information on Sai Flexi Rip software
Please refer to the information summarized above, and there is no additional information summarized yet.
6. Problems and solutions from actual consumer sites
1. Paper that absorbs ink
2. A line-like thing appears at the end of the white print surface
3.Can varnish banding be reduced?
4. Are there many problems with China’s UV Printer?
7. UV Printer Application
we are explaining not only UV printer problems and solutions, but also what products are produced with UV printers.
1. Braille printing
2. Flip the material and align it
3. 2.5D UV print
4. ARTJET UV Printer Application 6 _아크릴 본딩 장비
5. I phone 14 print limitation
6. Mask printing not recommend
7. Leather Cigarette Case UV Printing
8. Round soccer strategy board UV printing
9. Primer performance & limitation
10. UV Print & Laser crop mark cutting
11. Mobil case UV print profit
12. Screen vs Digital Comparison and UV Printing on Hand Sanitizer Cases
13. Bottle zig & print
14. Canvas UV Printing
15. Applying epoxy effect with varnish
16. Making a light frame with UV Printer & Laser cutter
17. UV Printer & Laser Cutting Equipment Button Name Tag Making
18. UV Printer & Laser Cutting Making a Cell Phone GripTok
19. Making an Acrylic Keychain with UV Printer & Laser Cutter
20. UV Print with Zig
21. How to make RD WORKS CCD camera cutting Video manual
22. Acrylic bonding equipment
23. All the steps to create UVDTF
24. UVDTF TEST Result on various material
25. ARTJET CW+C Print time & Ink Cost
26. Create a white shield with different images on the front and back of the keyring
27. Keyring Business Required Equipment and Investment Costs
29. Acrylic Lighting Goods
30. Ballpoint pen jig printing
31. Staining occurs when printing on coated leather
8. Bonus
1. ARTJET UV Printer Old Model Refurbished
2. UV Printer Laser Cutter Bonding Machine Which equipment should I buy first?
3. Considerations when choosing a UV printer
4. DTF Printer Price and Specification Survey
5. Acrylic Bonding Equipment Don’t Put It Off Anymore
6. China inkjet level now
7. Thoughts on KOSIGN 2024
8. ARTJET Delivery Preparation
9. ARTJET Setting Sequence
10. UV Printer History and Future Prediction 1
11. UV Printer History and Future Prediction 2
12. UV Printer History and Future Prediction 3
13. UV Printer History and Future Prediction 4
14. UV Printer History and Future Prediction 5
15. Are there many problems with China’s UV Printer?
16. UV Printer Small Text Meaning
17. Is the XP600 head okay
18. Roland UV Printer Summary
19. Mimaki UV Printer Summary
20. UV Printer Alibaba Direct Purchase Considerations
21. Things to consider when buying a used UV Printer
22. Bi Uni Print Quality Differences
23. RDworks download install and laser head position by SW
That’s it for today.