- Those looking to make UV DTF stickers using a UV printer
- Those curious about the structure of UV DTF Film A and B types and how they adhere to surfaces after printing
- Those wanting to handle small UV DTF orders using a flatbed UV printer and roll laminator
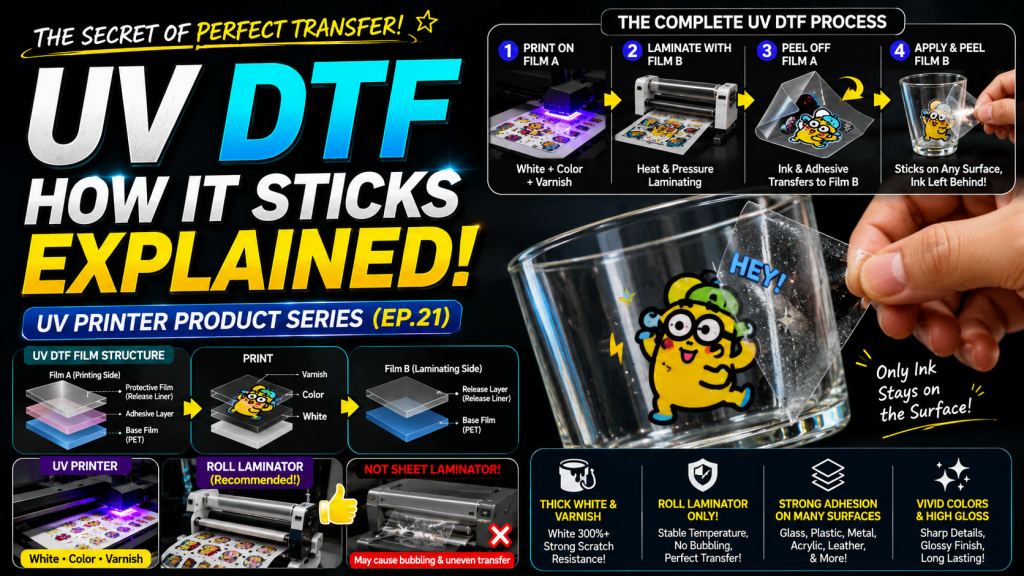
- White must be at least 300% of Color density, and Varnish should also be printed thick for scratch resistance — hard ink should be used for White and Varnish to withstand fingernail scratching
- A roll laminator must be used for heat lamination — sheet laminators cause warping and bubbling in certain areas during the lamination process
- Film A and Film B must be purchased from the same company — since A and B conditions are matched together, buying separately may cause transfer quality issues
- Required Equipment for UV DTF → UV Printer (White + Color + Varnish required), temperature-controlled roll laminator, UV DTF Film A and B
- Adhesion Principle → Print W·C·V on Film A adhesive layer → Heat-laminate to transfer onto Film B → Separate Film A → Attach Film B to surface and peel off, leaving only ink + adhesive on the object (decal principle)
- Currently, dedicated UV DTF roll printers are widely available for mass production, but flatbed UV printers can also handle small orders
Today, we will explain the entire UV DTF production process and application.
I. Equipment and Film Required for UV DTF — How UV DTF Stickers Adhere After Printing
Three things are needed to make UV DTF stickers.
A UV printer, a temperature-controlled roll laminator, and UV DTF Film A type and B type.
Typically, Film A type and B type are supplied together by the film provider.
Let us explain the equipment and film in more detail.
1. UV Printer
- To print on UV DTF, White, Color, and Varnish must all be available.
- Since printing is done on a sticky transparent film (called UV DTF Film A type), Color cannot be properly reproduced without White.
- Color is printed on top of White to reproduce colors,
- and Varnish must be printed on top of that so the printed ink transfers well onto the lamination film (called UV DTF Film B type) during the heat lamination process.
1_1. White and Varnish
- The higher the density of White and Varnish when printed — meaning the thicker they are printed — the more scratch-resistant they become.
- The adhesion method works like an illegal parking sticker on a car — the ink adheres directly to the object through the adhesive on Film A.
- If the ink is too thin, the adhesive peels off along with the ink when scratched with a fingernail.
- For this reason, White should be at least 300% or more compared to Color.
- Thicker Varnish also provides better scratch resistance.
- Color ink can be either flexible or medium — it does not matter much since White is layered underneath and Varnish covers the top.
- However, for White and Varnish, hard ink is better than flexible or medium. Since medium or flexible ink is weak against fingernail scratching, hard ink should be used for UV DTF.
2. Heat Laminator
- There are many affordable heat laminators on the market.
- However, do not purchase a sheet laminator just because it is cheap, as shown below.
-

How UV DTF Stickers Adhere After Printing - No matter how carefully you try to attach Film B to the printed Film A during lamination, certain areas will warp and bubble as shown below.

- For this reason, a roll laminator must be used to minimize warping issues.
- Since the temperature set during lamination is also important, we recommend a laminator with minimal temperature variance — not the cheapest option, but one at a reasonable price point.
- The Korean-made heat laminator shown below worked without major issues in our testing.
-

How UV DTF Stickers Adhere After Printing
3. UV DTF Film A Type and B Type
- UV DTF film has now become widely available.
- UV DTF film can be purchased from domestic or Chinese suppliers, and there are just a few things to keep in mind regardless of which product you choose.
- Since Film A and B conditions are matched together, do not buy Film A from one company and Film B from another — purchase both Film A and B types from the same company.
- You should also confirm the conditions for making UV DTF products through the UV DTF film seller.
- Should the UV ink be hard or medium type?
- What is the appropriate White density percentage?
- What is the appropriate Varnish percentage?
- What is the appropriate heat lamination temperature?
II. How UV DTF Stickers Adhere After Printing
1. UV DTF Application Diagram

- 1. UV DTF Film A consists of three layers: an adhesive layer on top of the base film, and a protective film that protects the adhesive.
- 2. UV Printing: Remove the protective film from Film A by hand, and print White, Color, and Varnish on the adhesive layer above the base film.
- 3. UV DTF Film B consists of two layers: a release agent and the film.
- 4. Heat Lamination: The release agent side of Film B is laminated to the printed surface of Film A.
- 5. Application to Object: As shown in the diagram below, when Film A and Film B are separated, the base surface of Film A (adhesive and printed White, Color, Varnish ink) detaches.
Now, when Film B is applied to an object and peeled off, the base surface and release agent of Film B also separate. This leaves only the adhesive and UV ink on the object, as shown below.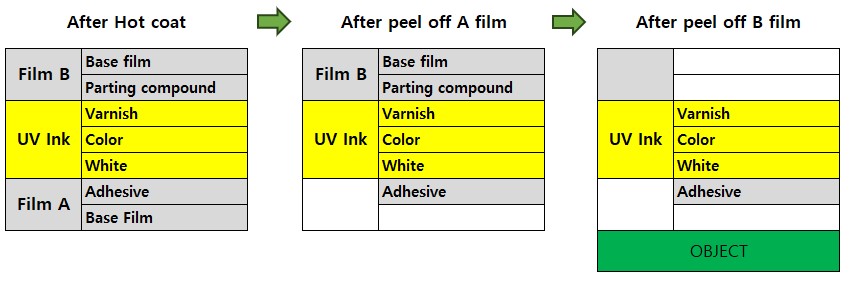
How UV DTF Stickers Adhere After Printing
2. From Printing to Application
Currently, dedicated UV DTF roll printers are available, so very few companies prepare a separate flatbed UV printer and heat laminator for production. However, if you already have a flatbed UV printer and need to handle small incoming orders, you can try the following process.
2_1. Step-by-Step from Printing to Application
- Peel off the protective film from Film A (which has adhesive applied) and place it at the UV printer output position.
- Proceed with front-side printing: White → Color → Varnish. This is NOT mirror printing. It is standard front-side printing.
- Once printing is complete, transfer the printed Film A onto Film B using the heat laminator.
- The photo below shows the completed heat lamination.
-

How UV DTF Stickers Adhere After Printing - The film above shows Film A and Film B attached together, and Film A and Film B can be separated by hand.
- When the films are separated, the printed image and adhesive from Film A are transferred to Film B.
- Since the ink and adhesive have been transferred to Film B, nothing remains on the sticky Film A that was originally printed on.
- Position and attach Film B (with the printed ink and adhesive) onto an object such as a glass cup.
- Firmly rub the attached Film B by hand to ensure the ink with adhesive adheres well to the glass cup.
- Then gently peel off Film B — the image and adhesive remain on the glass cup, and only Film B peels away.
- It works on the same principle as a decal transfer.
3. Video
- You can watch the entire UV DTF production process from A to Z in the YouTube video below. Note that this is an older video, so a sheet laminator was used instead of a roll laminator. Using a roll laminator simplifies many of the steps.
- UV DTF — Full Process from Printing to Application
III. ARTJET UV Printer
