How to Connect a Printhead DATA Cable
UV Printer Troubleshooting (Head/Data/Ink Supply) Field Guide _ Head Issues #12 _ ARTJET 2026
📌 Before you read this
Who should read this
- Anyone who needs to replace or reconnect an XP600 (or similar) printhead DATA cable
- Anyone seeing DATA-related symptoms after a head swap (missing colors, communication errors, abnormal board LEDs)
- Field techs who want a clear checklist for cable direction + 29-pin alignment before powering on
⚠️ Warnings
- Work with power OFF (ideally main power disconnected). Prevent static discharge (gloves/grounding recommended).
- If even one of the 29 gold traces is misaligned, it can cause print errors, communication faults, or board damage.
- Silver-strip cables can peel and cause contact failure—avoid them when possible.
✅ Key summary
Use a gold-strip DATA cable, follow the correct head-side direction (trimmed end), and visually confirm 29-pin alignment at the head and especially at the board side.
Index of UV Printer troubleshooting topics (so far)
I have organized UV printer troubleshooting topics as below. Each item is linked to the corresponding article.
How I approach problems (two directions)
1) Ink supply
Print errors caused by ink supply issues (including cleaning/pumping) are covered in the latest update.
If your printer uses dampers, the link below can help you troubleshoot.
If your printer uses dampers, the link below can help you troubleshoot.
2) DATA-related (mainboard / printhead / DATA cable)
This section is being updated. I’m organizing topics in the order below.
- Part 1: Symptoms & Fix When a DATA Cable Is Contaminated by Ink
- Part 2: 17 Stored Used Heads: How Many Worked After Alcohol Cleaning & What Errors Appeared
- Part 3: A Specific Color Prints Abnormally During Printing
- Part 4: How to Print on Reflective Materials + More Dangerous Causes That Can Clog Nozzles
- Part 5: Real Case: Reviving a White Head Not Used for One Month
[Click here for the “clogged white head” recovery method] - Part 6: Symptoms when a printhead reaches end-of-life and how to swap heads
- Part 7: Why banding appears only on certain solid colors + tips to reduce it
- Part 8: A case where a color still didn’t print even after replacing the head
- Part 9: Print Motion but No Ink Output
- Part 10: Symptoms of a Cracked Ink Channel Inside Print Head
- Part 11: Head replacement precautions and head replacement video
Today’s topic
How to connect a DATA cable (head ↔ board)
I. Checks before connecting the DATA cable _How to Connect a Printhead DATA Cable
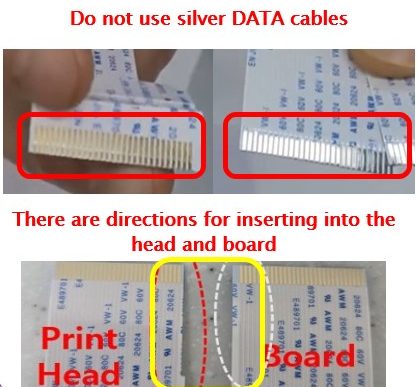
1. Gold strip vs. Silver strip
XP600 printhead DATA cables typically come in two types.
As shown below, one has a gold strip and the other has a silver strip.
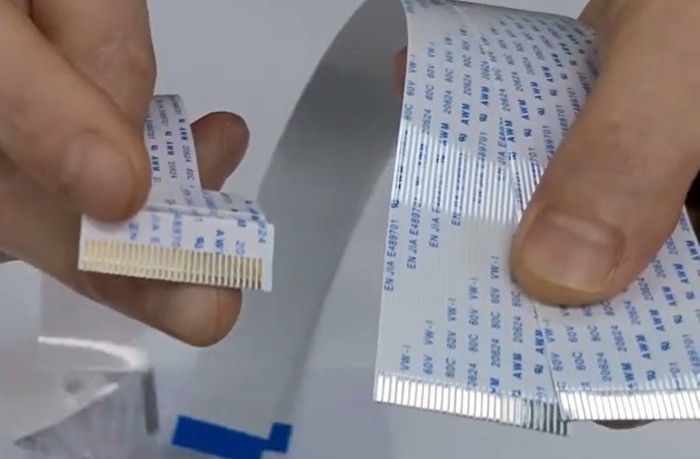
In theory, both can work.
However, the silver strip can peel off easily.
If you insert the cable incorrectly, the silver strip may peel and the head will not communicate properly.
Also, when you replace a head or repeatedly unplug/reconnect during troubleshooting, the silver strip may peel over time.
For this reason, it is better to avoid silver-strip DATA cables.
Recommendation: Use a gold-strip DATA cable whenever possible.
2. DATA cable direction

Here is how to identify which side goes into the printhead and which side goes into the board.
- At a glance, both ends of the DATA cable look similar.
- But if you look closely, one end is trimmed/cut (red outline in the left image),
- and the other end has more margin and is not trimmed (white outline in the left image).
- The trimmed end goes into the printhead.
Depending on your board design, some printers require trimming the board-side end (as shown on the right image) to fit,
while other printers can connect to the board without trimming.
while other printers can connect to the board without trimming.
Whether you should trim the board-side end depends on your printer specification.
However, the head-side direction is critical—always follow the correct orientation when connecting to the printhead.
II. Connecting the DATA cable (head ↔ board)_How to Connect a Printhead DATA Cable
1. The 29 gold traces must align

The 29 gold traces on the DATA cable must match the 29 metal contacts on the printhead and the board exactly.
I also went through many trial-and-error attempts when I first connected a head cable.
- “There’s no direction, right? It looks the same.” => The direction matters (explained above).
- “It feels tight, so it must be connected.” => I struggled because the gold traces were not aligned.
- On the board side, the cover often blocks visibility, so people connect it “by feel.” => That later causes issues. Open/remove the cover and visually confirm all traces align to the board contacts.
If even one gold trace is misaligned or only partially seated:
- The head board LED may blink,
- Or LEDs look normal but printing produces abnormal output for that color,
- Worst case: intermittent communication can eventually damage the mainboard.
Connecting to the printhead is usually easy to confirm visually,
but most real problems happen at the board-side connection.
but most real problems happen at the board-side connection.
-
- Because of the printer cover, people connect it “roughly” and fail to verify alignment.
- They do not remove the upper plastic cover and still connect by estimation.
- When connecting the DATA cable to the board, remove the cover and visually confirm the gold traces align exactly.
- Print Motion but No Ink Output
2. Watch the connection video (hands-on)
At this point you know:
– Use a gold-strip cable (avoid silver-strip),
– Follow correct head/board direction,
– Ensure all 29 gold traces align exactly on both ends.
Now you can follow the video and do it step-by-step.
For the head replacement video, see the link below.
🎥 How to replace a printhead + precautions :
[Video link]
[Video link]
III. A final caution (about cheap direct-import heads)
There are a few risks with very cheap heads purchased via direct import (e.g., Ali/AliExpress/Alibaba).
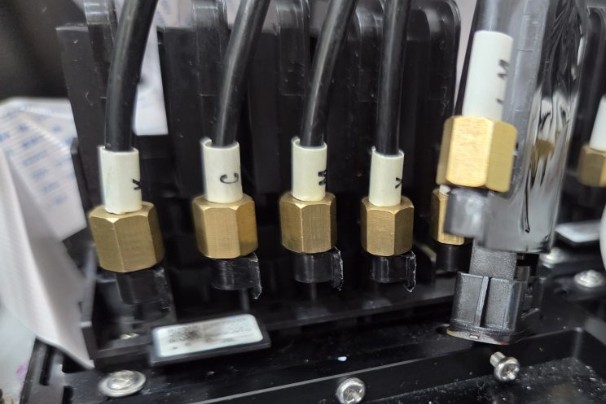
One customer experienced a damaged head board.
They bought low-priced heads via Alibaba. Many of these are salvaged from desktop printers, cleaned, and resold.
If the connector area is intact, it may work. But if something is off, you may see:
- No jetting at all even after connecting to the board,
- A damaged DATA cable,
- Backflow/back-current from the head that can damage the mainboard.
In this case, the customer bought two heads. One worked briefly and then damaged the board.
The other head was tested after connecting the damper (DATA cable was not connected, just in case).
- Pumping did not work,
- When checking the damper connection, the customer tried to remove the damper,
- But not only the damper came off—an ink inlet block that must never detach was pulled out from the head,
- The same issue appeared on the other channel as well.
For these reasons, I recommend avoiding very cheap direct-import heads.
IV. ARTJET UV Printer
Based on over five years of sales and maintenance experience with ARTJET UV printers, one key lesson stands out:
After product stability, the next most critical factor is troubleshooting data.
Every product can encounter issues — whether caused by equipment conditions or user operation.
In real production environments, reliability depends on how quickly and efficiently those issues can be identified and resolved.
In real production environments, reliability depends on how quickly and efficiently those issues can be identified and resolved.
What matters is how quickly and how accurately you can find the cause and fix the problem.
ARTJET continuously collects and organizes real field troubleshooting data to support faster and more accurate problem resolution.
🎥 Print quality samples
