(Head Issue #9) _ARTJET 2026
In many situations, the root cause is not ink supply — it’s a board ↔ printhead communication issue (often timing-related).
- Your printer performs the print motion (carriage movement), but no ink is jetted at all.
- Even after pressing Nozzle Test, nothing prints (no pattern).
- After powering off the PC/printer and reconnecting everything, output suddenly stops completely.
- This issue typically falls into two categories: ① Ink supply (cleaning/pumping) vs ② DATA/communication (board · head · cables).
- Today we focus on ② Board ↔ Printhead communication (motion is normal, but no jetting).
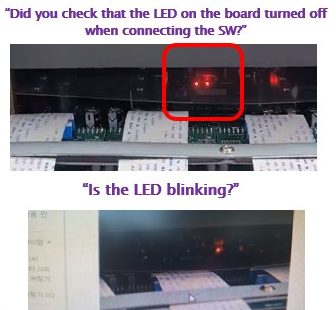
- Key point: After pressing the Power button, confirm the two board LEDs turn off together, then connect the software after about 7–10 seconds.
- If the LEDs do not turn off together or one LED keeps blinking, a communication error is likely (cable/head/board check routine needed).
- For any board/head/cable work, always proceed with the Main power switch OFF. (GUI OFF → Power OFF → Main switch OFF → wait 30 seconds)
- If abnormal LED blinking continues, the board may be damaged. Stop immediately: Power OFF → Main switch OFF.
- DATA cables can fail communication if the gold contacts are even slightly misaligned. After removing the cover, verify alignment carefully.
- To reduce cost, troubleshoot in this order: Re-seat connections → Replace cable → Replace head → Replace board.
Power ON → confirm two LEDs turn off together → wait 7–10 seconds → connect software → run TEST
If your printer uses dampers, many cases can be solved via the link below.
This is a 23-post index with photos. Click the table of contents inside to open each post.
- Part 1: Symptoms & Fix When a DATA Cable Is Contaminated by Ink
- Part 2: 17 Stored Used Heads: How Many Worked After Alcohol Cleaning & What Errors Appeared
- Part 3: A Specific Color Prints Abnormally During Printing
- Part 4: How to Print on Reflective Materials + More Dangerous Causes That Can Clog Nozzles
- Part 5: Real Case: Reviving a White Head Not Used for One Month
[Click here for the “clogged white head” recovery method] - Part 6: Symptoms when a printhead reaches end-of-life and how to swap heads
- Part 7: Why banding appears only on certain solid colors + tips to reduce it
- Part 8: A case where a color still didn’t print even after replacing the head
I. Board ↔ Printhead Communication Issue (Print motion but no ink output)
1) Symptom
but the customer reported that nothing appears.
2) Fix
Before connecting the software, wait 10 seconds.”

3) What you MUST confirm before connecting the software
In the center of the board, two red LEDs turn on and then turn off.”
so DATA is not delivered to the head.
After pressing the Power button, confirm both LEDs turn off together, then connect the software about 7–10 seconds later.
II. When Board ↔ Head Communication Has a Problem
- Software connection appears normal
- Other motions are normal
- But the nozzle test pattern does not print
- During printing, the carriage moves, but ink is not jetted
In communication errors, unlike the first video:
- The two LEDs do not turn off together
- One turns off, while the other keeps blinking
- One LED may keep blinking at intervals
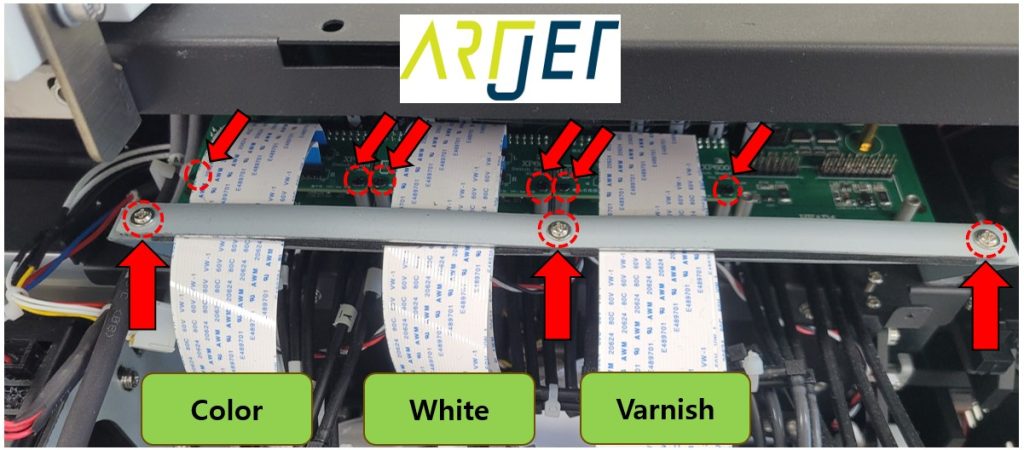
- Flat cable connection: If even one of the Color/White/Varnish head sets has a poor flat cable connection, this can happen.
- Head failure: If even one head set is damaged, the board may fail to communicate.
- Board failure: If the board itself is damaged, this can happen.
III. Inspection Procedure (Print motion but no printing)
you must inspect step-by-step:
- No nozzle pattern prints and nothing prints at all
- The center LEDs do not turn off together (they turn off with a delay)
- Even after turning off, one LED continues blinking
1) Remove the printer cover
Because you can’t confirm it clearly with the cover on, remove the printer cover first.

- Loosen the screw until it becomes less tight, then twist to remove naturally.
- You don’t need to remove all bolts.
- While turning the screw, avoid touching the wires as much as possible.
- After removal, place the wired part temporarily toward the front.
- After fully removing the cover, place it outside the right side to avoid interference with the motor/belt.
- The cover screws are typically two on the right end and two on the left end (as shown in the photo).
- After removing 4 bolts, two people should lift the cover up together to detach it.
- It may be slightly hooked with the main ink tank area, so lift carefully.
- After removing the cover, place the Emergency button outside the right side to avoid motor/belt interference.
2) Check whether the board is damaged first
- Power OFF completely (GUI OFF → Power OFF → Main switch OFF → wait 30 seconds)
- Remove the silver bar holding the printhead DATA cables (remove 3 bolts)
- Remove the transparent plastic cover on the head board (remove 4 bolts)
- Remove the two black screws on the small boards connected to Color/White/Varnish (2 each → total 6)
- Remove the three small boards where DATA cables connect (tight—twist gently and pull)
- Place removed small boards so they do not touch the head board
- If removing small boards is difficult, disconnect only the head-side DATA cables from the small boards.
- Confirm the removed Emergency button is placed outside the X-axis to prevent interference with the X motor.
- With all head cables disconnected, turn the printer ON (Main switch ON → Power button ON)
- If the two red LEDs turn on together, then turn off together, and no LED blinks afterward, the board is 정상.
- If the two LEDs do not turn off together and one LED keeps blinking afterward, the board itself is damaged.
- Since all heads are disconnected, this indicates a board fault. There is no solution other than board replacement.
3) Find the head or DATA cable causing the communication error
Each head must be checked, starting with the Color head.
- You must check both board-side and head-side connections, but start with the board side.
- Power OFF completely (GUI OFF → Power OFF → Main switch OFF → wait 30 seconds)
- Disconnect the DATA cable from the small board, then reconnect by aligning the gold contacts precisely
- Connect the Color small board to the head board
- Leave White and Varnish disconnected
- Turn printer ON (Main switch ON → Power button ON)
- If the two red LEDs turn off together and no LED blinks afterward, the Color head is communicating normally.
- Keep Color connected
- Power OFF completely (GUI OFF → Power OFF → Main switch OFF → wait 30 seconds)
- Reconnect White DATA cable with gold contacts aligned
- Connect the White small board to the head board
- Color and White are connected; Varnish is still disconnected
- Turn printer ON and observe the LEDs
- If communication stays normal, the White head is likely not the problem.
- If one LED keeps blinking, the White head or head-side DATA cable may be the cause.
- For now, assume the White head is OK.
- Repeat the same method as Color/White.
- If the LEDs do not turn off together and one keeps blinking, immediately Power OFF and Main switch OFF. Prolonged blinking can damage the board.
- At this point, two areas can be the problem:
- The board-side DATA cable is already verified and likely OK.
- The printhead-side DATA cable connection may be poor.
- If that is also OK, then the DATA cable itself may be faulty, or the head may be faulty.
- Replace the cheapest part first: the DATA cable.
- If replacing the DATA cable doesn’t solve it, replace the printhead.
- If all three heads are connected and the LEDs behave normally, you can proceed with printing.
From real customer cases:
- Most cases were caused by poor board-side DATA cable seating and were solved by re-seating the connection.
- However, in two cases the head board was damaged.
- In one case, the customer imported heads directly (suspected reverse current damaged the board).
- In another case, intermittent errors from an ambiguous cable connection eventually damaged the board.
For head-side DATA cable connection, refer to the head replacement video below.
IV. ARTJET UV Printer
Based on over five years of sales and maintenance experience with ARTJET UV printers, one key lesson stands out:
After product stability, the next most critical factor is troubleshooting data.
Every product can encounter issues — whether caused by equipment conditions or user operation.
In real production environments, product reliability depends on how quickly and efficiently those issues can be identified and resolved.
ARTJET continuously collects and organizes real field troubleshooting data to support faster and more accurate problem resolution.
You can view print quality samples here:
[Print quality sample by video]
You can view ARTJET pricing and sales conditions here:
(Note: Exterior design has been updated)
You can also review a complete list of products that can be produced using UV printers here:
[UV Printable Product Guide]
