Damper
So far, I have summarized the information related to UV Printers below. If you click on the article, you will be taken to the link for related information.
9 articles on head basics,
12 articles on actual head issues and their solutions,
10 actual mechanical Machine Problems and Solutions.
12 Problems and Solutions of Electronic Boards and SW Actually Issued
11 Problems and Solutions: Sai Rip Installation and Basic Settings, Spot Color Creation, and More
We’ve compiled a list of products that can be made with a UV printer.
I. Background information _Damper
We’re updating previous content.
The full text of Part 24 of the Ink Supply Issues series can be found through the link below.
24 articles on ink supply issues,
This article discusses the Damper, highlighted in red in the full table of contents for ink supply issues.
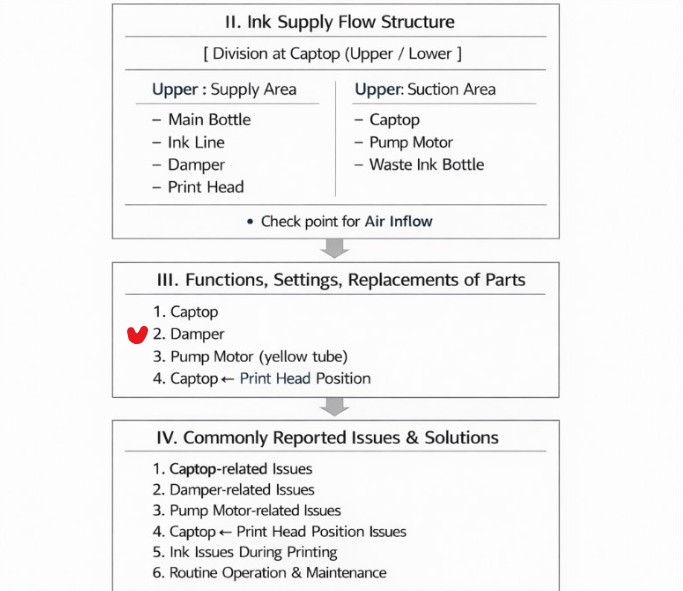
II. Damper location and role _ Damper
As shown in the photo below, the first component connected to the ink tube from the main ink tank is the damper.
The damper is connected to the print head and supplies ink to the print head.
The damper serves two purposes:
- It stores ink that flows convectively from the main ink tank and supplies it to the print head.
- The damper prevents ink from dripping through the print head and stays on the nozzle surface, ensuring proper ink ejection during printing.
- It also acts as a filter, removing air bubbles and impurities within the ink.

III. Ink supply structure _Damper
1. Overall structure _Damper
Most UV printers using three XP600 print heads have a structure similar to the photo below.
- There are three print heads in total.
- The color print head has six main ink tanks: C, M, Y, K, Lc, and Lm.
- The white print head has four channels connected to the first white main ink tank, and two channels connected to the second white main ink tank.
- The varnish print head has six channels connected to the varnish main ink tank.
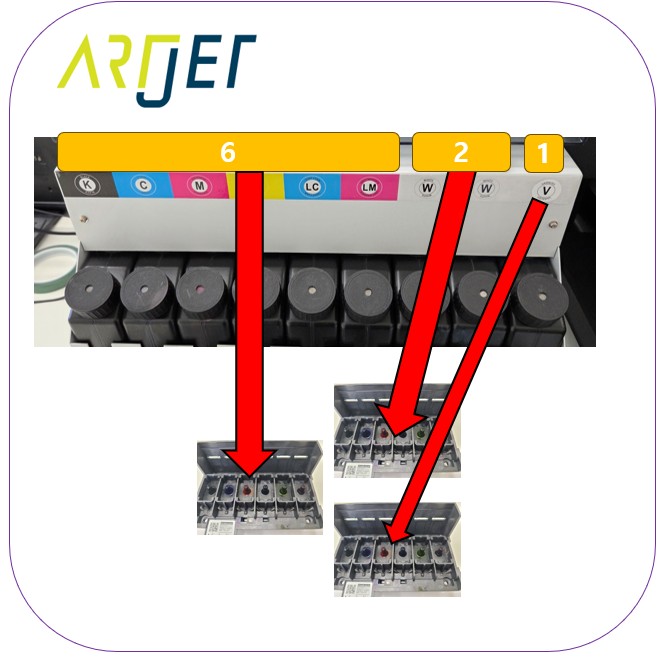
Color is
- CMYK, Lc, and Lm, each channel connected 1:1 to one main ink tank and one damper.
- If a particular color isn’t displayed, simply check the damper or the color itself.
However, White and Varnish have different inspection methods.
White is
- The first ink tank supplies ink to four channels: dampers W1, W2, W3, and W4.
- The second ink tank supplies ink to two channels: dampers W5 and W6.
- The photo below shows the main ink tank and its corresponding damper connections.
- You can also see the white nozzle pattern printing position in the order in which it’s printed.
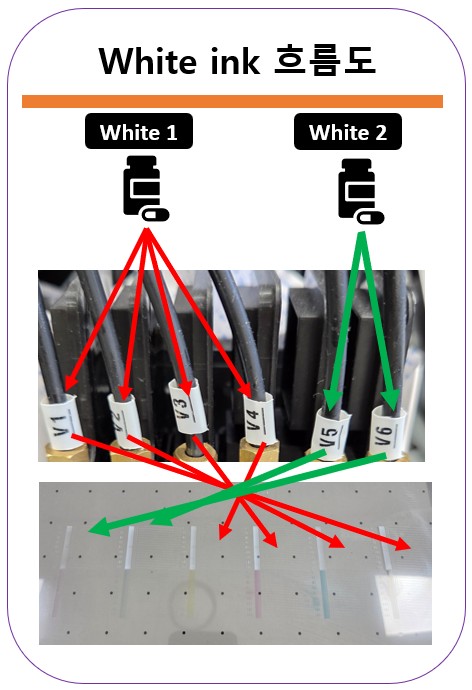
Varnish
- uses a single main ink tank.
- However, two ink tubes are created directly from the main ink tank.
- The subsequent stages are similar to White: the first tube handles V1, V2, V3, and V4,
- and the second tube handles V5 and V6.
If cleaning or ink pumping issues occur with White and Varnish,
- if a specific channel is not flowing, isolate that channel and use a syringe to draw ink.
- Since they share the main ink tank, all other channels connected to the head’s main ink tank will be affected.
- When inspecting White and Varnish, it’s crucial to know which channels share the main ink tank.
- This is why I shared the photo above.
2. When pumping problems occur _Damper
Let’s look at examples for both Color and White.
Since this article deals with ink supply issues, we will exclude head or data issues.
Color Example
- Let’s assume the LC color and nozzle pattern are not displayed.
- First, check if the ink supply is working properly.
- The first check is to ensure that ink is properly supplied from the main ink tank to the damper.
- After detaching the LC damper from the print head, use a syringe to directly check if ink is being supplied properly from the damper.
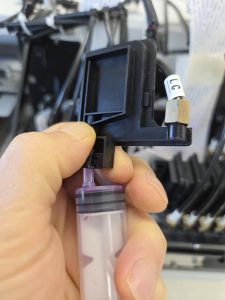
Here’s how to check if ink is being properly supplied from the damper using a syringe.
- As shown in the photo below, press the syringe against the part where the damper attaches to the head.
- Then, when you pull the syringe to draw ink,
- the ink will come out with bubbles, and at some point, only ink will be sucked out without any bubbles.
- If the ink flows out without bubbles, the ink supply from the main ink tank to the damper is fine.
- If bubbles continue to flow out, there’s an air leak somewhere, which needs to be addressed.
- If this isn’t resolved, cleaning problems, ink pumping problems, and ink leaks during printing can occur.
White and Varnish Example
- Let’s assume the W3 nozzle pattern isn’t working.
- Just like the Lc process for Color, pulling out the W3 damper and drawing ink with a syringe is pointless.
- Even if ink is drawn in, is it coming from the main ink bottle?
- Is it coming from the W1, W2, and W4 dampers, which are interconnected? It’s impossible to tell.
- If you only work with the W3 damper, ink will initially flow out, but then only air will flow out.
- That is, ink is initially drawn from another channel damper closer to the main bottle.
- Once ink is drawn from that damper, the head nozzle is open to air, so even when you use the syringe, only air will flow in.
- After detaching the W1, W2, and W4 dampers, which are interconnected, from the head, and using a cable tie to close the ink tube to block air inflow,
- you must then perform the W3 damper syringe process to ensure that the ink supply to that damper is flowing smoothly from the main ink tank.
IV. Problems that actually occurred _Damper
1. Rigid ink tube _Damper
Almost all of the ink tubes connecting the main ink tank to the damper are made of rigid ink tubes.
However, only the ink tube connected to the last damper is a flexible ink tube.
I’ll describe the actual problem I encountered.
- When I first received the equipment and was performing after-sales service, I purchased only rigid ink lines.
- When replacing the damper, I used rigid tubes to fill the remaining ink tubes.
- Previously, the ink pumped to some extent, but after the replacement, the ink did not load (pump) at all.
- At first, I suspected that the rubber ring connected to the damper was not properly sealed.
- I opened the gold bolt, replaced the rubber ring, and tightened the bolt with all my strength.
- Even then, the ink did not load (pump).
- Ultimately, I solved the problem by using a flexible tube in the damper.
- When inserting the flexible tube into the damper, it must be firmly inserted.
- Once inserted, it should not be easily removed by hand.
- Also, the rubber ring and bolt above cannot prevent air from entering unless the ink tube itself is tightly fitted.

2. Damper Inlet Diameter _Damper
After learning that I needed to use a soft tube and that rubber rings weren’t very helpful,
- Before actually using the damper, I inserted the soft ink tube into the damper inlet. If it was tight, I used it; if not, I discarded it.
- While the shape is the same, dampers made by different manufacturers have different inlet diameters. Buying any damper from an online store could cause problems later.
- The ink tube itself also has slightly different inner and outer diameters depending on the manufacturer. Buying any ink tube from an online store could cause problems later.
- In the early days, I purchased parts from a parts specialist, but after learning this, I discarded all of them.
- Since then, I’ve only imported parts used in this printer by the manufacturer, even though they’re more expensive.
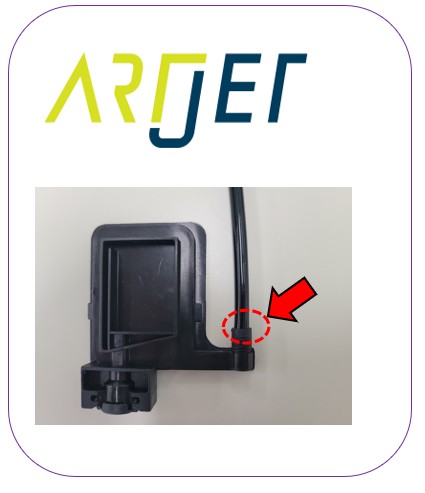
- In the photo below, insert the ink tube in the circled area. When you pull it out, make sure it’s not pulled out too far. This prevents air from entering during ink loading (pumping).
3. White & Varnish _Damper
As explained above, the damper ink supply check process for White and Varnish is different from that for Color.
- Other channels that do not draw ink with a syringe must be blocked during the process.
- Failing to do so not only fails to check for ink supply problems in those channels,
- but other channels that were previously working properly may also become problematic.
- This is because, as shown in the video below, ink is supplied to multiple channels from a single main ink tank.
- Damper cleaning issue sum up parts 3
The video below captures the entire process, from syringe operation to nozzle testing.
Damper cleaning issue sum up parts 3 full video
- Here’s a look at how the damper and ink tube feel when they’re not tight,
- how ink flows out when drawing ink with a syringe,
- and how the cable tip locks another channel when working on the white damper.
- While the model is from five years ago and differs from the current model, the ink supply method is the same.
4. When to replace the damper and if you have this symptom,,, _Damper
Let me explain the most important point: when to replace the damper.
- Since dampers don’t cause major problems even if used as-is, most people don’t replace them, even though they’re consumables.
- However, if this causes an unknown abnormality, and after checking everything else, you’re exhausted and have no time or energy, you decide,
- “Let’s try replacing the damper one last time. It doesn’t seem related, but…”
- And sometimes, the problem is resolved.
- In simple cases, the white color in a specific channel is particularly difficult to clean, and replacing the damper for that channel resolves the issue.
- However, in some cases, the cause can be difficult to pinpoint.
- To prevent these problems, you should replace your dampers at least every six months.
어렵게 찾아낸 문제를 설명 드리면, 증상은 하기와 같습니다.
- 인쇄 도중 특정 color가 잘 나오다 갑자기 빠집니다.
- 다시 Cleaning 하고 nozzle pattern을 확인하면 정상입니다.
- 그리고 다시 인쇄를 진행하면 처음에는 괜찮다고 중간쯤에 또 다시 잉크가 빠지기 시작합니다.
- 다시 cleaning하고 nozzle pattern을 확인하면 정상입니다.
- 헤드 수명때문에 그런가하고, 헤드를 교체하니 다시 정상으로 작동합니다.(헤드 상태에 따라 괜찮을 수 있습니다)
- 하지만 시간이 지나면 헤당 color가 또 빠지게 됩니다.
Here are some troubleshooting tips and solutions.
While some issues can be caused by the head, I’ll focus on ink supply here.
- If a specific color is missing a few nozzles at a time or is missing sporadically during printing, check as follows:
- Raise the head and visually inspect the underside of the head.
- If ink is deposited on the head surface, that head nozzle is unable to eject ink.
- Alternatively, leave the head in this position for 30 minutes and check if ink is deposited on the surface.
- In this case, the first thing you should do is replace the color damper.
- This is most likely due to the damper’s lifespan reaching the end of its lifespan and not properly holding the ink.
- There have been cases where replacing the damper has resolved the issue.
- Furthermore, since replacing the damper is the cheapest and easiest solution,
- if a similar issue occurs, it’s best to do this first to eliminate any damper variables.
V. ARTJET UV Printer
One thing I’ve noticed after five years of sales and maintenance of ARTJET UV printers is that troubleshooting data is second only to product stability.
All products have issues, whether they’re caused by actual equipment problems or consumer error. Product stability hinges on how quickly and easily you can resolve those issues.
ARTJET compiles all troubleshooting data.
You can see the product print quality by clicking here.
Click here for ARTJET pricing and terms of sale. The exterior design has changed.

핑백: Captop and head position _ Printer Cleaning Issues Part 5 ARTJET 2026
핑백: Aligning the Captop and Head Position - Printer Cleaning Issues Part 6 ARTJET 2026
핑백: Ink that has deteriorated inside the captop - Printer Cleaning Issues Part 9 ARTJET 2026
핑백: How to Replace a Motor Pump Tube - Printer Cleaning Issues Part 12
핑백: Why it's important to replace the yellow tube and captop
핑백: Head protection plate crumpled _ Printer Cleaning Issues Part 14 ARTJET 2026
핑백: Head protection plate cracked _ Printer Cleaning Issues Part 16 ARTJET 2026
핑백: When ink runs out during printing - Printer Cleaning Issues Part 17 ARTJET 2026
핑백: White flies around the image - Printer Cleaning Issues Part 19 ARTJET 2026
핑백: How to Find the Problem Color When the Color is Strange - Printer Cleaning Issues Part 21 ARTJET 2026
핑백: Problems that occur when ignoring the low ink alarm - Printer Cleaning Issues Part 22 ARTJET 2026
핑백: Printer Cleaning Problems Part 23 Table of Contents ARTJET 2026