Why it’s important to replace the yellow tube and captop – Printer Cleaning Issues Part 14
So far, I have summarized the information related to UV Printers below. If you click on the article, you will be taken to the link for related information.
- 9 articles on head basics,
- 12 articles on actual head issues and their solutions,
- 10 actual mechanical Machine Problems and Solutions.
- 12 Problems and Solutions of Electronic Boards and SW Actually Issued
- 11 Problems and Solutions: Sai Rip Installation and Basic Settings, Spot Color Creation, and More
- We’ve compiled a list of products that can be made with a UV printer.
I. Background information
We’re updating previous content.
The full text of Part 24 of the Ink Supply Issues series can be found through the link below.
24 articles on ink supply issues,
This article addresses the motor pump issue highlighted in red in the full table of contents for ink supply issues,
and explains why it’s important to replace the yellow tube and captop.
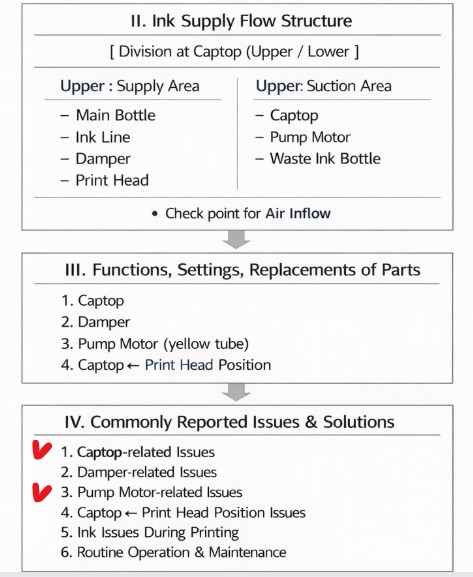

When ink flows from the main ink bottle through the ink tube to the damper, it flows through the print head to the captop, then through the motor pump to the waste ink tank.
- The first session covered the captop lower tube,
- The second session covered how to replace the captop,
- The third session covered the damper.
- In the fourth hour, the pump motor and the yellow tube.
- In the fifth hour, Captop and head position.
- In the sixth hour, how to manually align the captop and head position.
- In the seventh hour, the capping station is not level and how to level it.
- In the eighth hour, the problem of the Captop surface drying out and its solution.
- In the ninth hour, the problem and solution that occurs when deteriorated ink remains inside the Captop.
- In the tenth hour, the problems caused by too frequent pumping and cleaning.
- In the eleventh hour, the symptoms and solutions that occur when the main ink tube torn.
- In the twelfth hour, how to replace the motor pump tube.
- In the third session, we explained why white cleaning did not work well and tips for improvement.
You can check the details by clicking the link.
In the thirteenth session, when white cleaning isn’t working properly,
I explained two temporary solutions that can be applied when consumables are out of stock, prioritizing replacing consumables.
Today’s content will explain why I mentioned that.
In the past, white cleaning on my demo equipment wasn’t working properly, so I tried several methods. Ultimately, I’d like to share the process of replacing the yellow tube and captop, which ultimately improved the situation.
II. White Cleaning Has Become Difficult _Why it’s important to replace the yellow tube and captop
1. 10-month-old demo equipment
The demo device is now 10 months old.
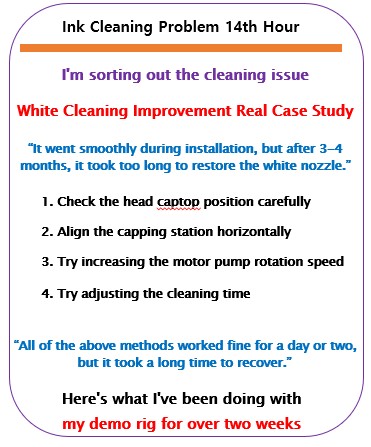
For about three or four months, white cleaning worked smoothly, and the white nozzle recovered quickly. However, at some point, it started taking a long time to restore the white nozzle.
A month or two ago, it took over 30 minutes, sometimes up to an hour, to achieve the desired white nozzle condition.
It was a waste of time, but the ink consumed by cleaning was also considerable.
I took my time and started checking.
2. Various attempts
Since cleaning and pumping were complete, I began checking other areas without considering replacing the yellow tube and captop.
- I also checked the X-axis home position several times using the software, changing the numbers. It didn’t make much of an improvement, so I returned it to its original position.
- I even loosened the bottom bolt of the capping station and re-adjusted the entire position. It seemed to work well at first, but the next day, the white cleaning was still not smooth.
- I readjusted the capping station horizontally. While there was significant improvement, compared to when it was first installed, it took longer to restore the white nozzle.
- I also tried increasing the motor pump speed. This helped the first few times, but after a few days, it didn’t work as well.
- I also adjusted the cleaning time. This didn’t show much improvement.
3. Captop Replacement
It looked perfectly fine, so I didn’t consider replacing the captop. However, after trying all other methods and seeing no improvement, I replaced it with a new one.
After replacing it, the white nozzle recovered much more quickly.
I thought that was the solution, but after about two days, the white nozzle started taking a long time to recover again.
4. Old yellow tube
The yellow tube looked remarkably clean, considering it was a demo unit, and it was free of contamination.
- However, when I pressed the “Cleaning” button, it only made a humming sound, didn’t run during the first or second ink-pumping cycle, and only started running from the last cycle, which was to purge any remaining ink in the captop.
- After this cycle, the first ink-pumping cycle didn’t work properly, but the second cycle worked fine, so I assumed there was nothing wrong.
However, while certain channels recovered quickly, nozzles in channels 1 and 2 always failed to recover.
Since ink flowed smoothly even after loading and cleaning, I hadn’t considered replacing the yellow tube.
III. What’s different from when it was first installed? _Why it’s important to replace the yellow tube and captop

1. What are the conditions that have changed since the initial installation?
Control of the entire ink flow from the main ink tank to the waste ink tank involves convection (liquid flows from high to low), damper technology, and a motor pump.
There’s nothing related to the electrical and electronic boards, software, or image data.
I started considering different ink supply conditions than when I first installed it.
- A single motor pump draws ink from the main ink tank through the ink tube and damper to the print head. The motor runs smoothly, so it’s not relevant.
- The main ink tank and ink tube aren’t consumables, so they’re not relevant.
- The print head simply flows ink, so they’re also not relevant.
- The three consumables for the UV printer are the damper, captop, and yellow tube.
2. Decided to replace the yellow tube
The following items have been checked so far:
- The print head and captop are correctly positioned.
- The capping station is leveled.
- The captop has also been replaced.(Captop replacement video)
Things I haven’t done yet are replacing the damper and the yellow tube.
- Since the cleaning process only made a humming noise and the pillars above the motor pump weren’t turning properly, I decided to replace the yellow tube first.
- You can see why replacing the yellow tube is a priority over replacing the motor pump in this section: How to Replace the Motor Pump Tube.
- The first operation was a bit rough, but from the second operation onward, it was smooth and the ink was flowing well. I thought it might be a bit excessive to replace the yellow tube as well,
- but since it’s a consumable, I replaced it anyway. (Yellow tube replacement Video)
After replacing the yellow tube, the white nozzle recovery time was significantly reduced, and the condition remained similar for several days.
Because of the improvement, the damper was not replaced.
3. When to replace the yellow tube and captop
I’ve tried various methods, and while I’ve seen improvements, nothing beats replacing the basic consumables.
Captop Comparison
- In the photo below, the left side is the replaced captop, and the right side is the new captop.
- The rubber blades on the old captop were significantly worn,
- and I suspect this prevented a good seal, making cleaning difficult.

Yellow Tube Comparison
- In the photo below, the top part is the new yellow tube, and the bottom is the old yellow tube.
- The old tube had shrunk, so it couldn’t fully suck up the liquid when it was sucked up.
- As a result, ink was only being drawn from the dampers that were sucking ink well among the six white dampers.
- This seems to have prevented proper restoration of nozzles 1 and 2 in white channels.

If pumping and white cleaning are working properly, but the white nozzle isn’t recovering properly,
- First, replace the cap top and yellow tube.
- Prioritize replacing consumables before anything else.
- If that doesn’t improve the problem, inspecting other areas is the quickest solution.
IV. ARTJET UV Printer
One thing I’ve noticed after five years of sales and maintenance of ARTJET UV printers is that troubleshooting data is second only to product stability.
All products have issues, whether they’re caused by actual equipment problems or consumer error. Product stability hinges on how quickly and easily you can resolve those issues.
ARTJET compiles all troubleshooting data.
You can see the product print quality by clicking here.
Click here for ARTJET pricing and terms of sale. The exterior design has changed.

핑백: Head protection plate crumpled _ Printer Cleaning Issues Part 15 ARTJET 2026
핑백: Head protection plate cracked _ Printer Cleaning Issues Part 16 ARTJET 2026
핑백: When ink runs out during printing - Printer Cleaning Issues Part 17 ARTJET 2026
핑백: The color has faded - Printer Cleaning Issues Part 18 ARTJET 2026
핑백: White flies around the image - Printer Cleaning Issues Part 19 ARTJET 2026
핑백: Printer Cleaning Problems Part 23 Table of Contents ARTJET 2026