The color has faded – Printer Cleaning Issues Part 18
So far, I have summarized the information related to UV Printers below. If you click on the article, you will be taken to the link for related information.
- 9 articles on head basics,
- 12 articles on actual head issues and their solutions,
- 10 actual mechanical Machine Problems and Solutions.
- 12 Problems and Solutions of Electronic Boards and SW Actually Issued
- 11 Problems and Solutions: Sai Rip Installation and Basic Settings, Spot Color Creation, and More
- We’ve compiled a list of products that can be made with a UV printer.
I. Background information
We’re updating previous content.
The full text of Part 24 of the Ink Supply Issues series can be found through the link below.
24 articles on ink supply issues,

When ink flows from the main ink bottle through the ink tube to the damper, it flows through the print head to the captop, then through the motor pump to the waste ink tank.
- The first session covered the captop lower tube,
- The second session covered how to replace the captop,
- The third session covered the damper.
- In the fourth hour, the pump motor and the yellow tube.
- In the fifth hour, Captop and head position.
- In the sixth hour, how to manually align the captop and head position.
- In the seventh hour, the capping station is not level and how to level it.
- In the eighth hour, the problem of the Captop surface drying out and its solution.
- In the ninth hour, the problem and solution that occurs when deteriorated ink remains inside the Captop.
- In the tenth hour, the problems caused by too frequent pumping and cleaning.
- In the eleventh hour, the symptoms and solutions that occur when the main ink tube torn.
- In the twelfth hour, how to replace the motor pump tube.
- In the third session, why white cleaning did not work well and tips for improvement.
- In the fourteenth hour, real-life cases where white cleaning did not work well and how to resolve them.
- In the fifteenth hour, the problem and solution that could not be solved even after using all of my knowledge.
- In the sixteenth session, a pumping issue caused by a cracked head protection plate and its solution.
- In the seventeenth hour, we discussed the problem of a specific color suddenly disappearing during printing and how to resolve it.
You can check the details by clicking the link.
Today, I will explain the problem of the color fading even though the cleaning and pumping are going well.
II. Problem Symptoms and Solutions _The color has faded
1. Problem symptoms
This is a question that first-time UV printer users inevitably ask.
“Cleaning and pumping work well.”
“Both color and white prints come out well when I do a nozzle test.”
“However, when I only print white, the overall color is lighter.”
“Strangely, the color is lighter at the beginning, but as I get closer to the middle, it gradually becomes more accurate.”
2. Additional Questions and Solutions
If the color has faded, it’s important to determine whether a specific ink is missing or if there’s another symptom.
At this point, we’ll request a nozzle test pattern or a photo of the printed image.
“Can I get a photo?”

After receiving the same issue several times, I offer the following solution:
- Pump only the white ink, and ink will begin to flow into the waste ink tank. After 15 seconds, it will stop.
- Clean and test the nozzle.
- If the white nozzle does not flow properly, repeat the cleaning process once or twice and then test the nozzle.
- If the nozzle test pattern is satisfactory, print a test image.
- If it is satisfactory, proceed with the main process.
Additionally, please note:
- Color and varnish do not require pumping. Pump only the white ink.
- Stop pumping after 15-20 seconds, not after pressing the white pumping button.
- After the white ink begins to flow into the waste ink tank, there will be ink on the underside of the head, so cleaning is essential.
- Since only white ink was pumped, please clean only the white ink.
- Pumping forces white ink out of the damper, leaving no ink inside the damper. Even after cleaning, the nozzle pattern may be unstable.
- Wait for about 5 minutes, perform one or two white cleanings, and then print a test image.
- During the test image printing, ink will be supplied to the damper, and the white jetting will improve.
- Cleaning once or twice after the test print will significantly improve the nozzle condition.
III. Why the color appears pale _The color has faded
1. Is the color pale? Is the whiteness gone?
This was a problem that caught me off guard when I first reported it.
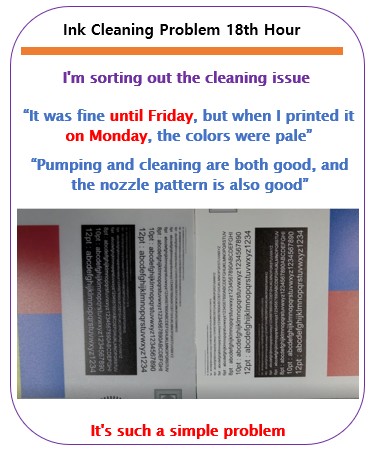
- Looking at the photo above, the colors on the left are dull, while the colors on the right are bright.
- Looking only at the colors can make you feel this way, leading you to mistake it for a color-specific issue.
- However, if you look closely at the whites, rather than just the color,
- the white on the left is dark, while the white on the right is bright.
In both photos I initially shared, the white density wasn’t sufficient, causing the colors on top to appear dull.
- Just as printing colors on a dark background results in a dark, unsaturated color,
- think of it as printing on paper with a black undertone rather than pure white paper, with the white density being diluted.
- “The colors are diluted,”
- “My colors are starting to show through about halfway through the print.”
- Both issues stem from a diluted white density.
2. Why does White come out pale?
CMYK Lc Lm, color inks contain relatively small amounts of pigment, so they don’t sink to the bottom.
- To properly express color, the color pigment must be added in an appropriate amount.
- Too much color pigment results in a dark, cloudy color, while too little results in an inaccurate color.
- In other words, there’s no need to add too much color pigment.
- Since color inks don’t contain a lot of color pigment, the color pigment is evenly distributed and doesn’t sink to the bottom compared to white pigment.
On the other hand, white ink is more demanding when it comes to pigments that express white.
- First, to express white, it’s crucial to use white pigments that properly express the white color (other inks often contain a slight yellow tint).
- Second, it’s crucial to create proper masking through white printing, even on materials containing transparent colors.
- For this reason, white ink contains larger white pigments than color inks.
- Furthermore, white pigments are added to the maximum extent possible for stability.
- In other words, white ink contains larger pigments than color inks, but it also contains more.
- For this reason, if white ink isn’t stirred regularly,
- the heavier pigments will sink to the bottom, resulting in a dense white at the bottom, while the upper layer will contain less pigment and a thinner white.
To explain it like a printer:
- Most main ink tanks have a stirrer, so the white ink is well-mixed within the white ink tank.
- However, the ink tube, which stretches approximately 2.5 meters from the main ink tank to the damper, has neither a stirring device nor a circulation device.
- With daily use, the ink flows through the ink tube, preventing the heavy pigments from settling.
- However, after two or three days of inactivity, the heavy pigments in the white ink in the ink tube settle to the bottom.
- As the white pigment accumulates at the bottom, the white at the bottom of the ink tube becomes darker, while the white at the top becomes lighter.
- The lighter white at the top is lighter and flows well, so it flows to the damper first due to convection pressure, resulting in this light white.
- During the nozzle test, although light, the white remains intact, allowing printing to proceed.
- In this way, when a light white is printed on the background and color is placed on top of it, the color appears dull due to the light white.
3. Ink load function
Ink loading and pumping are processes that forcefully remove ink.
- When performing an ink load, separated ink within the ink tube is drained into the waste ink tank,
- and the ink tube and damper are filled with the ink contained within the ink bottle.
- Printing in this state produces a white color with a higher density.
- Note that the white ink within the damper also undergoes layer separation. Therefore, in some cases, rather than performing a longer white clean,
- shortening the ink load and then performing a cleaning can help restore the white nozzle condition more quickly.
IV. ARTJET UV Printer
One thing I’ve noticed after five years of sales and maintenance of ARTJET UV printers is that troubleshooting data is second only to product stability.
All products have issues, whether they’re caused by actual equipment problems or consumer error. Product stability hinges on how quickly and easily you can resolve those issues.
ARTJET compiles all troubleshooting data.
You can see the product print quality by clicking here.
Click here for ARTJET pricing and terms of sale. The exterior design has changed.

핑백: Printer Cleaning Problems Part 23 Table of Contents ARTJET 2026