- Anyone whose Color cleaning button suddenly stops responding for no apparent reason
- Anyone whose program freezes during initialization and cannot connect to the printer
- Anyone experiencing irregular White and Color misalignment only in certain print zones
- Anyone who needs to reinstall the printer program after a PC replacement or crash
- Anyone dealing with unexplained recurring symptoms that persist despite rebooting or power cycling
- Always uninstall the existing program before reinstalling — this prevents conflicts during the new installation
- Without the config file (.ini), the software will install but all settings will reset to defaults — requiring a full reconfiguration from scratch
- If your PC shows signs of failure, back up the ARTJET folder on the desktop immediately — it contains all files needed for reinstallation
- After importing the config file, always follow the correct shutdown sequence: GUI Off → Power OFF → Main switch OFF
- Recurring unexplained symptoms → Uninstall and reinstall the program first
- 3 files required: ARTJET SW installer / USB communication program / config file (.ini)
- Reinstalling on existing PC → USB communication program usually does not need reinstalling
- Replacing with a new PC → USB communication program must be installed
- After installation: import config file → restart machine → run print test
I. When Reinstallation Is Needed — How to Reinstall the Printer Program
Over more than five years of selling our printers, we have occasionally resolved unexplained symptoms through program reinstallation.
The root cause was never identified in these cases — but in each instance, reinstalling the program resolved the issue.
Below is a list of symptoms that were resolved through program reinstallation.
If you are experiencing any of the symptoms below, we recommend trying a program reinstall first before investigating further.
1. Color cleaning button suddenly became unresponsive
- The printer had been working normally up to the previous day — then suddenly, pressing the Color cleaning button produced no response.
- Closing and reopening the program on the PC made no difference. Rebooting the PC also had no effect.
- Performing a full power OFF and ON of the printer did not resolve the issue.
- Uninstalling and reinstalling the program resolved the issue.
2. Program fails to connect to the printer
- When launching the printer program, the initialization sequence stalls at a specific step and cannot proceed.
- Powering the printer and PC off and back on did not help.
- Unplugging and replugging the USB cable made no difference.
- Moving the USB cable to a different port on the PC also had no effect.
- A faulty USB board on the printer was suspected, but no replacement was immediately available.
- Uninstalling and reinstalling the program resolved the issue.
3. White and Color misaligned by approximately 1mm in certain zones only (X-axis)
- This occurred during simultaneous White and Color printing.
- In some zones, White and Color aligned perfectly — while in others, they were off by about 1mm.
- The misaligned zones appeared both at the start of the print and mid-print, with no consistent pattern.
- Since it was X-axis related, the liner scale and liner scale reader were inspected — but no fix was found.
- The ripping data was also checked and appeared normal.
- After exhausting all other checks without resolution,
- uninstalling and reinstalling the program resolved the issue.
4. PC became unresponsive due to age
- If your PC begins showing signs of instability, copy all files in the ARTJET folder on the desktop immediately.
- These files alone are sufficient to reinstall both Sai RIP and the printer program from scratch.
II. How to Reinstall the Program
1. Files Required for Reinstallation
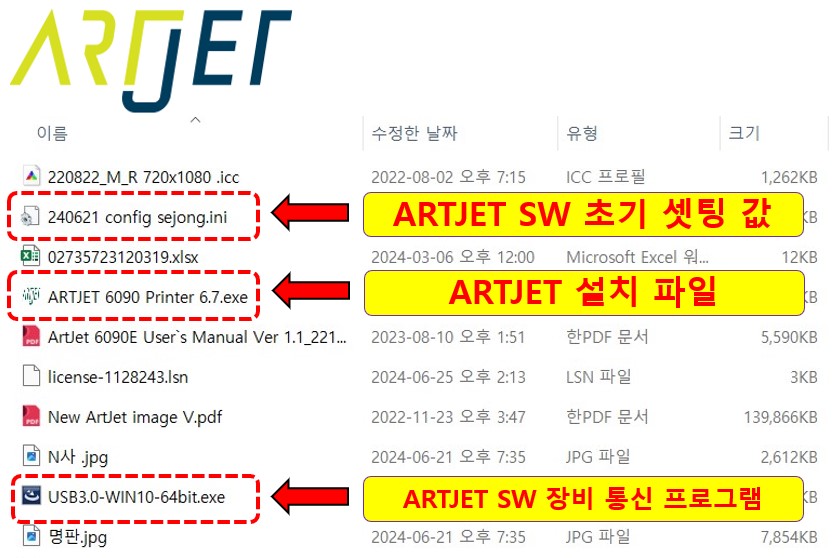
At the time of machine installation, we always create an ARTJET folder on the customer’s PC desktop and save all necessary files there.
This folder contains every file needed to configure the printer.
- The ARTJET SW, the config file containing initial settings, and the USB communication program
- The Sai RIP license password, ICC profiles, and more
The folder typically contains the following files. The three files required for printer program reinstallation are:
- ARTJET SW installer [ARTJET 6090 Printer 6.7.exe] — version number may differ if you have a newer version
- USB communication program [USB3.0-WIN10-64bit.exe] — not required if reinstalling on the same PC that was previously connected, but must be reinstalled if USB connection fails
- Config file containing all original machine settings (start position, offset values, etc.) [240621 config sejong.ini] — the filename shown is for reference only; look for any file ending in .ini. Without this file, the SW will install but all settings will be reset to defaults, requiring full reconfiguration.
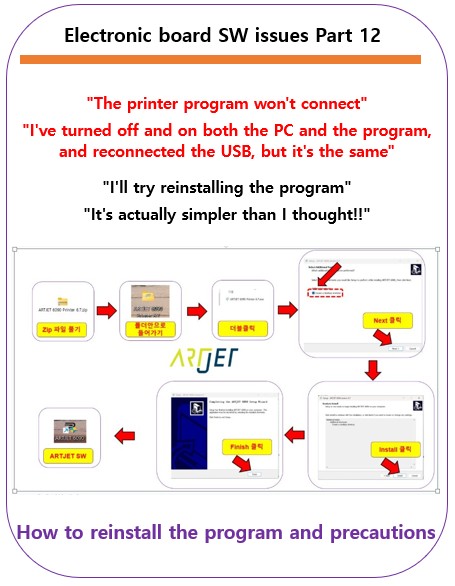
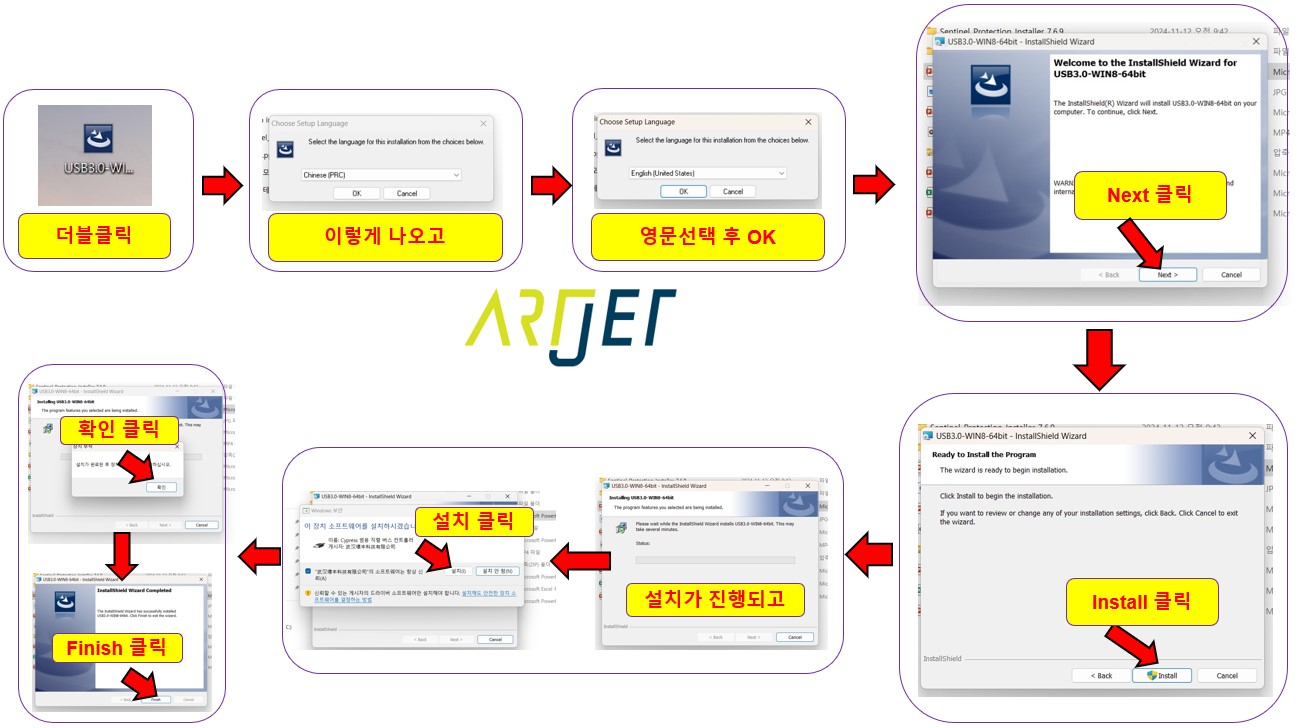
2. Reinstallation Steps
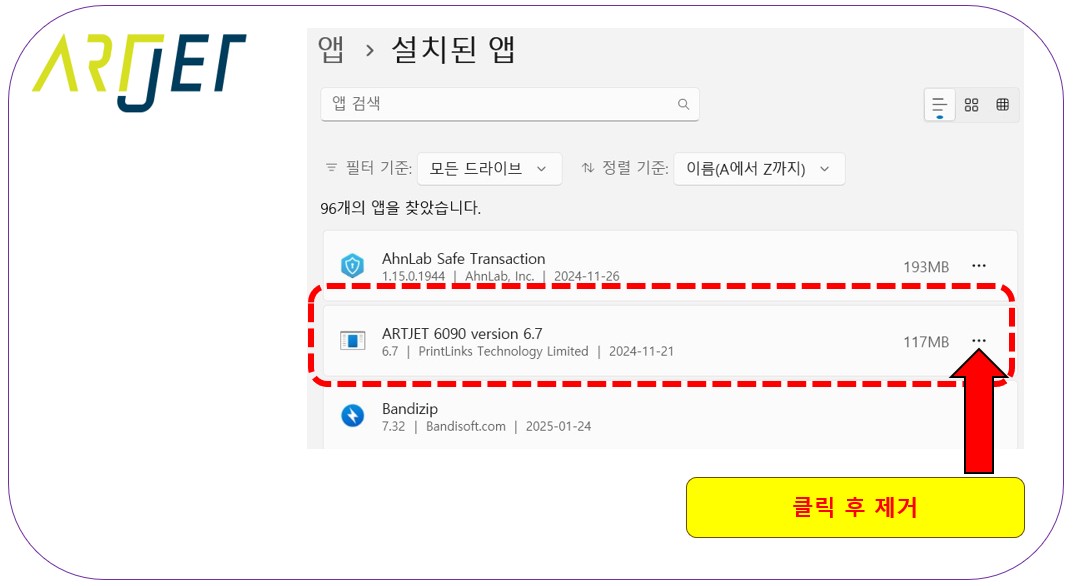
1. Uninstall the existing program
- Before reinstalling, remove the currently installed program from your PC.
- This step is required to prevent conflicts during the new installation — always uninstall first.
2. Reinstall the printer program [ARTJET 6090 Printer 6.7.exe]
Unlike Sai RIP, which takes time and involves multiple configuration steps, the printer program installation is straightforward.
- Extract the ZIP file and open the folder.
- Double-click the Software program .exe file.
- Check “Create a desktop shortcut” and click “Next”.
- Click “Install”.
- Click “Finish”.
Once complete, the software shortcut will appear on your desktop.
The entire process takes approximately 1–2 minutes.
3. USB communication program [USB3.0-WIN10-64bit.exe]
If reinstalling on the same PC that was previously used, this communication program generally does not need to be reinstalled.
However, if the program fails to connect to the printer, this program should also be uninstalled and reinstalled.
To uninstall: go to [Device Manager] on your PC, unplug and replug the USB cable — the port that disappears and reappears is the one to remove.
Delete that device, then reinstall [USB3.0-WIN10-64bit.exe].
As noted, this step is usually unnecessary when using the same PC — it is included here as a precaution.
When setting up a brand new PC, this communication program must always be installed.
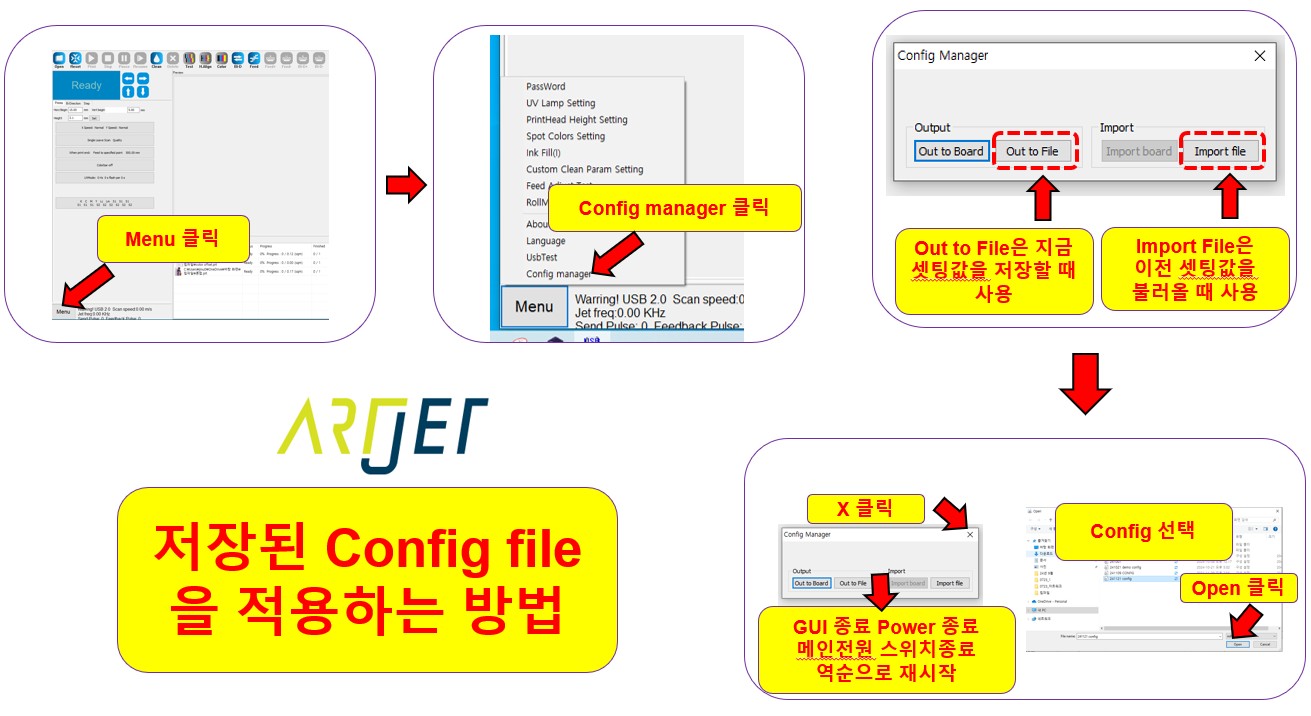
4. Import the config file after connecting the program to the printer [**.ini]
Once both programs above are installed, the software will connect to the machine.
Since the installation resets all values, the print start position and offset values will be at defaults — printing in this state will not produce correct results.
The original settings from the initial machine setup must be loaded back into the program.
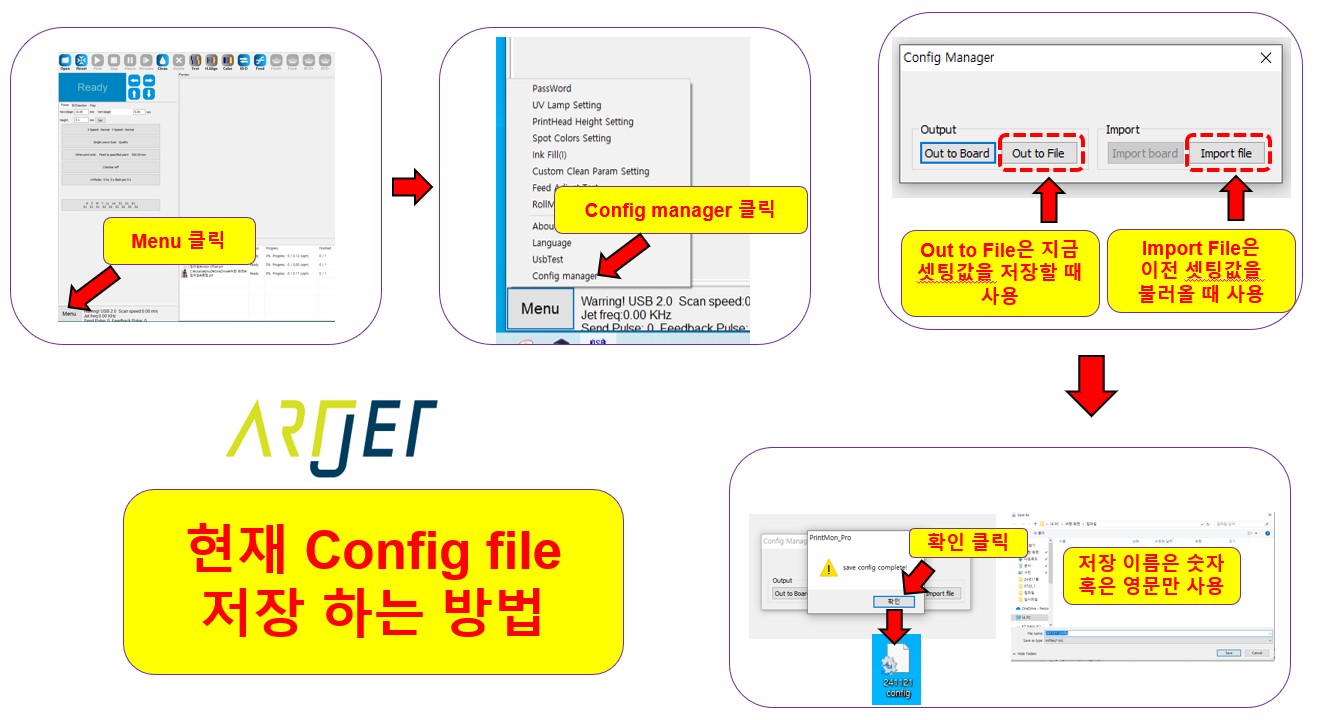
Our printer software allows all previously configured values to be saved as a config file and reloaded at any time.
After connecting the program to the machine for the first time, the following steps must be performed:
- Menu → Config Manager → Import File → open the ARTJET folder on the desktop → select the available file [**.ini] → click OPEN
- After importing the config file: GUI Off → Power button OFF → Main switch OFF. Wait 1–2 minutes, then restart the machine.
Always verify the following before restarting the machine:
- Press the [Power] button on the touch panel.
- The two center lights on the head carriage board should turn off simultaneously after approximately 7 seconds.
- After they turn off, confirm that neither of the two center lights is blinking before connecting the program.
How to save the config file
- After replacing the head and reconfiguring offset values,
- or after adjusting bidirectional pin values that you want to preserve, save using the steps below.
III. ARTJET UV Printer
