When Head Board LEDs Blink — Control Board/Software Communication Issues (Part 1)
Symptoms → Hypothesis → Inspection Order → Solution · Re-evaluating “Motion is Normal but No Ink Jetting”
✅ Who Should Read This
- Those experiencing zero ink jetting during nozzle patterns or printing despite normal carriage motion.
- Those who performed pumping/cleaning due to suspected clogging, where waste ink flows but output remains zero.
- Those observing abnormal LED patterns (blinking or incorrect shut-off) on the head board.
⚠️ Precautions (Protecting Expensive Parts)
If the LEDs do not turn off in the normal pattern after ~7 seconds of pressing the Power button, or if one LED continues to blink, immediately turn the power OFF. Leaving it on in this state can damage the Printhead, DATA cables, or the Control Board.
🧭 Key Summary (On-site Diagnosis)
- Normal motion + zero output often points to Head-Board communication (SW timing/signal) issues rather than physical clogging.
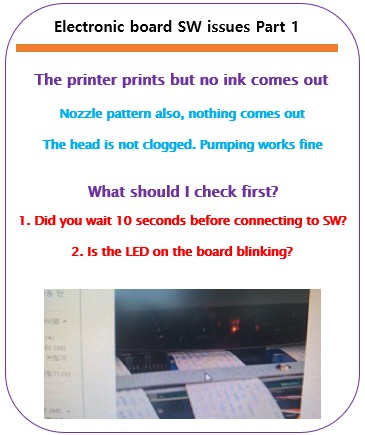
- Normal: After Power ON, 2 LEDs light up simultaneously and turn off simultaneously after ~7s → Then connect SW.
- Abnormal: LEDs do not turn off simultaneously or one keeps blinking → Immediately turn OFF and perform isolated inspection.
UV Printer Fundamentals · Troubleshooting · Product Guide
We have organized UV Printer content as follows. Click an item to navigate to the post.
1) Ink Supply
23 posts on printing errors caused by ink supply issues (including cleaning/pumping).
· [Summary] 23 Posts on Printer Cleaning Issues – ARTJET 2026
· [Summary] 23 Posts on Printer Cleaning Issues – ARTJET 2026
2) Head Related Issues
12 posts covering everything from head replacement to common problems.
· [Summary] 12 Posts on Head Issues by Symptom – ARTJET 2026
· [Summary] 12 Posts on Head Issues by Symptom – ARTJET 2026
For deeper technical knowledge:
9 Posts on Printhead Fundamentals
9 Posts on Printhead Fundamentals
3) Mechanical Issues
4) RIP Software
5) UV Printed Products
Starting today, we will organize Control Board (including Head Board) and Software issues. In this first session, we revisit the issue of “Motion is Normal but No Ink Jetting” from an electronic/SW perspective. This is a critical topic as it can lead to the destruction of expensive heads and boards.
I. Symptoms — When Head Board LEDs Blink
The software connects fine, and all mechanical motions are normal. However, during printing, the head carriage moves back and forth, but no ink is jetted at all.
“Is the head clogged?” Thinking this, you print a nozzle pattern, but the result shows zero nozzles (a completely blank output).

Since everything except the ink flow seems normal, you might try pumping or cleaning. Strangely, pumping shows ink flowing normally into the waste tank.
The head is not clogged, pumping works, and motion is normal, yet output is zero.
→ In this case, you must suspect Communication/Signal (Board · SW) issues.
→ In this case, you must suspect Communication/Signal (Board · SW) issues.
II. Simple Case — Resolving via “SW Connection Timing” _When Head Board LEDs Blink
This symptom can be a simple fix or require multi-variable inspection. Let’s start with the easiest solution.
The core issue is connecting the Software before the Head Board and Printhead establish a normal handshake.
- Pressing the Power button on the touch panel supplies power to the carriage board.
- 2 LEDs in the center of the board turn on, then simultaneously turn off after ~7 seconds.
- Normal communication begins only after these 2 LEDs turn off.
- Connecting the Software after this point ensures normal operation.
If you connect the Software before the LEDs turn off:
The SW attaches before the board-head communication is finalized. Motion remains normal, but the board fails to send jetting signals to the head, resulting in zero output.
The SW attaches before the board-head communication is finalized. Motion remains normal, but the board fails to send jetting signals to the head, resulting in zero output.
Solution: Wait for the 2 LEDs to turn off simultaneously (approx. 7s) after hitting Power, then connect the Software.
III. Complex Case — Abnormal LED (Continuous Blinking) / Isolated Inspection _When Head Board LEDs Blink
If the 2 LEDs do not turn off simultaneously after 7 seconds, or if one LED continues to blink, immediately turn the power OFF.
This indicates a failure in communication between the head board and the printhead.
1) Symptom Details
- Instead of turning off together within 7s, the LEDs turn off at different times.
- Subsequently, one LED continues to blink intermittently.
- Refer to the video/playlist below for the visual symptom.
Possible causes for board blinking are numerous:
- Failure of one of the Color / White / Varnish heads.
- Poor contact or damage to the Board-to-Head DATA cable.
- Damage to the Head Board Main Chip.
(Board failure requires replacement; there is no other fix).
2) Troubleshooting Procedure
All work must be performed with the power OFF.
Since we must check the board, 3 heads, and 3 DATA cables, remove the printer cover first for easier access.

A. Verifying the Board
- Disconnect all Color / White / Varnish cables from the head board.
- Turn the power ON. If the 2 LEDs turn off simultaneously and there is no blinking, the board is normal.
- If they still fail to turn off together or one blinks, the board itself is faulty. Replacement is necessary.
B. Verifying Individual Heads (If Board is Normal)
- With power OFF, connect only the Color Head DATA cable to the board.
- Turn power ON. If LEDs turn off normally, the Color Head is normal.
- If they fail to turn off or blink, the Color Head (or its cable) is the cause of the error.
- Try replacing the DATA cable with a new one first. If the symptom persists, the head requires replacement.
If Color is normal, repeat the process for White → Varnish until the faulty component is identified.
3) Detailed Instruction Manual (Reference Link)
This topic was previously covered in our Head Issues index. We emphasize it again here because of the high risk of damaging expensive components.
Please refer to the link below for detailed step-by-step instructions and safety warnings.
IV. ARTJET UV Printer
In over 5 years of selling and maintaining ARTJET UV printers, we’ve learned one vital lesson:
Next to product stability, the most important factor is the accumulation of troubleshooting data.
Problems can arise due to environment, conditions, or user skill. What matters in a production environment is not “a machine with zero issues,” but:
How quickly and accurately you can identify the cause and resolve it when a problem occurs.
ARTJET continuously collects and organizes real-world field data to support faster and more accurate problem resolution.
🎥 View Print Quality Samples
💰 ARTJET Pricing & Sales Conditions
(Note: Exterior design has been updated)
🧾 Complete List of UV Printable Products

* Note: Exterior design has been updated.
핑백: Head Pin Value Offset Precision Tuning — Electronics Board / Software (Episode 8) ARTJET 2026
핑백: X-Axis Start Position Keeps Shifting — Electronic Board / Software Issue (EP.10) ARTJET 2026
핑백: How to Reinstall the Printer Program — Electronics / Software Issues (EP.12) ARTJET 2026
핑백: UV Printer Electronics Software Issues 12 Articles by Symptom