- Those who produce their own jigs using a laser cutter for UV printing
- Those struggling with microscopic misalignment between the jig and UV print area
- Those preparing for UV printing on materials with tricky adhesion like anodized steel, metals, or glass
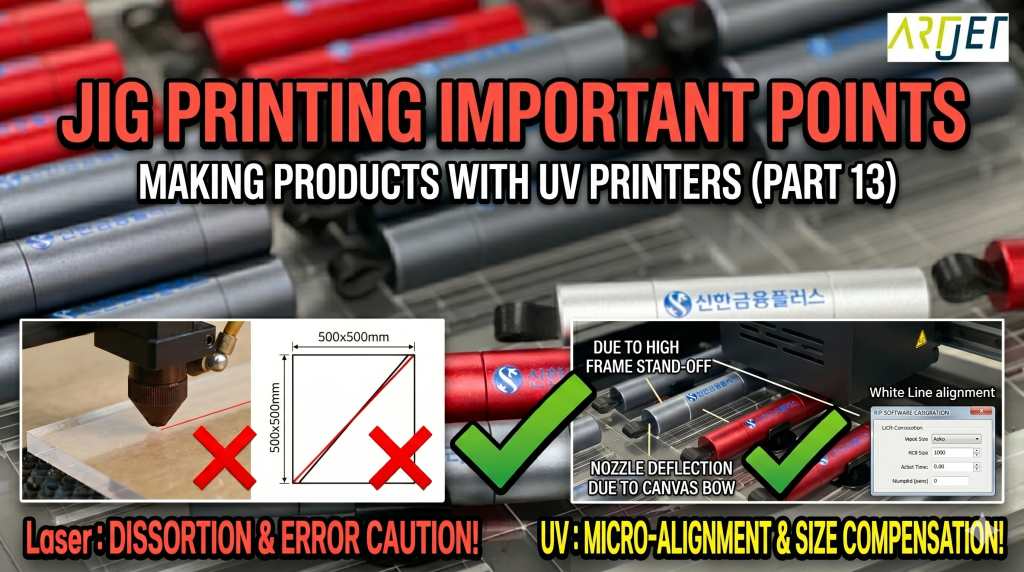
- You must pre-check if the X and Y axes of the laser cutter are perfectly vertical and horizontal — there is no way to compensate for rhombic jigs in UV printing
- Do not align the jig based on the grid lines of the UV printer bed — you must print a White line on the bed first and align to that line
- Due to the nature of motor transport, the Y-axis print length error can increase as it gets longer, so size compensation must be performed first
- Anodized metal and glass materials will suffer from ink peeling after delivery if a suitable pre-treatment agent (Primer) is not found
- Before making a jig → Cut a 500×500mm square with a laser cutter and verify that the diagonal lengths are equal; if different, readjust the Y-axis pulley and recut
- Jig alignment → Place the jig based on the actual printed White line, not the bed grid
- Size compensation → Measure the Y-axis print length error, then enter the measured value in the RIP Software to compensate (the image must be re-imported to apply)
- Metal/Glass printing → Pre-treatment agent testing must precede production; proceed with mass production after verifying adhesion
I. How to Match Jig and Print Size – Precautions When UV Printing Using Jigs
1. Points to Check Before Producing Jig with Laser Cutting Equipment
- When ordering from a jig manufacturing company, one naturally expects no size error.
- However, if you are producing the jig yourself using your own Laser cutting equipment, you must check the size of the manufactured jig once more.
- Is it a rhombus instead of a rectangle?
- Does the Laser cutting equipment’s X-axis move perfectly horizontally?
- Does the Y-axis also move perfectly in the vertical direction?
- Do the X and Y axes cutting lengths exactly match the cutting file dimensions?
- Are the X or Y axis cutting lengths too short or too long?
1_1. Producing Jig After Adjusting Laser Cutter Y-Axis
- If the diagonal lengths are not equal when cutting a 500 x 500mm square with a laser cutter, the jig produced with the Laser cutter will also not be accurate.
- Before producing the jig, you must verify that the diagonal lengths within the square below are accurate.
- If the diagonal lengths are not equal, you must loosen the pulley of the laser cutter’s Y-axis driving part,
- and cut a square while adjusting one side until the diagonal lengths become equal.
- Only after adjusting like this should you produce the jig to avoid size error.

2. Is There No Size Error When Printing with a UV Printer?
- You do not need to doubt whether the image is at a right angle when UV printing.
- However, you must not align the jig based on the X and Y axes scale marks that are on the bed itself. There is a discrepancy between the bed’s X-axis line and the X-axis transport section.
- Instead, if you align the entire jig based on the White ink line printed on the bed, it will print while maintaining a right angle to the end. Be sure to align the jig to that printed line after printing a White line on the bed.
- Also, you must check the X and Y axes print lengths.
- Since the X-axis prints while reading a linear scale, there is almost no length error, but the Y-axis transport relies on a motor, not a linear scale, so errors can occur as the Y-axis print length increases.
- Errors also occur due to resolution, in addition to motor transport. For those who are curious about this professional concept, please refer to the link below:
- Inkjet Printing Resolution Concepts
3. How to Match Jig Made with Laser Cutter and UV Print Size
- Laser cutting device: The X and Y axes must perfectly form a 90-degree vertical angle. If the jig is rhombus, there is no way to align it.
- UV Printer: May have horizontal/vertical size errors. If you perform size compensation once, you can accurately match the position.
II. Actually UV Printing via Jig – Precautions When UV Printing Using Jigs
1. How to Perform UV Print Size Compensation
“Manager, I did watch the size compensation method, but… it’s not well understood.”
“For a moment, can you measure how many mm the error is out of the 300mm Y-axis?”
“Just a moment… I think 0.7mm is short.”
“Then it’s 299.3mm. If you enter 299.3 in the box and click verify, the value will automatically change.”
“Oh, the number changes.”
“Ceo, you must re-import the image for the size to be compensated from then on.”
For printing 300mm or more, be sure to eliminate the size error using the method in the link below.
2. Anodized Steel Substrate
- There are almost no UV Inks that provide adhesion to anodized steel plates.
- The CEO found a pre-treatment that provides bonding strength through trial & error.
- You must find a suitable primer when printing on Metal or glass. The product below is UV printed after suitable pre-treatment.
- For the entire manufacturing process, refer to the article: 창원 RED DOT Screen Printing UV Printing
-

Precautions When UV Printing Using Jigs
III. ARTJET UV Printer
