
Ink that has deteriorated inside the captop – Printer Cleaning Issues Part 9 ARTJET 2026
So far, I have summarized the information related to UV Printers below. If you click on the article, you will be taken to the link for related information.
- 9 articles on head basics,
- 12 articles on actual head issues and their solutions,
- 10 actual mechanical Machine Problems and Solutions.
- 12 Problems and Solutions of Electronic Boards and SW Actually Issued
- 11 Problems and Solutions: Sai Rip Installation and Basic Settings, Spot Color Creation, and More
- We’ve compiled a list of products that can be made with a UV printer.
I. Background information
We’re updating previous content.
The full text of Part 24 of the Ink Supply Issues series can be found through the link below.
24 articles on ink supply issues,
This article describes Captop-related issues highlighted in red in the full table of contents for ink supply issues.
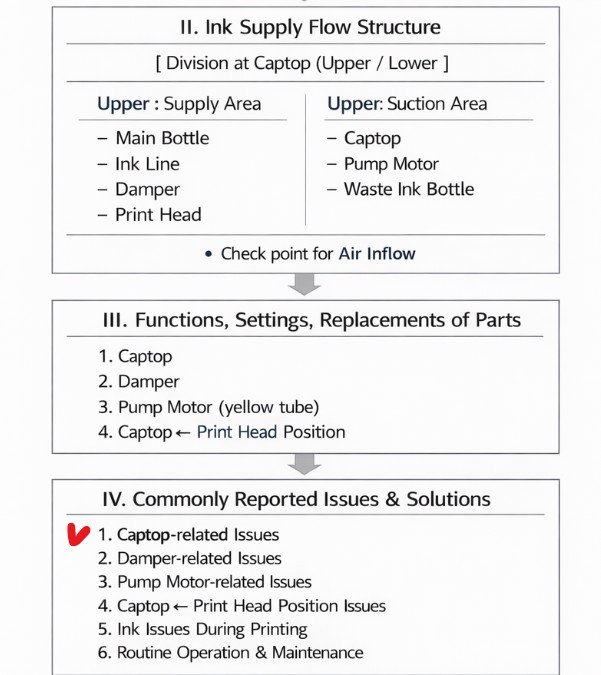

When ink flows from the main ink bottle through the ink tube to the damper, it flows through the print head to the captop, then through the motor pump to the waste ink tank.
- The first session covered the captop lower tube,
- The second session covered how to replace the captop,
- The third session covered the damper.
- In the fourth hour, the pump motor and the yellow tube.
- In the fifth hour, Captop and head position.
- In the sixth hour, how to manually align the captop and head position.
- In the seventh hour, the capping station is not level and how to level it.
- In the eighth hour, we discussed the problem of the Captop surface drying out and its solution.
You can check the details by clicking the link.
Today, I’ll explain the symptoms and solution to a problem that occurred when contaminated ink remained in the captop, a problem I struggled with for over eight hours.
The first time I encountered this issue, I managed to resolve it by accident. The second time, I spent eight hours replacing all the parts and even the ink before finally identifying the cause.
The same issue subsequently recurred on two other consumer sites, and because it was such an unsuspected variable, it was only resolved after exhausting all other measures.
I’m sharing the cause and solution I discovered after eight hours of hard work.
II. Problem symptoms _Ink that has deteriorated inside the captop
This was a problem I couldn’t quite understand.
- Cleaning works fine.
- Inkload (pumping) and pumping work fine.
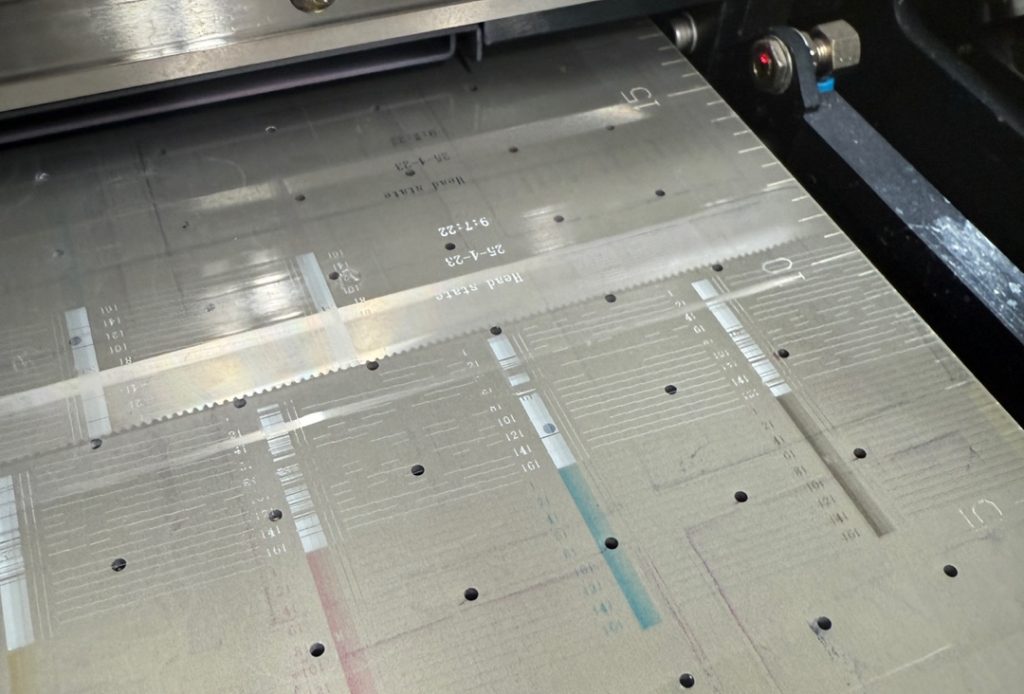
- However, when I print the nozzle pattern, the white pattern doesn’t print properly.
- I thought a test print would work just in case, so I did, but the white nozzle still wouldn’t come out.
- That doesn’t mean the head is clogged. It’s not that the same nozzle is clogged; the area where the white nozzle is clogged changes from time to time.
- I solved the problem in 8 hours.

III. Testing process _Ink that has deteriorated inside the captop
1. Head replacement
Since both cleaning and pumping were working well, I replaced the white head, thinking it would solve the problem.
However, the white nozzle didn’t come back to life.
I briefly suspected the electronic board, but as shown in the photo below, the white isn’t clean, but it’s coming from all channels, so I concluded it wasn’t a data-related issue.
2. Ink Suspicion
Since both the ink load and print head cleaning were functioning properly, I approached the issue with the thought, “Could there be some kind of deterioration in the white ink itself?”
A. Damper Replacement
- The equipment was installed two years ago, and while the customer occasionally replaced consumables, it had been a while since I’d installed it, so I decided to replace the damper.
- However, replacing the damper didn’t improve the condition.

B. Refilling with New White Ink
- Considering that the white ink in the main ink bottle had deteriorated, I filled the white ink tank with new white ink.
- I pumped the ink to empty the white ink in the ink tube,
- and then drained the ink until the new ink was present.
- I tested the ink, but there was no improvement.
C. ‘Is it due to the contamination of the deteriorated ink?’
- Considering that the ink might be mixed, causing the same problem,
- I removed the white ink tank, poured out the white ink,
- cleaned the bottom of the tank with 99% IPA (alcohol), wiped it with a cloth, and then refilled it with new white ink.
- I assumed it would work, so I printed the nozzle pattern, but there was no improvement.
D. “Is it possible that the deteriorated ink is still in the damper, causing the same problem?”
- Just in case, I replaced the damper with a new one.
- After replacing the damper, I naturally assumed this was the only cause of the problem,
- and printed the nozzle pattern, but the problem still wasn’t resolved.
After seven hours of testing various products on consumer sites, I was ready to give up.
IV. Causes and Solutions to the Problem _Ink that has deteriorated inside the captop
1. Same pattern found
After a seven-hour troubleshooting,
- I thought, “Maybe a test print will improve things,” so I continued printing with the poor white nozzle condition.
- White ink wouldn’t print at all, so I pressed the Pause button mid-print, cleaned the print head, and then restarted the print.
- The white ink, which had been missing, printed normally, and the white ink continued to print properly until the end of the print.
- This was the first time I successfully printed white ink.
- However, after printing, I cleaned the nozzle pattern and then printed the white nozzle pattern.
Same pattern
- I printed the test image again => Pause => Cleaning => Restart printing. This resulted in the white ink printing properly.
- After printing ended, I cleaned the nozzle pattern. The white pattern did not appear.
- The same problem persisted several times.
2. One thing that’s different when it comes out well and when it doesn’t!!
I was wondering what the difference was between normal and abnormal white printing.
- When cleaning after printing, the print head would finish with the bottom of the print head touching the captop. If I printed the nozzle pattern in this state, the white print would not print properly.
- When pausing and cleaning mid-print, the bottom of the print head would not touch the captop and printing would resume immediately. From this point on, white prints would be correct.
- In other words, when the print head touched the captop, the nozzle pattern was poor, but when it did, printing proceeded properly.
Could it be that the deteriorated ink on the captop was reaching the print head?
- Since the ink load (pumping) and cleaning were both working properly, I didn’t consider replacing the captop.
- Since the damper and main ink bottle would have been inspected in the case of white ink deterioration, I didn’t consider this a captop-related issue.
- Furthermore, I thought that through numerous ink loads (pumping), the ink residue on the captop had been diluted by the ink from the pump.
- I never imagined that the deteriorated ink remaining on the captop could briefly touch the print head surface during cleaning and cause this problem.
In conclusion,
- the problem was caused by the deteriorated ink remaining on the captop briefly touching the print head nozzle surface, which then affected the ink jetting.
- The problem was immediately resolved as soon as the captop was replaced.
V. What the four people who had problems had in common _Ink that has deteriorated inside the captop
A total of four customers experienced the same issue. Two experienced the same issue on White, and the other two experienced it on Color.
Based on the environments of these four customers, we can speculate on which customers might experience this issue.
A. Too Low Temperature
- This customer’s office temperature dropped to 2 degrees Celsius in the winter, and due to the high ceilings, the office temperature didn’t rise above 15 degrees Celsius even with the heater on.
- Despite four hours of repeated pumping and cleaning, the nozzles were still fragile. Finally, at 2 p.m., when the temperature rose to a certain level, the nozzles recovered.
- However, shortly after my visit, I received a call saying that the ink load and cleaning were working fine, but the white nozzles weren’t functioning.
- If the temperature is too low or too high, it can change the ink viscosity, deteriorate the ink material, and leave deteriorated ink on the captop.
- In this case, replacing the captop immediately resolved the issue.
B. Low Usage Frequency
- Since the printer is not used frequently, ink in the captop may remain unused and not be replaced with new ink.
- Ink remaining in the captop may deteriorate more quickly than ink in the light-blocked ink bottle or damper.
C. Captop Replacement Cycle
- These customers had not replaced their captops for a very long time.
As I mentioned last time, the following parts are consumables and should be replaced at the appropriate time.
- Damper => Even if it looks fine on the outside, if it’s old, the nozzle may fall out during printing and cleaning may not work properly.
- Pump Tube => While it can be cleaned with ink or other cleaners, if it’s old, the nozzle may take a long time to recover, or even if it looks fine, it may not pump properly.
- Captop => At some point, cleaning with ink may not work. Or, the same problem may occur.
- If any problem occurs, replace the three consumables mentioned above and then check the problem to quickly resolve it.
- Since the three parts can cause problems in a complex manner, it can take time to pinpoint the exact cause.
- For this reason, if you encounter an unknown problem, replace all three consumables and then check the problem.
If I had replaced the captop first, it would have been completed in 10 minutes, but I suffered for 8 hours…
VI. ARTJET UV Printer
One thing I’ve noticed after five years of sales and maintenance of ARTJET UV printers is that troubleshooting data is second only to product stability.
All products have issues, whether they’re caused by actual equipment problems or consumer error. Product stability hinges on how quickly and easily you can resolve those issues.
ARTJET compiles all troubleshooting data.
You can see the product print quality by clicking here.
Click here for ARTJET pricing and terms of sale. The exterior design has changed.

핑백: Time for ink to fill the damper - Printer Cleaning Issues Part 10 ARTJET 2026
핑백: Ink tube torn - Printer Cleaning Issues Part 11 ARTJET 2026
핑백: How to Replace a Motor Pump Tube - Printer Cleaning Issues Part 12
핑백: Head protection plate crumpled _ Printer Cleaning Issues Part 14 ARTJET 2026
핑백: Head protection plate cracked _ Printer Cleaning Issues Part 16 ARTJET 2026
핑백: When ink runs out during printing - Printer Cleaning Issues Part 17 ARTJET 2026
핑백: White cleaning methods that might clogged - Printer Cleaning Issues Part 23 ARTJET 2026