
- Anyone attempting braille printing with a UV printer for the first time
- Anyone who wants to learn how to build layer height using White and Varnish simultaneously
- Anyone unfamiliar with the Spot Color options (100%–800%, density settings) in the printer program
- Anyone confused about head height and print direction (uni-directional vs. bi-directional) settings for braille
- Anyone exploring braille product manufacturing for public facilities, banks, or corporate signage
- Always enable Light Oil mode (or Varnish Mode) when using Varnish. Without it, the last layer of Varnish will not be cured and will not adhere to the substrate.
- Because ink layers build up height, set the head height 0.3–0.4 mm higher than the default. Otherwise, the head may contact the stacked surface and risk damage.
- Use uni-directional printing instead of bi-directional when the head height is raised. Bi-directional printing may cause ink to scatter around the edges.
- Repeated LED lamp exposure generates heat on the substrate. Adjust LED lamp power for heat-sensitive materials — in some cases, printing may not be feasible.
- To achieve 0.5–0.7 mm braille height, stacking White + Varnish simultaneously is the fastest method.
- In the printer program’s Spot Color options, set White and Varnish channels to 400–800%, and set the bottom density to 100%.
- The 100%–800% setting does not increase the amount of ink per pass — it increases the number of repeated passes over the same area. 800% = 8 passes = 8× print time.
- ARTJET uses 6 channels per XP600 head, enabling up to 4,800% Varnish density — 6× faster layering than single-channel printers.
- When using Varnish: enable Light Oil mode, raise head height +0.3–0.4 mm, and use uni-directional printing.
Starting from this article, we will cover the various products you can make with a UV printer — beginning with braille printing.
Any UV printer can print braille, but not every UV printer can achieve the required layer height and raised dome shape.
I. Braille Printing Using White and Varnish Together — UV Printer Braille Printing White and Varnish Layer Settings Guide
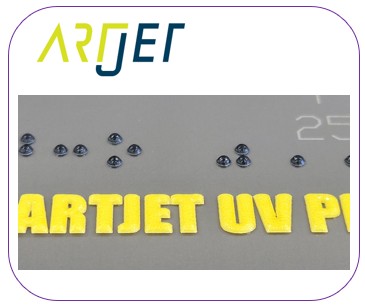
1. The braille sample shown in the photo below is explained as follows.
- The braille dot height needs to be approximately 0.5–0.7 mm.
- The height was achieved using both White and Varnish ink.
- After the layering was complete, a final pass of color (Black) was printed to add visual contrast.
- Using White alone or Varnish alone to build up the layers takes significantly longer, so we used White and Varnish simultaneously to build the ink height.
2. Preparing the AI File and Creating the File in Flexi RIP
2_1. AI File Preparation
- The braille image file was downloaded from the internet, and the AI file was used as-is without modification.
- The braille dots were set to black, and the text [ARTJET UV Printer] was set to yellow.
- The image to be printed is an AI file as shown below.
-

UV Printer Braille Printing White and Varnish Layer Settings Guide
2_2. Using Spot Color or the Solid Color Mode in Flexi RIP to Create White/Varnish Layers
- Instead of creating White and Varnish spots manually in the AI file, we used the “Solid Color Mode” in the RIP software to auto-generate them.
- If you want White or Varnish to print only underneath areas that have color in the AI file:
- You can create a Spot Color layer in the AI file, or
- You can import the AI file into the RIP software and use the [Solid Color Mode] in the Spot Color options.
- However, if parts of the image are represented in White only, the [Solid Color Mode] will not generate a White layer beneath those areas — because White is not recognized as a color.
- In conclusion: if you need to print White or Varnish independently, create a Spot Color layer in the AI file.
- If you only need White or Varnish beneath colored areas, you can use the [Solid Color Mode] in Flexi RIP’s Spot Color options.
-

UV Printer Braille Printing White and Varnish Layer Settings Guide
3. Setting Options in the Printer Program
The RIP image alone will not produce any layering. You also need to configure the printer program to print White or Varnish at 0.5–0.7 mm height.3_1. Accessing the Spot Color Options
- There are other features available, but here we focus on the settings needed to print White or Varnish at 0.5–0.7 mm height.
- In the printer program, click [Menu] at the bottom-left, then click [Spot Color] at the top. The following window will appear.
-

UV Printer Braille Printing White and Varnish Layer Settings Guide
3_2. Enable Varnish Mode or Light Oil Mode (Top-Right Corner)
- As mentioned earlier, we use both White and Varnish simultaneously to build the ink layers.
- Since Varnish is being used, you must click to activate Varnish Mode [previous name] or Light Oil Mode [current program name].

- This button must be enabled so that after printing is complete, the head carriage continues to move back and forth a few more times — curing the last layer of Varnish with the dedicated Varnish LED lamp.
- If this is not enabled, the final Varnish layer will remain uncured and will not adhere to the substrate.
- When using Varnish, this checkbox must always be checked.
3_3. Setting White and Varnish Repeat Printing (Middle Section)

- Each channel can be set from 100% to 800%.
- 100% prints the RIP image as-is. 200% repeats the same area twice. 300% repeats three times… and 800% repeats eight times.
- Because the same area is printed repeatedly, the print time increases proportionally.
- At 800%, the same area is printed 8 times, so the print time increases by 8×.
- Channels 7–12 are for White — change the setting from 100% to 400%.
- Channels 13–18 are for Varnish — change the setting from 100% to 400%.
3_4. Setting White and Varnish Density (Bottom Section)
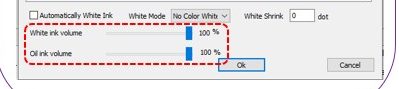
- This setting is not for repeat passes —
- It controls the amount of White or Varnish deposited in a single pass of the RIP image.
- Since we need to build up ink layers, this must be set to the maximum value for faster layering.
- Set both White and Varnish density to 100%.
3_5. Start Printing
- Once these settings are complete, you can begin printing.
- Since the typical layer height is 0.5–0.7 mm, it is recommended to raise the head height by 0.3–0.4 mm above normal.
- For example, if the substrate height is 1.5 mm, set the head height to 1.8–1.9 mm instead of 1.5 mm.
- Because the head height is raised, use uni-directional printing instead of bi-directional to achieve cleaner results.
- All of the above is also available as a video — click below to watch:
- How to Make Braille with a UV Printer (Video)
II. Braille Printing Using White Only or Varnish Only — UV Printer Braille Printing White and Varnish Layer Settings Guide
1. Braille Printing with White Only
- No changes are needed to the AI file or Flexi RIP options.
- Only the Spot Color options in the printer program need to be adjusted.
- In the printer program, go to Menu → Spot Color options, and select “Print only White.”
- Set White channels 7–12 to 800%.
- Set the bottom White density to 100%.

2. Braille Printing with Varnish Only
- There is no “Print only Varnish” option in the printer program — you need to create a Varnish-only file in the AI file.
- Then select Varnish (or Light Oil Mode) as shown below.
- Set Varnish channels 13–18 to 800%.
- Set the bottom Varnish density to 100%.

III. Detailed Explanation of Each Option — UV Printer Braille Printing White and Varnish Layer Settings Guide
1. What Light Oil Mode / Varnish Mode Means
1_1. Varnish Head and Varnish Lamp Positioning
- One important point to emphasize: this option is not related to print DATA.
- This is a lamp-related option. On ARTJET printers, the Varnish head is mounted one block ahead of the color heads,
- and the Varnish lamp is positioned even further forward than the Varnish head.
- If the lamp passes over the Varnish immediately after it is deposited, the result is a matte finish.
- By positioning the lamp further forward, the Varnish ink has time to spread before curing — producing a glossy effect.
-

UV Printer Braille Printing White and Varnish Layer Settings Guide
1_2. However, When Printing Ends and All Motion Stops:
- If the machine stops immediately after the last Varnish pass, the Varnish head is positioned ahead — meaning the final Varnish layer at the trailing edge will not be cured by the lamp.
- Although no more printing occurs, the head carriage needs to travel back and forth a few more times so the lamp can cure the final Varnish.
- Enabling [Light Oil Mode / Varnish Mode] ensures the head carriage continues to move after printing ends, curing the last Varnish layer.
- When printing with Varnish, this checkbox must always be checked.
2. What the 100%–800% Setting Means
- This option does not increase the amount of ink deposited in a single pass.
- It increases the number of passes — the number of times the head carriage travels back and forth over the same area — to build up density.
- At 100%, the head prints the existing passes as normal.
- At 200%, each pass is repeated twice — the head carriage travels back and forth over the same area twice before advancing.
- This doubles the density, but also doubles the print time.
- At 800%, the head makes 8 passes over the same area — density is significantly higher, but print time increases by 8×.
- This feature was specifically designed for applications like braille, where ink height is needed to create a tactile, raised effect.
3. What the Bottom 0–100% Setting Means
- This option controls the amount of ink deposited per single pass of the head carriage.
- It does not increase the number of passes, so print speed remains the same.
- If the White or Varnish density per pass is too high, you can reduce it (e.g., 50%) using this setting.
- For braille printing, where ink layer thickness is critical, this must be set to 100% — the maximum.
IV. Braille Printing Density and Precautions — UV Printer Braille Printing White and Varnish Layer Settings Guide
1. Density Calculation
- Let’s calculate the White or Varnish density numerically.
- Using the photo below as an example:
-
UUV Printer Braille Printing White and Varnish Layer Settings Guide - Channels 13–18 are for Varnish.
- Our printer uses the XP600 (FA1080-a1) print head, with 6 channels per head.
- All 6 channels on the Varnish head are dedicated to Varnish.
- Varnish density per pass: 100%.
- Repeat passes: 800% — meaning 8 repetitions over the same area.
- 6 channels × 100% density × 800% (8 repeats) = Total Varnish density of 4,800%.
- Compared to printers with only 1 Varnish channel, the 6-channel setup builds braille height 6× faster.
- The same calculation applies to White ink.
2. Precautions
The results described above may vary depending on the following factors:
- Under these settings, the actual layer height may differ depending on printer-to-printer variation. If the height is insufficient, additional passes may be needed.
- Bi-directional settings, bed levelness, and ambient temperature can all affect accumulated ink thickness.
- Repeated LED lamp exposure generates heat on the substrate. For heat-sensitive materials, adjust the LED lamp power — in some cases, printing may not be possible.
- Because the ink builds up height, the initial head height should be set 0.3–0.4 mm higher than default. However, since the raised head may cause ink to scatter, uni-directional printing is recommended over bi-directional.
- With ARTJET, multiple AI files are not required to create a raised dome shape. A single AI file is sufficient — the ink’s natural cohesion creates the dome profile through layering alone.
- If the dome effect does not occur due to substrate variation, you may need to use multiple AI files to shape the raised profile.
3. The Braille Printing Market
- According to a 2023 report by Business Research Insights, the braille printing market is projected to grow at a CAGR of 7.7% through 2031.
- The primary applications are books and maps, with key substrates including paper, plastic film, rigid plastic, and others.
- The market segment we focus on is signage for public institutions, banks, and general corporate facilities.
- The traditional method — embossing simple text or logos onto metal substrates using mechanical force — produced functional signs focused on information delivery, and required minimum order quantities to proceed.
- However, with UV printer-based braille, images can be incorporated alongside the braille, and small-quantity orders are now feasible. We expect the braille market to be partially displaced from traditional methods to UV printing going forward.
V. ARTJET UV Printer

핑백: Why Printing on iPhone 14 Cases Is Difficult — UV Printer Products (Part 4) ARTJET 2026
핑백: Precautions for UV Printing on Leather — UV Printer Products (Part 6) ARTJET 2026
핑백: Primer Functionality and Concerns — UV Printer Products (Part 9) ARTJET 2026
핑백: Creating Epoxy Effects with Varnish — UV Printer Product Guide (Part 11) ARTJET 2026
핑백: How to Use Laser Camera Cutting — Making Products with a UV Printer (Part 16) ARTJET 2026