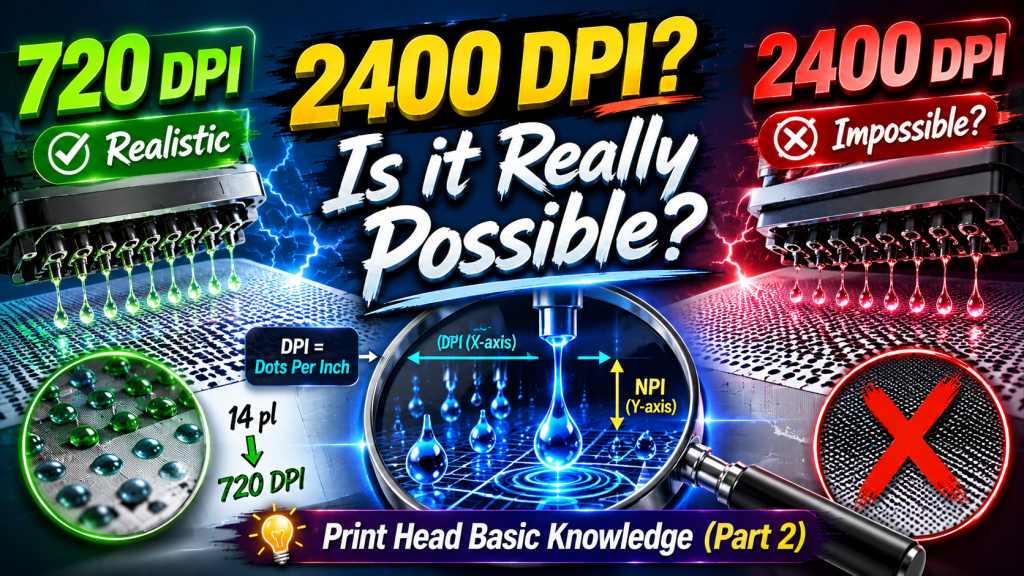
- This article is for everyone who has ever heard the term DPI.
- From those new to printers, to experienced field operators and service engineers — inkjet resolution is more widely misunderstood than you might expect.
- “Smaller pico means better quality,” or “The same head can do 2400dpi on another machine” — if you’ve ever heard either of these, this article is for you.
- The DPI calculations and figures in this article are based on Konica printhead data.
- Actual values may vary depending on the head manufacturer, ink type, and print substrate.
- There is no simple formula of “X picoliters = Y DPI.” Please read this article with the understanding that mechanical precision, flatbed leveling, waveform tuning, and other combined conditions must all be met.
- DPI = the number of ink drops per inch. A higher number does not automatically mean better quality.
- Picoliter (pl) is ink volume, not size. Smaller volume means a smaller ink dot diameter, which enables higher resolution.
- Every head has a maximum achievable DPI. 14pl → max 720dpi / 6pl → max 1440dpi.
- 2400dpi is not realistically achievable with commercial print heads. In environments where mechanical transport error alone exceeds 50㎛, a 10㎛ dot is meaningless.
- Y-axis resolution is determined by the head’s NPI. Unlike the X-axis, it cannot be freely adjusted through software.
The Exact Concept of Inkjet Print Resolution
I. What You Need to Know Before Understanding Inkjet Resolution — The Exact Concept of Inkjet Print Resolution
1. Print Resolution
1_1. The Definition of DPI You Can Easily Find Online
- This is information anyone can find with a quick search.
- It may sound basic, but you need to understand this concept, so we are stating it here.
- Print resolution refers to the number of ink drops (dots) that fall within 1 inch.
- To put 1 inch in more familiar terms, it is approximately 25.4 mm.
- DPI is determined by how many ink drops fall within that 25.4 mm.
- For example, 720 dpi means 720 ink drops fall within 25.4 mm.
- Written out in full, 720 DPI means 720 Dots Per 1 Inch.
- However, this concept alone is not enough to fully understand print resolution.
1_2. But Resolution Always Shows Two Numbers — Like 720 x 720 dpi. Why?
- Print resolution is always expressed as two numbers.
- One represents the horizontal axis direction, and the other represents the vertical axis direction.
- With 720 x 720 dpi, 720 ink drops fall per inch along the X-axis (print direction),
- and 720 ink drops fall per inch along the Y-axis (feed direction).
- In other words, at 720 x 720 dpi, a total of 518,400 (720 x 720) ink drops fall within a 25.4 x 25.4 mm square to produce the image.
Now we have a rough understanding of what DPI means, and why resolution is always expressed with two numbers.
To fully understand print resolution, there is one more piece of knowledge you must have beyond the DPI concept itself. We will explain it right away.
2. Picoliter — “How Many Picoliters Is This Head?”
- This is a question often asked by those who know a thing or two about equipment. Because smaller pico means a finer image, they always ask this.
- Let us give you a precise answer to this question.
- Pico is a unit, and to explain it more fully:
- 1m (meter) → mm (millimeter) → um (micrometer) → nm (nanometer) → pm (picometer). Here, ‘pico’ is a unit of 10 to the power of −12.
- In other words, it refers to an extremely small unit.
- When someone says “This is a 3 pico head,”
- many people misunderstand this as referring to the size of the ink drop. But it is not size — the “L” for liter is simply omitted, and it means 3 picoliters.
- In other words, it refers to ink volume, not size.
- “This head is 3 pico” means the same as “This head jets ink at a volume of 3 picoliters.”
3. Revisiting Print Resolution Through DPI and Picoliter
3_1. Why You Cannot Determine Print Resolution from “It’s a 3 Picoliter Head” Alone
- Now we understand both the concept of DPI and the concept of pico.
- But there is something odd here.
- DPI is based on 25.4 mm — a unit of distance. But pl, or picoliter, is not a unit of distance; it is a unit of ink volume, i.e., capacity.
- “One is distance, the other is volume — how can you define print resolution with different units?”
- That is correct. With different units, you cannot calculate print resolution.
- In other words, the answer “It’s 3 pico” to the question “How many picoliters is the head?” does not give you enough information to determine print resolution.
3_2. Converting Picoliter to a Distance Unit
- Resolution is the number of ink drops that fall within 25.4 mm.
- The picoliter value from the head represents the ink volume before it lands on the substrate.
- You need to actually drop that ink volume onto the substrate to see the size of the landed ink drop.
- Once the ink drop has landed on the substrate and you measure its diameter, a head of X picoliters is defined as producing ink drops of Y micrometers in diameter.
- When an ink drop lands on the substrate, the picoliter ink volume typically forms a circle with a diameter of several micrometers (um).
3_3. How the Size of a Landed Ink Drop Is Defined
- There is reference data available from Konica print heads, so we will explain in more detail using the Konica head as our basis.
- This is a head with an ink volume of 14 picoliters.
- When 14 picoliters of ink land on the print substrate, the measured diameter of the ink drop is 50um (micrometers).
- However, the diameter used for DPI calculations is different.
- If you use 50um in the DPI calculation, there will be too many empty spaces on the substrate and colors will not be reproduced properly.
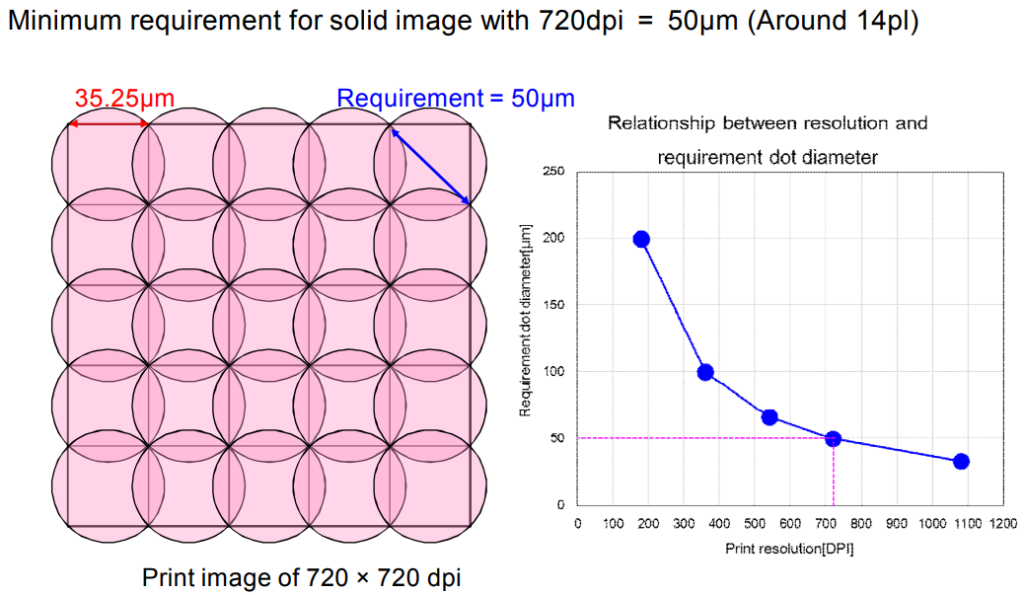
- As shown in the diagram below, the ink diameter that fills space without gaps is 35.25um. Using this value gives a DPI at which the image can reproduce colors correctly.
- To summarize why a 14 picoliter head achieves 720dpi:
- 25.4mm = 25400um, and 25400um ÷ 35.25um = 720.5 dpi.
-
The Exact Concept of Inkjet Print Resolution
4. Common Misconceptions About Print Resolution
- Occasionally, customers say: “I heard that the same head can do up to 2400 dpi on another machine.”
- Theoretically, dropping 2400 ink drops within a 1-inch square would produce 2400dpi.
- However, if you drop 2400 large-diameter ink drops, the ink simply lands on top of previously landed ink, and only the color becomes darker.
- Higher resolution should mean a sharper and finer image, but neither sharpness nor fineness improves.
- As shown in the diagram above, a 14 picoliter head has an ink drop diameter of 50um. Subtracting the overlapping area, the effective diameter is 35.25um, giving a maximum achievable DPI of 720dpi.
- In this way, every head has a maximum achievable DPI determined by its picoliter rating.
- A 6 picoliter head has a maximum achievable resolution of 1440 dpi. (The effective diameter after subtracting overlap on the substrate is 17.63um.)
- To achieve 2400 dpi, the effective ink drop diameter on the substrate (after subtracting overlap) would need to be 9um, and the ink drop volume would need to be smaller than approximately 1 pl. No head used in commercial printing meets this specification.
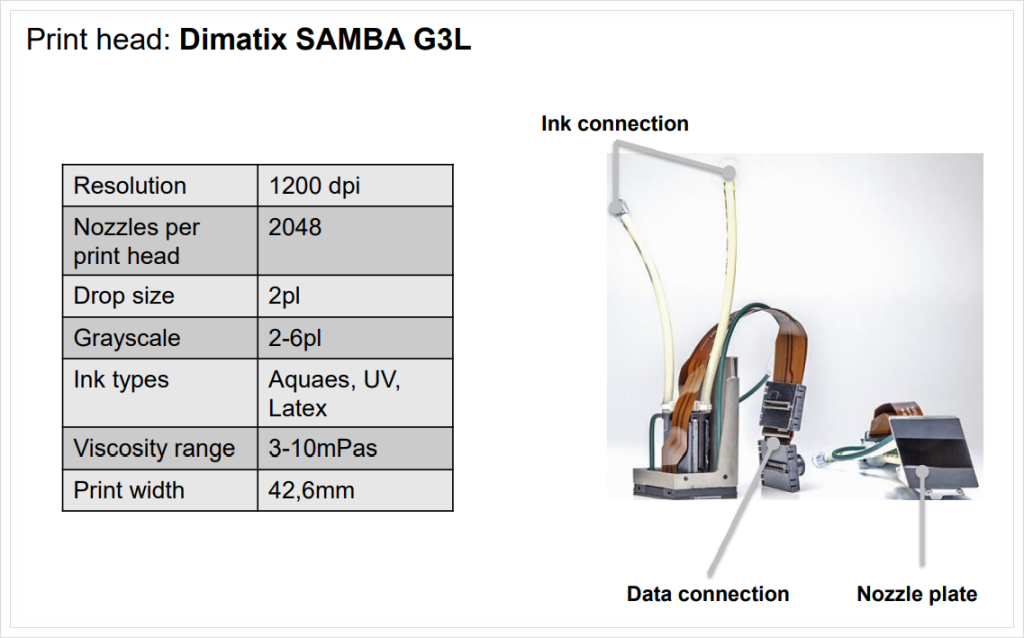
- Looking at the Samba single-pass print head — one of the highest-resolution heads currently available — at 1200 dpi will help you understand this quickly.
- In prints produced at 1200 x 1200 dpi, even 2-point text shows no visible ink dots at all.
- Yet even at this level of quality, the maximum DPI is 1200 x 1200 dpi, not 2400dpi.
-

The Exact Concept of Inkjet Print Resolution
Per the print head spec, the ink drop is 2pl and the maximum resolution is 1200 dpi.
This is not the whole story. So far, we have only covered the exact concept of print resolution itself.
To truly understand resolution, you also need to know the differences between X-axis and Y-axis print resolution.
II. The Difference Between X-Axis and Y-Axis Resolution — The Exact Concept of Inkjet Print Resolution
1. The Difference Between X-Axis and Y-Axis Resolution
1_1. X-Axis Resolution
- X-axis resolution — the number of ink drops per inch in the print direction — can be controlled through software.
- There are a few prerequisites as listed below, but DPI can be set via software to match the ink drop size.
- Stable ink / Waveform tuning / Operating within the head’s max frequency / Carriage speed adjustment
- These concepts relate to printer development and will not be explained further in this article.
1_2. Y-Axis Resolution
- Y-axis resolution is determined by the print head’s own specifications.
- When referring to the head itself, the term NPI is used instead of dpi.
- NPI stands for Nozzle Per 1 Inch. “How many nozzles fit within 1 inch (25.4mm)” determines what is called a “X npi head.”
- We will explain this using Konica head data.
-
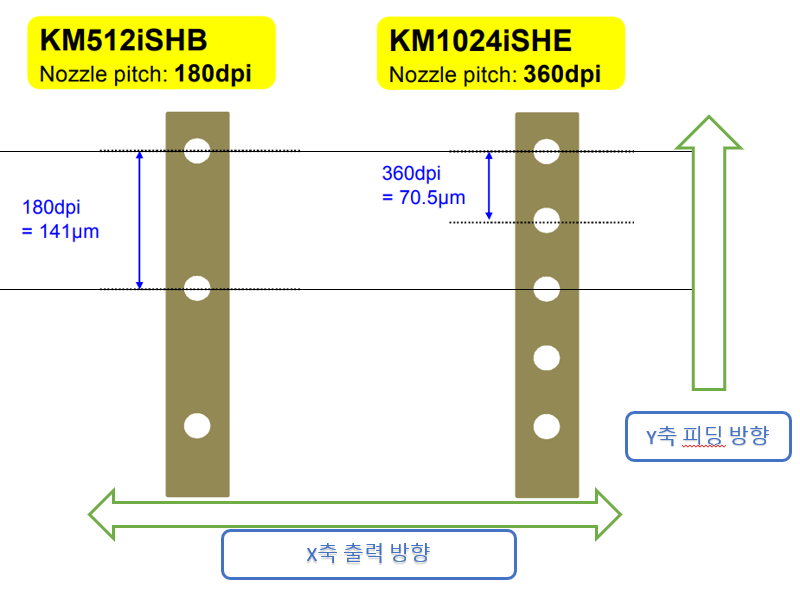
The Exact Concept of Inkjet Print Resolution - The KM512i print head has a nozzle pitch of 141um. 1 inch (25400um) ÷ 141um = 180, so this head is called a 180 npi (180 nozzles per inch) or 180 dpi-class head.
- The KM1024i head, calculated the same way: 1 inch (25400um) ÷ 70.5um = 360, making it a 360 npi or dpi-class head.
2. A Closer Look at Y-Axis Resolution
2_1. Key Considerations When Selecting a Head
- X-axis resolution can be configured to various DPI settings depending on the head’s maximum frequency and carriage speed. To put it simply: if you keep all other conditions the same and cut the carriage speed in half, you can jet at 1440dpi instead of 720dpi.
- However, Y-axis resolution — the feed direction — is determined by the distance between nozzles on the print head. To achieve 1440 npi from a 360 npi head, you need to give a 70.5um offset along the Y-axis, pass over nearly the same area 4 times, and jet ink into the gaps each time, in order to achieve 1440dpi (360npi × 4 scans) with a 360 npi head.
- To produce 1440 dpi from a 360 npi head this way requires 4 scans, so speed is reduced by a factor of 4.
- Moving by exactly 70.5um also requires higher Y-axis precision, which inevitably raises the cost of building the machine.
- Since the print head must be selected with both target print quality and equipment cost in mind, the NPI of the Y-axis resolution is an important spec to know.
2_2. How to Achieve 720dpi Resolution with a 360npi Head
Let us explain using the diagram below.
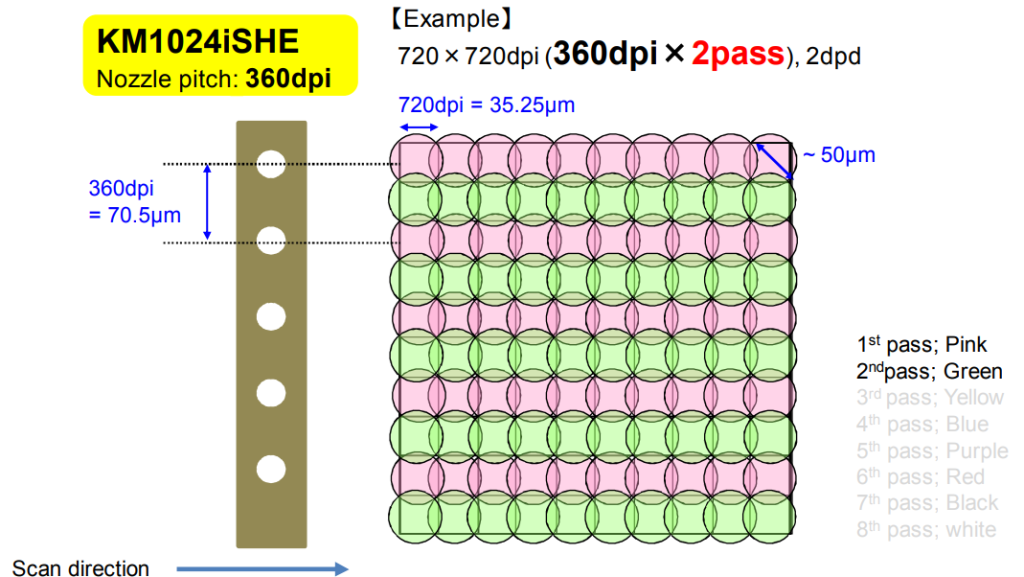
- When the head makes one pass in the X-axis scan direction (not the Y-axis), only the pink dots are jetted.
- If the head then moves along the Y-axis by the full nozzle span of 72mm (for the KM1024 head, the distance from the first to the last nozzle is 72mm) without repeating the same area, and jets again, the ink drops along the Y-axis will be spaced 70.5um apart (360 dpi = 70.5um), giving a Y-axis resolution of 360dpi.
- To go from 360dpi to 720dpi, move subtly along the Y-axis by half the nozzle pitch (70.5um ÷ 2 = 35.25um), then jet again.
- In other words, jetting one more time between the Y-axis nozzle positions takes you from 360dpi to 720dpi.
- If you have watched a large-format UV printer in action, you may notice that when the head carriage moves left it shifts along the Y-axis, but when it comes back to the right it seems not to move — yet the colors appear to deepen slightly.
- It is not that the head is stationary; it has moved 35.25um along the Y-axis and is printing.
3. Y-Axis Pass Count and Nozzle Duty
- The method where the head is fixed and the substrate passes underneath is called Single Pass. In Single Pass printing, all the necessary ink is applied in one pass as the substrate moves through. The DPI on one axis is determined by the print head’s NPI.
- In contrast, the method where the head moves back and forth is called a Scanning printer. A scanning printer makes multiple passes over the same area to apply the necessary ink. The number of passes is referred to as 4-pass, 8-pass, 12-pass, and so on.
- To explain using 4-pass as an example: the data to be jetted from the print head is split into 4 portions. On each pass, only 25% of nozzles across the entire nozzle span jet ink, and after 4 passes, 100% of the data has been applied to the substrate.
- As shown in the diagram below, it is a method of splitting into 4 passes what could theoretically be done in a single pass.
- Similarly, 8-pass uses 1/8 nozzle duty and 12-pass uses 1/12 nozzle duty.
-
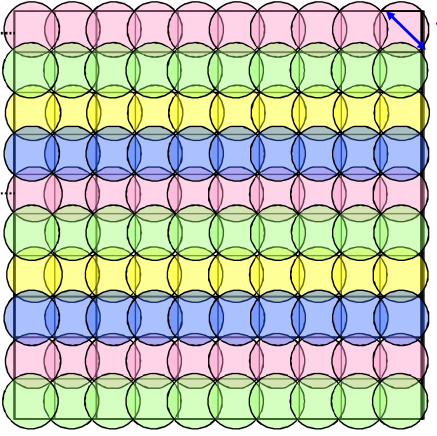
The Exact Concept of Inkjet Print Resolution - The reason for reducing nozzle duty and splitting into multiple passes — despite the speed penalty — is that if ink is jetted in a regular pattern, that pattern becomes visible to the human eye as banding. And if any nozzles are missing, the gaps in that missing area become even more obvious.
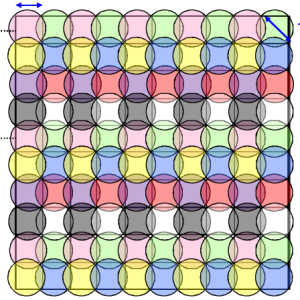
- However, as shown in the diagram above, when the jetting pattern is made complex by splitting into passes, both banding and missing nozzles become far less visible. Head manufacturers refer to this technique of creating complex jetting patterns as interlacing or interweaving.
- In 4-pass mode, 25% nozzle duty is used, so that 25% is jetted randomly rather than in a regular pattern, and the remaining 3 passes are also jetted in an irregular pattern.
- As shown in the diagram below, jetting ink in complex patterns through software ensures that both banding and missing nozzles remain nearly invisible.
-
The Exact Concept of Inkjet Print Resolution
4. Conditions Required to Achieve Accurate Resolution
- There is currently no head used in commercial signage that achieves 2400 dpi.
- Even if such a head existed, both mechanical conditions and ink jetting conditions would need to be fully optimized before 2400 dpi could be realized.
- Let us explain the conditions required to achieve accurate DPI output.
4_1. The Importance of Mechanical Precision
- Let us use 2400dpi as an example.
- The effective ink dot diameter (after subtracting overlap) would need to be (25400um ÷ 2400) = 10.58um to achieve 2400dpi.
- Yet even on signage printers costing over 200 million KRW, laser measurements of actual transport distance reveal positional errors exceeding 50um.
- While having a 10um ink drop is important, if the actual transport error is 50um, even the smallest dot will not land at the correct position, and the image will not be reproduced properly.
- In other words, even if you use a head with a small picoliter rating, proper resolution cannot be achieved if mechanical precision is insufficient.
4_2. Flatbed Leveling
- Unless you are using a precision surface plate, keeping the entire flatbed surface within a 0.3mm (300um) tolerance is not easy.
- For small flatbeds, 0.5mm (500um) is considered standard spec. When the head carriage speed is 800mm/second, a flatbed level difference of 0.2mm (200um) or more will cause a difference in bidirectional print quality.
- This means the ink landing position will be off. No matter how small the dot, uneven flatbed leveling makes it impossible to achieve the head’s rated DPI.
- You can also see how flatbed levelness affects ink landing position during bidirectional printing in this video.
4_3. Ink Drop Speed and Volume During Jetting
- Ink does not always jet from every nozzle at the same speed with the same volume.
- A waveform tuned for consistent jetting speed and appropriate volume must be applied in order to achieve the head’s rated DPI.
- The dropwatcher explanation below will help you understand this.
III. ARTJET UV Printer
