- The actual printed size differs from your image file size and you want to know why
- You’re looking for how to calibrate print size in Sai Flexi RIP
- You’re getting size errors on large-format prints and need to correct them
- You want to calculate and apply the correction factor manually
- You need to fine-tune print size down to 0.2mm precision
- Method No.1 (automatic test print calibration) is convenient but accuracy drops on large-format prints. If you’re printing near the maximum print area, use Method No.2.
- When calculating the correction factor manually, measuring the actual print size accurately with a ruler is critical. A measurement error will carry into the correction.
- The X-axis and Y-axis must be calibrated separately. Correcting one axis leaves the other uncorrected.
- After applying the correction, always verify with an actual print. Entering the value doesn’t mean the calibration is complete.
- Root cause → Motor variance + belt tension differences = accumulated mechanical error
- Where to calibrate → Sai Flexi RIP [Settings → Output Size Correction]
- Quick method (No.1) → Print test, enter measured value — accuracy drops on large sizes
- Precise method (No.2) → Print at max size, measure, calculate correction factor manually and enter directly
- Formula → File size : Actual size = Default 1 : X → Enter X value
I. Why the Printed Size Differs from the Image File Size — The Printed Size Doesn’t Match the File
1. Mechanical error
- The most common reason the printed size differs from the image file size is accumulated mechanical error.
- An inkjet printer builds an image by moving back and forth along the X and Y axes while firing ink.
- The motors driving those axes have inherent variance,
- and the belts connected to those motors have different tension across different sections — introducing additional error.
- Even with a precision linear scale, high-quality belts, or a linear motor,
- measuring the commanded travel distance against actual movement with a precision laser tool can reveal discrepancies of 0.1mm or more.
- As these errors accumulate, a measurable gap can develop between the file’s intended print size and the actual output.
2. The size correction feature built into RIP software
- Early inkjet printers used roll-to-roll media rather than flatbed — printing large Y-axis formats like banners.
- Roll-driven systems have inherently larger Y-axis positional errors than flatbed systems.
- Feed distance varies depending on media thickness,
- media slip during roll transport also changes the actual feed distance,
- and manufacturing tolerances in the roll itself introduce further variation.
To compensate for these errors, RIP software ships with a built-in size correction feature as standard.
Nearly all RIP programs include this feature, though the correction method may vary by software.
II. How Size Correction Works and How to Apply It in Sai Flexi — The Printed Size Doesn’t Match the File
1. How size correction works
It’s straightforward. The adjustment method varies by RIP software, but the underlying principle is the same.
Here’s how it works.
Starting assumption
- If your printer’s flatbed is 2.5 x 1.2 meters, you create a 2.5 x 1.2m rectangular image (Ai file) and print it.
- The correction method is the same for both the X and Y axes.
- Let’s use the shorter Y axis as the example.
- The Y-axis dimension in the Ai file is 1200mm.
- You print the file through the printer.
- Once printing is complete, you measure the actual printed Y-axis length with a tape measure.
- Let’s say the measured Y-axis length is 1195mm — not the 1200mm in the file.
- The size correction option in the RIP program has a default value of 1 or 100.
- We’ll assume it’s set to 1.
How to calculate the correction
- We output 1200mm but got 1195mm, and the default value is 1.
- We can set up the following proportion:
- 1200 : 1195 = 1 : X
- X = (1195 × 1) / 1200
- X = 0.99583333……
- Replace the default value of 1 in the RIP option with 0.99583 — size correction is complete.
Printing after size correction
- Print the same 1200mm Y-axis file again.
- The image that previously printed at 1195mm will now print at 1200mm —
- making the actual output match the file size exactly.
2. Applying it in Sai Flexi RIP
Here’s how to perform size correction in Sai Flexi RIP.
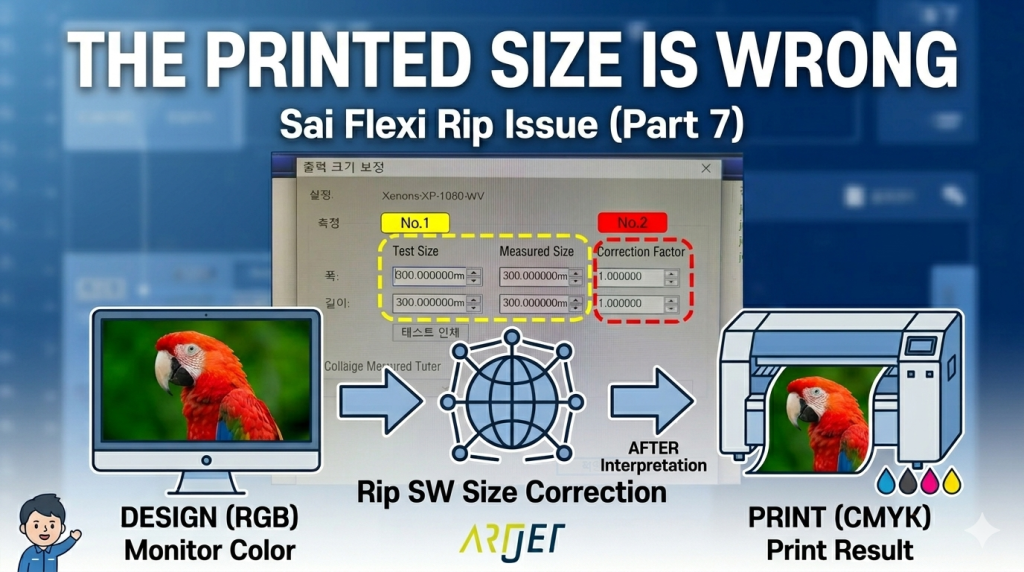
1. Where to find the size correction panel
- As shown in the image below, go to [Settings → Output Size Correction].
-

The Printed Size Doesn’t Match the File - Clicking [Output Size Correction] opens the following panel.
-

The Printed Size Doesn’t Match the File
2. Size correction methods: two options are available.
-

The Printed Size Doesn’t Match the File
2-1. Method No.1 (highlighted in yellow)
- This method is easy to use, but accuracy decreases on larger prints.
- Set the file print size to 300 x 300mm, print it, then enter the measured dimensions — the correction factor updates automatically.
- That’s all it takes to complete the correction.
- However, our printer’s maximum print area is 600 x 899mm.
- Measuring a 300 x 300mm test print by eye with a ruler introduces its own error —
- which means when printing at full size (600mm wide or 899mm long), errors that weren’t visible at 300mm may appear.
2-2. Method No.2 (highlighted in red)
- Instead of using the test print from No.1,
- create a large image file, print it, measure the actual output with a ruler,
- calculate the correction factor from that measurement, and enter it directly into the No.2 correction factor field shown in red.
- It takes a bit more effort, but this method ensures accurate size output even on large-format prints.
3. Step-by-step practice — can you get the print size exactly right?
Create an Ai file at 600 x 899mm and print it.
Once printing is complete, measure the actual printed dimensions with a ruler.
For this example, assume the X-axis (width) measures exactly 600mm, and the Y-axis (length) comes out at 895mm.
With a correction factor of 1.00000, a 899mm file prints at 895mm. The following equation applies:
- 899mm : 895mm = 1.00000 : X
- 899mm × X = 895mm × 1.00000
- X = (895mm × 1.00000) / 899mm
- X = 0.99555
Replace the Y-axis correction factor of 1.000000 with 0.99555 — calibration is complete.
From the next print onward, a 899mm Y-axis file will output at 899mm instead of 895mm, matching the file size exactly.
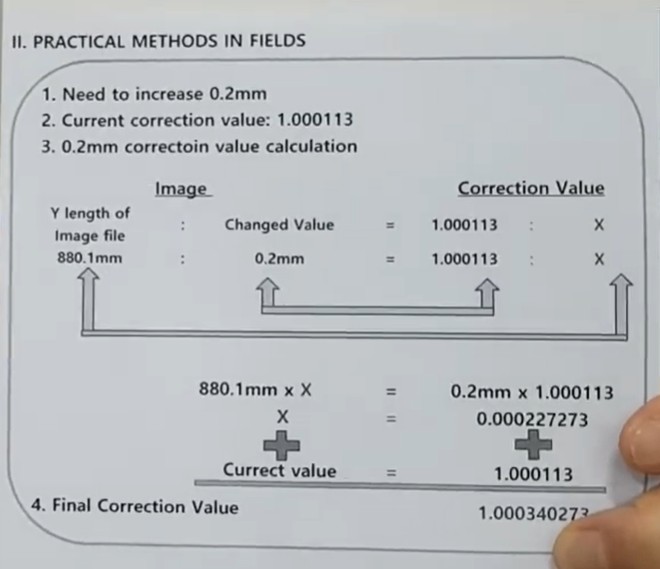
4. Beyond standard correction — when fine-tuning is needed
- Here’s how to increase the print size by exactly 0.2mm.
- The YouTube video below walks through a more detailed method for fine-tuning size up or down.
- https://www.youtube.com/watch?v=XUPhv9I3CWc&t=167s
- A simplified diagram is included here for reference.
-
The Printed Size Doesn’t Match the File
5. In general
- Large-format UV printers cover more area per print — so without size correction, dimensional discrepancies become noticeable.
- Operators running large-format machines are typically aware of this feature and apply corrections themselves.
- For smaller printers, the print area is smaller,
- so many users don’t pay much attention to it — and in practice, the size error tends to be small.
- That said, size mismatches do occasionally appear on larger prints,
- and that’s usually when the question comes up: “Why doesn’t the size match?”
III. ARTJET UV Printer
